Tent Rocks is one of those places that feels completely unexpected — like you’ve stumbled onto another planet right in the middle of New Mexico. If you’re planning a Southwest road trip, this is a stop that’s absolutely worth the extra planning. Save this guide for later!
What Are Tent Rocks?
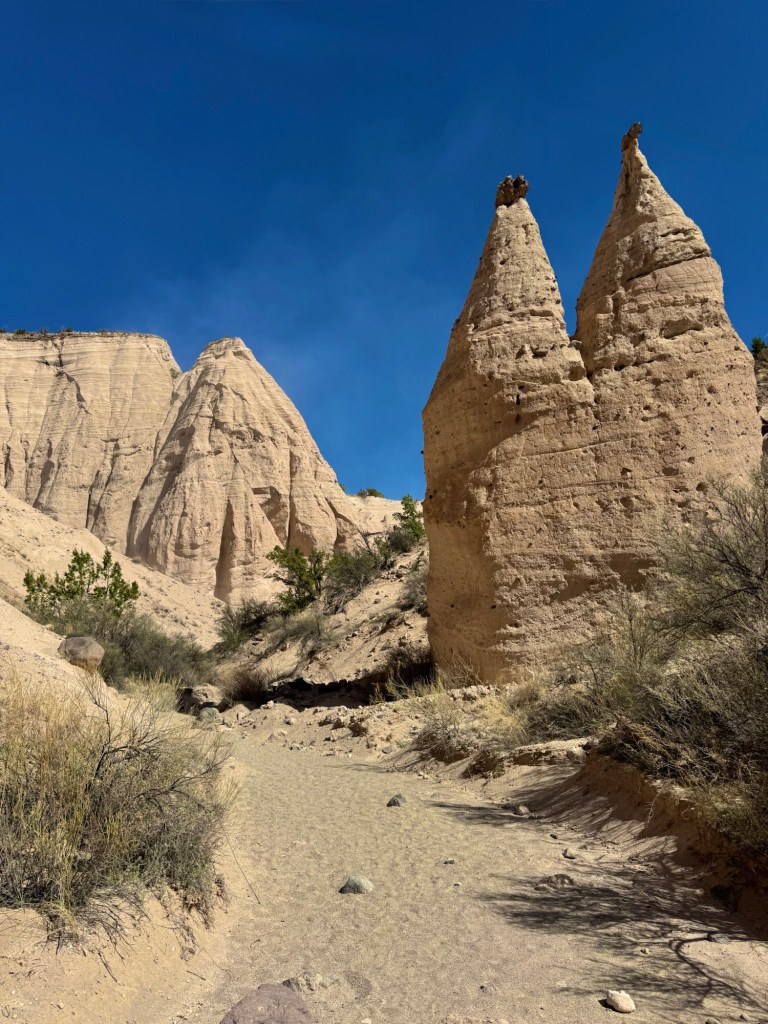
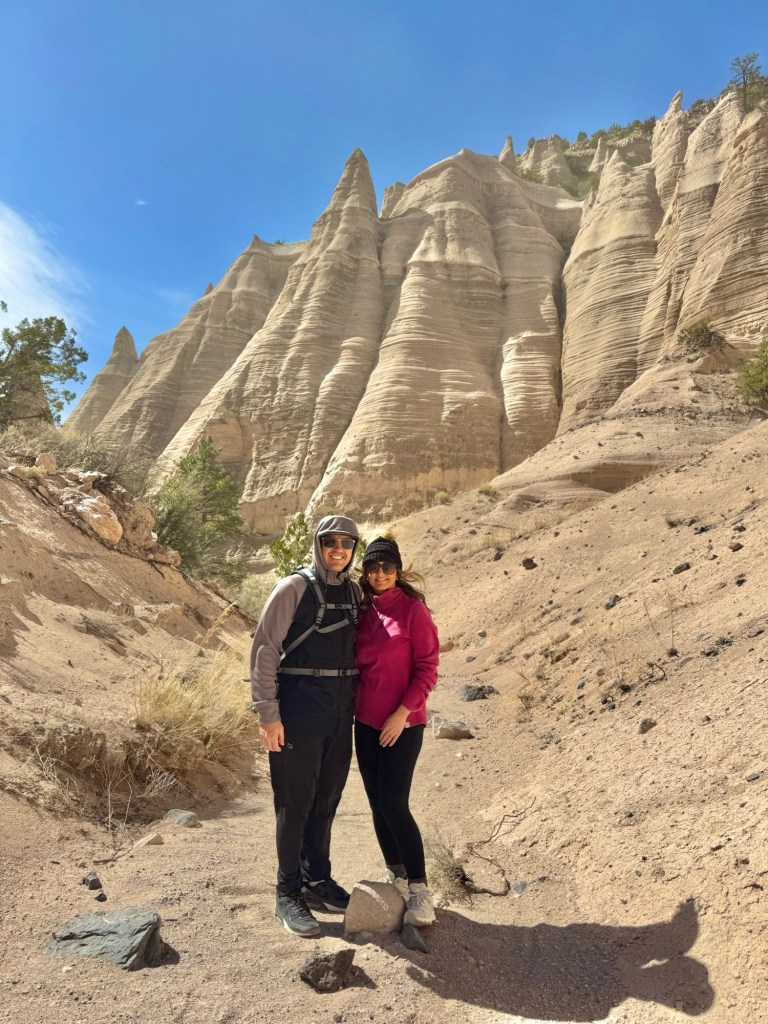
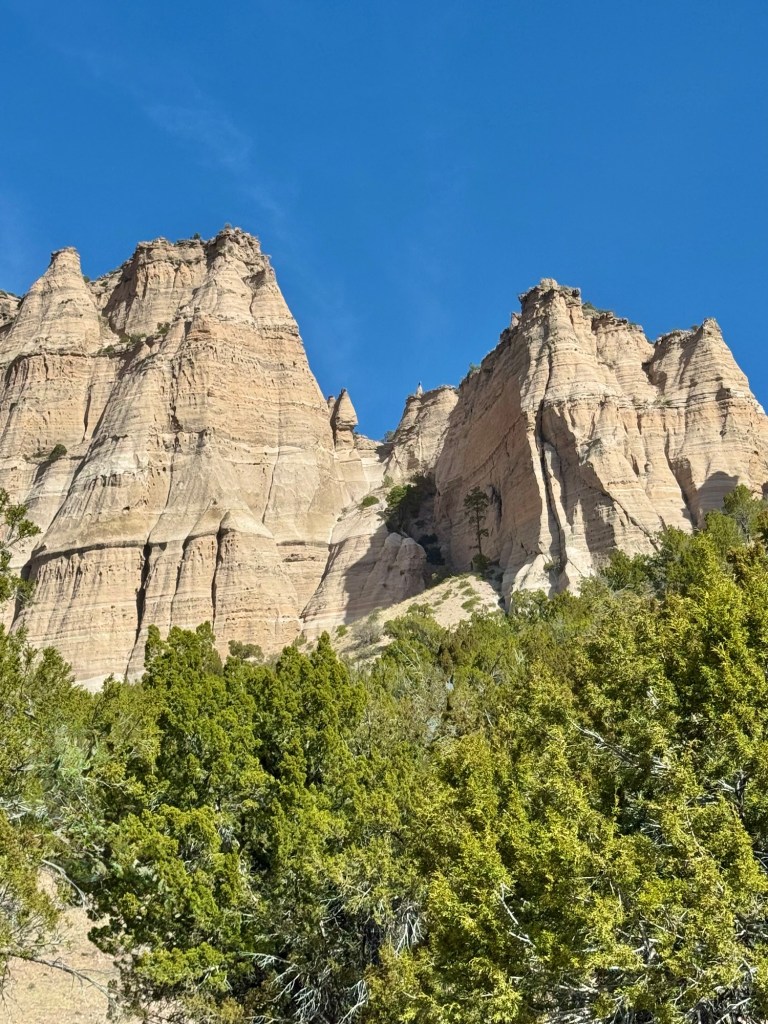
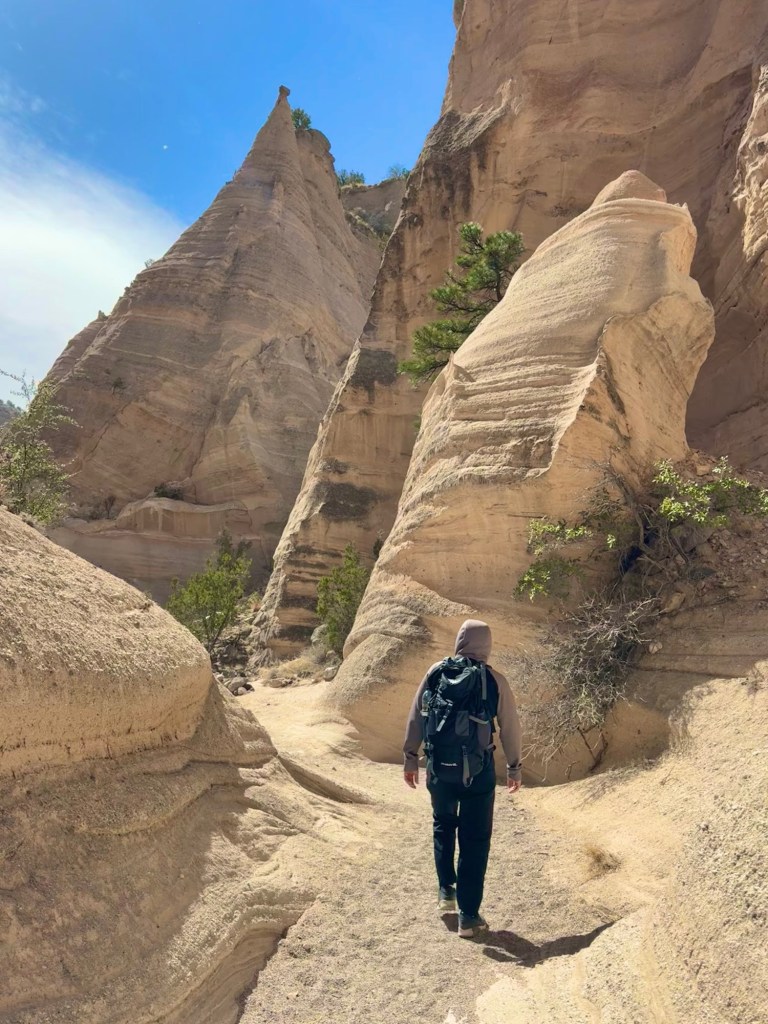
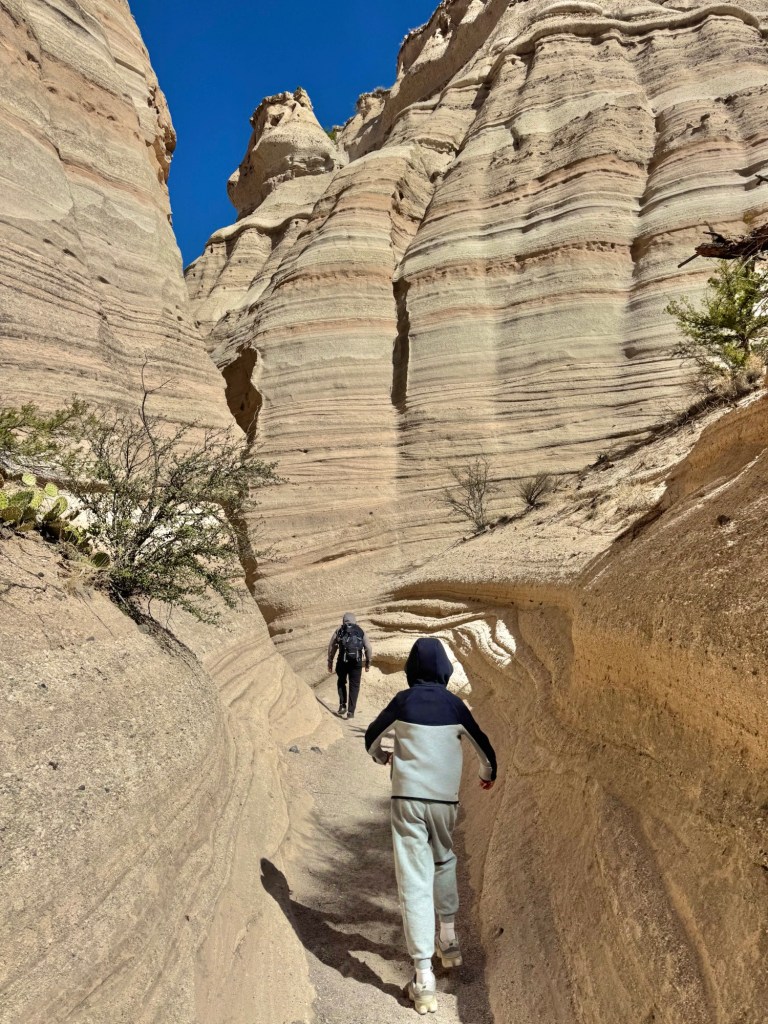
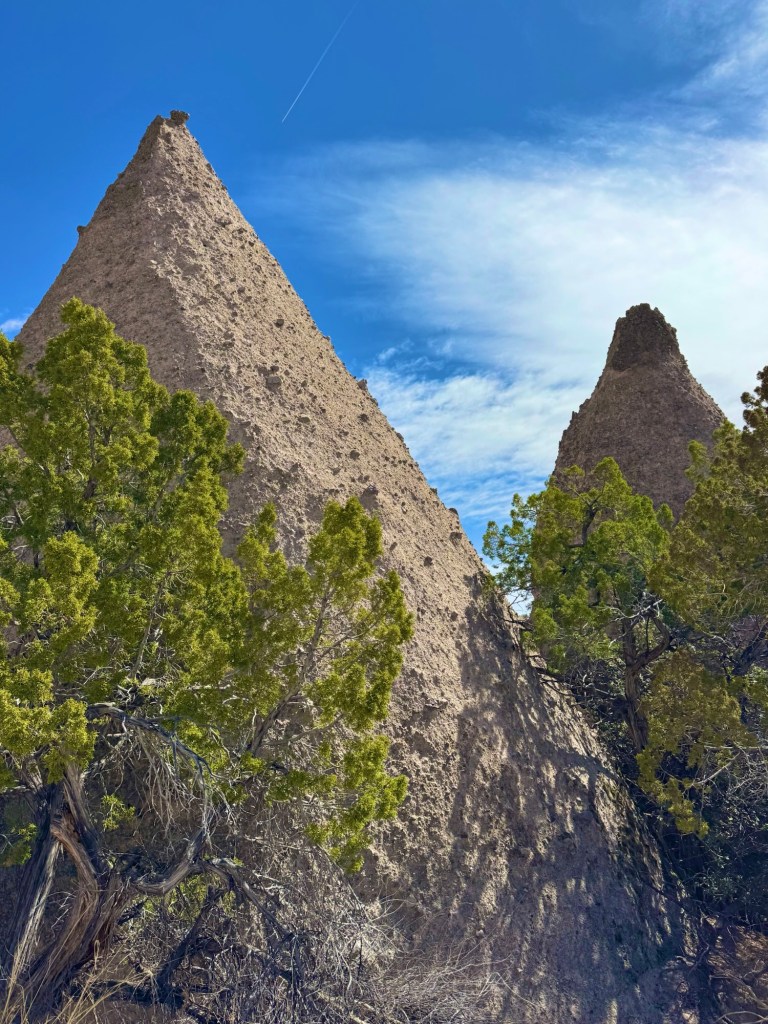
Kasha-Katuwe Tent Rocks National Monument is one of the most unique landscapes in New Mexico, known for its cone-shaped rock formations (called hoodoos) created by volcanic eruptions millions of years ago.
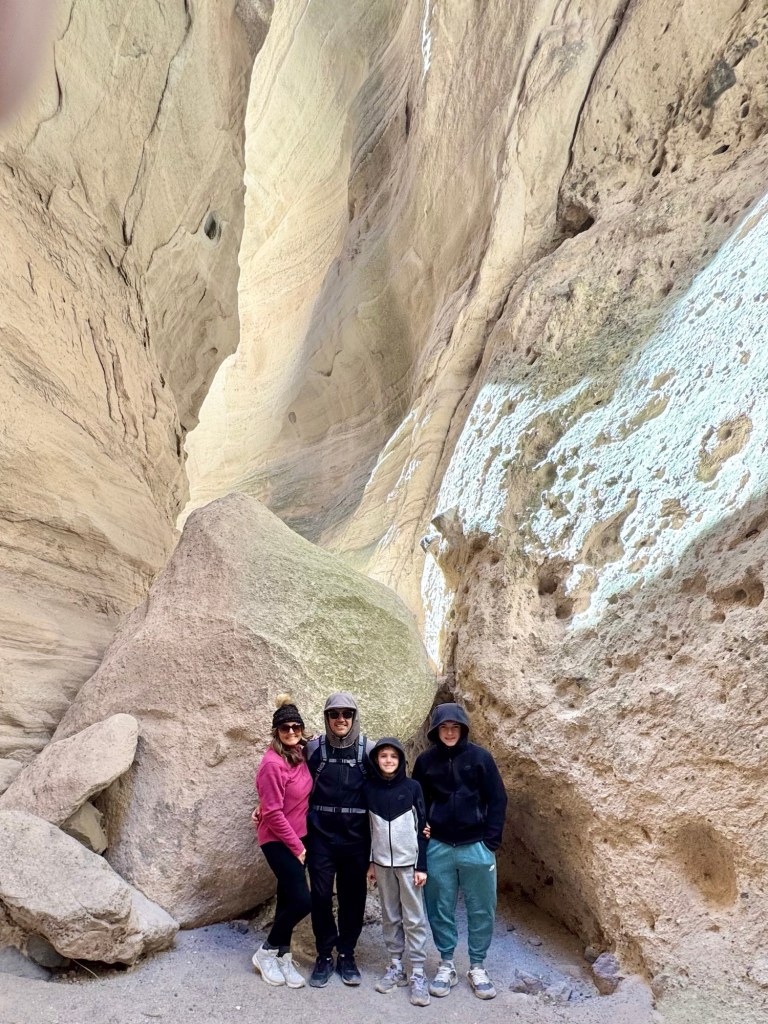
It honestly feels like walking through another planet — especially once you hit the slot canyon.
You’ll check-in at the Visitor Center and then follow a pilot truck to the actual site
Hours & Access
Typically open Thursday–Monday
Closed Tuesday & Wednesday
Day-use only (no sunset access)
Tent Rocks opens at 8:00 am and the last pilot truck leaves the Visitor Center at 1:00 pm
⚠️ Hours can change — always double check before going
Best Hike to Do
Slot Canyon Trail (DO THIS ONE)
~3 miles round trip
Moderate
Includes:
Slot canyon section (super narrow + fun)
Short ladder climb
Panoramic overlook at the top
Is It Kid-Friendly?
Yes, but:
The slot canyon gets tight
The ladder may be tricky for little ones
Great for adventurous kids
Best Time to Go
Morning = best lighting + fewer crowds
Avoid midday heat (very exposed)
No shade for most of the hike
What to Bring
Water (no services inside)
Good hiking shoes
Sun protection
Sun glasses – it was extremely windy and sandy on our visit
Snacks if doing the full hike
Photo Tips
The slot canyon = best reel footage
Shoot upward angles to capture the scale
Overlook at the top = wide landscape shots
Things to Know Before You Go
No pets allowed
No drones
Limited facilities
Can close due to weather
Is It Worth It?
100% yes — one of the most unique hikes in New Mexico.
This ended up being one of our favorite stops on the entire trip — and honestly, I didn’t expect it to be. It’s fun, unique, and just adventurous enough to feel like a hidden gem. If you’re building out a Southwest road trip, definitely add this one to your list.
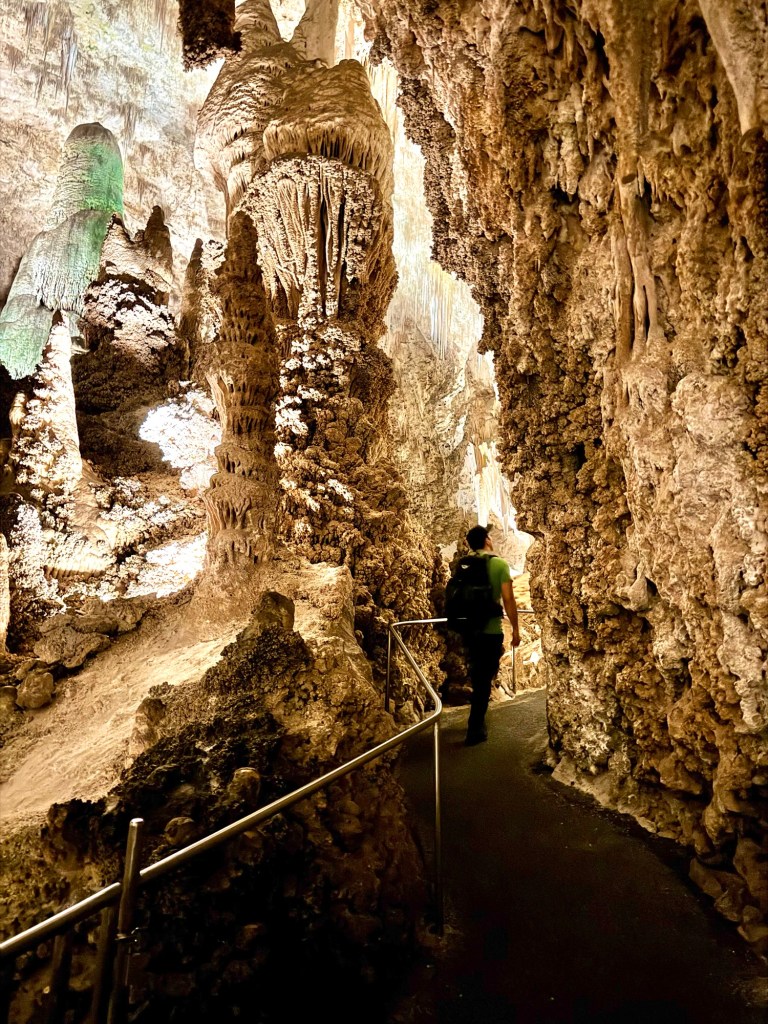
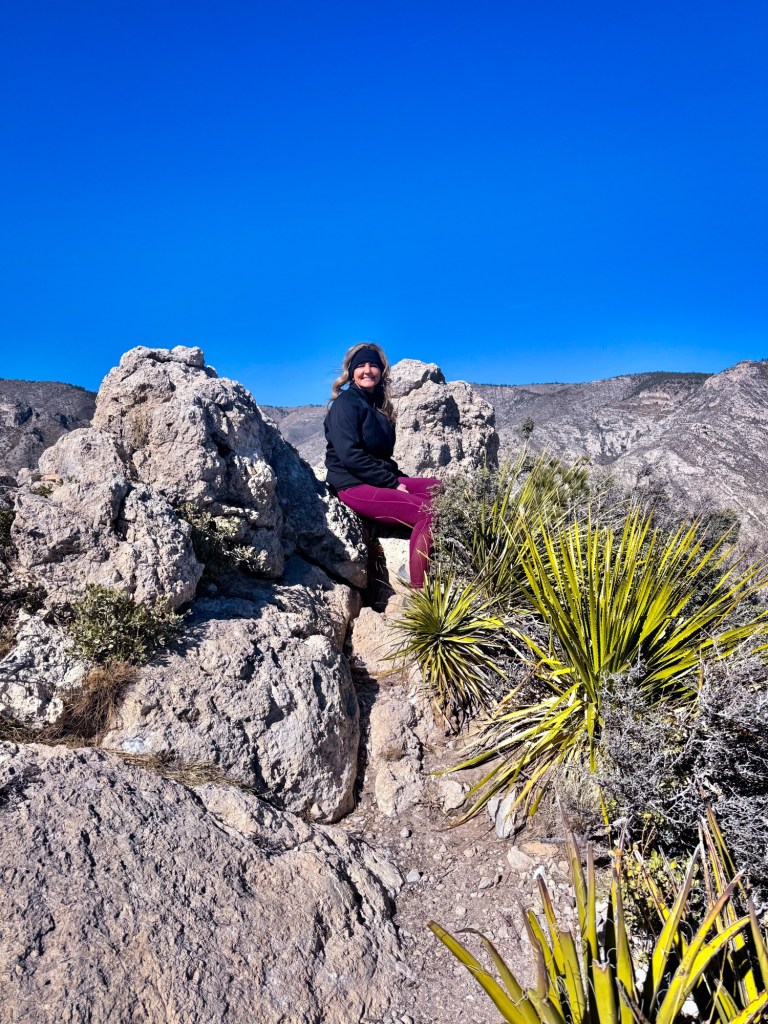
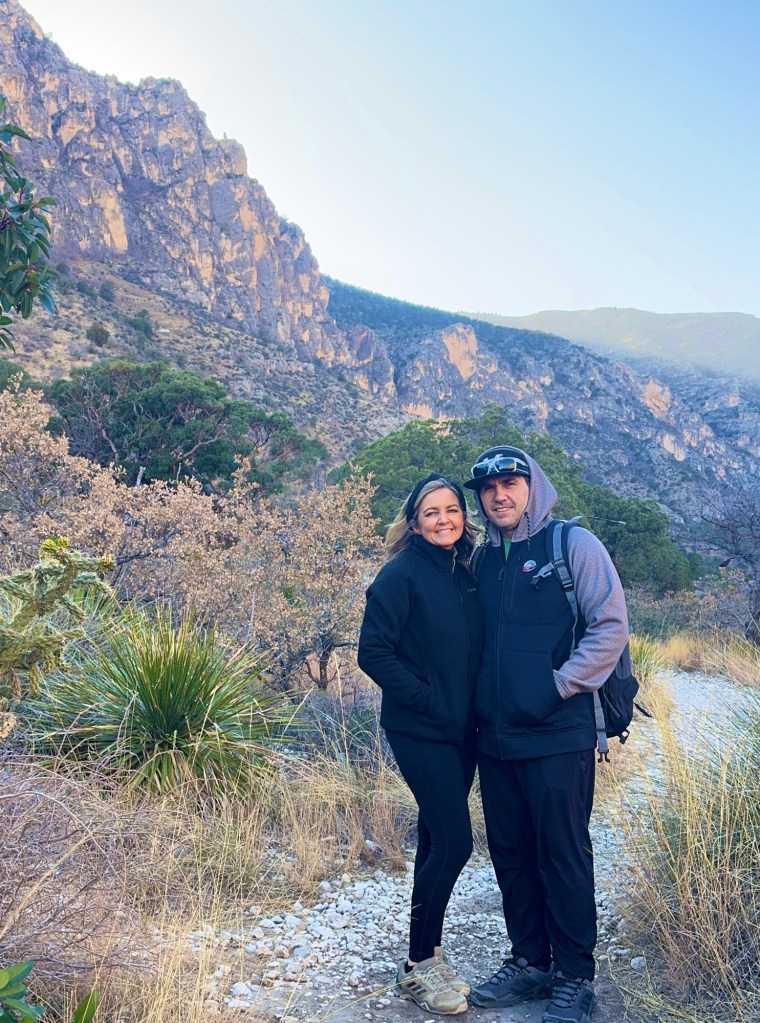
If you’re craving a weekend trip that delivers jaw-dropping scenery, epic hikes, and minimal crowds, this Carlsbad Caverns & Guadalupe Mountains National Park itinerary belongs at the top of your list.
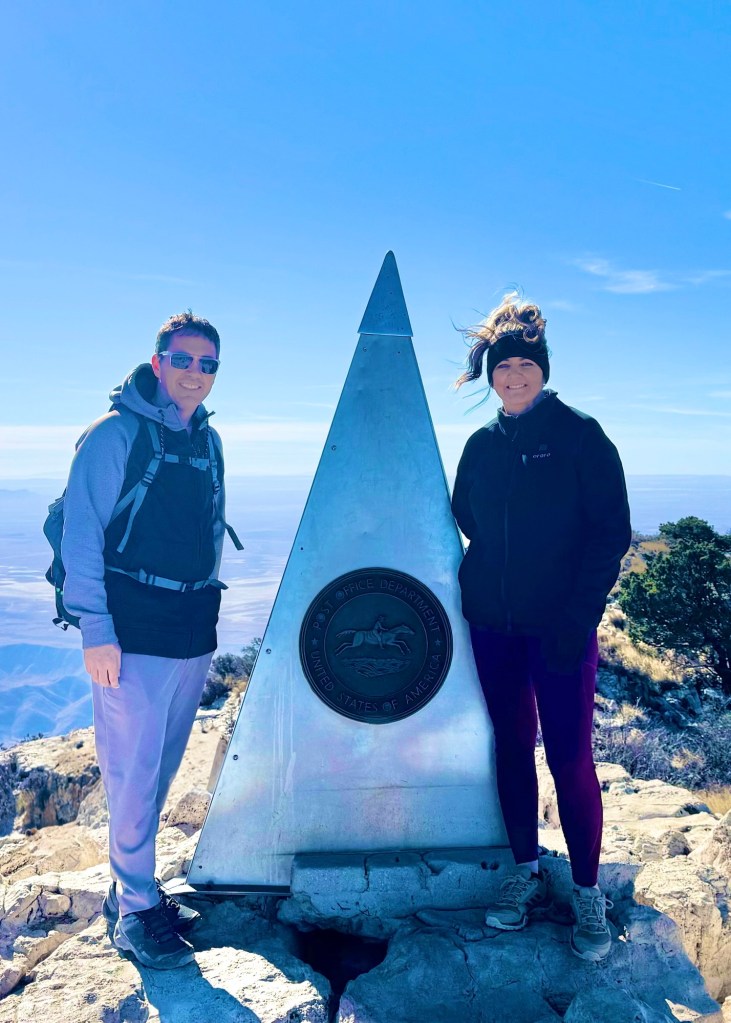
In just one weekend, we explored the deepest cave in the U.S., hiked desert trails with dramatic canyon views, and stood on the highest point in Texas — all without needing a full week off work.
Here’s exactly how to plan the perfect weekend road trip to Carlsbad Caverns and Guadalupe Mountains National Parks.
Why Pair These Two National Parks?
Carlsbad Caverns and Guadalupe Mountains are only 35 miles apart, making them one of the best national park pairings in the Southwest.
Kids who can walk independently usually do great here.
After finishing the caverns, grab lunch in Carlsbad before heading west. We ate at the Visitor Center and had the green chili pork stew and it was delicious!
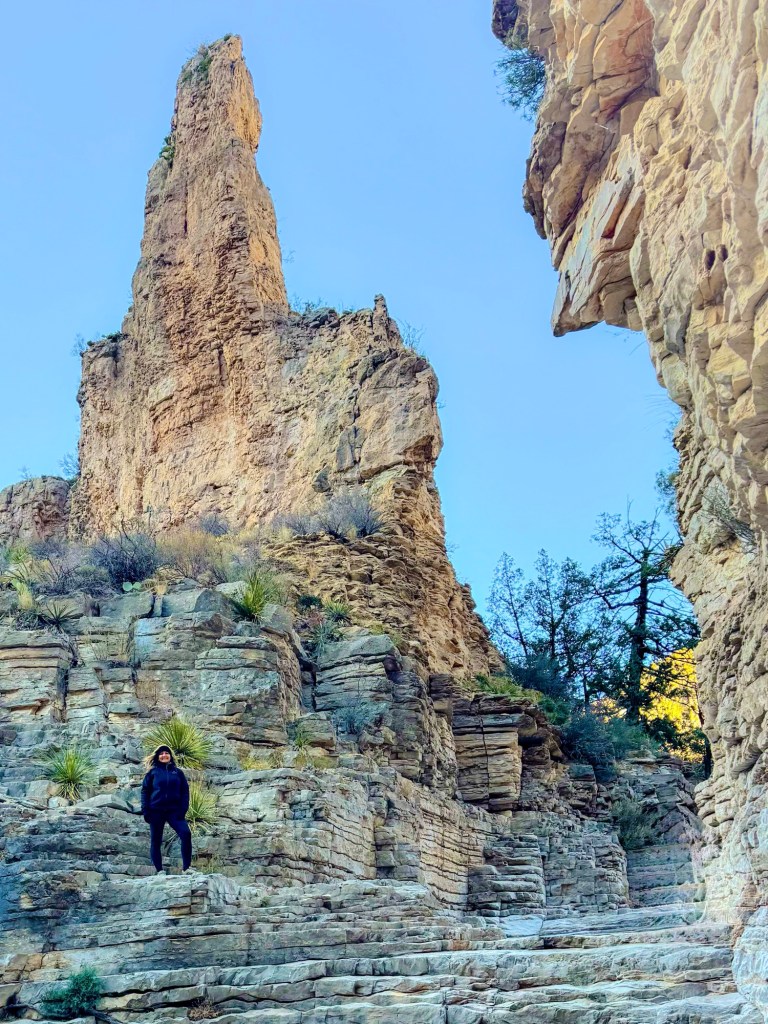
Why It’s Worth It: Endless desert views and serious bragging rights
Start early to avoid heat and wind near the summit. The trail is steady uphill the entire way, and the descent can be just as challenging as the climb.
Helpful Tips
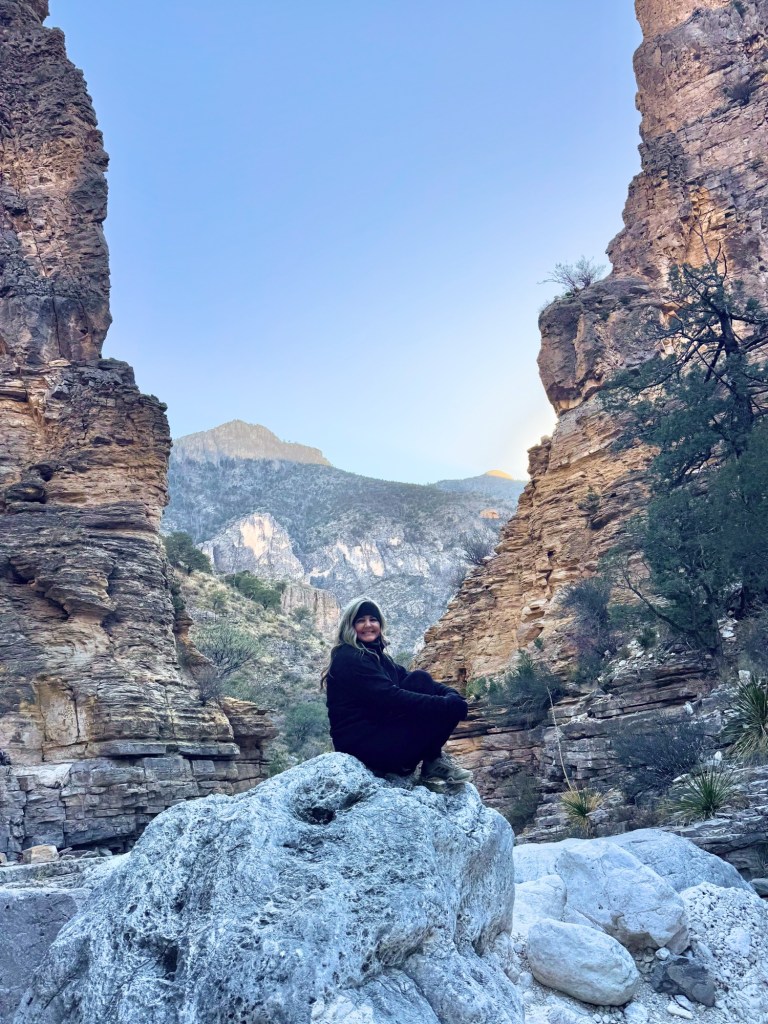
Wind at the top can be intense — pack layers even in warm months.
Bring more water than you think you’ll need
Electrolytes and peanut butter saved the day for us
Plan for 6–8 hours total, including breaks and time at the summit. It took us about 6 hours total, 3.5 to hike up to the peak, and then 2.5 hours to hike back down to the trailhead.
Why This Order Works So Well
✔️ Caverns when energy is high ✔️ Devil’s Hall as a “warm-up” hike ✔️ Peak hike gets its own day ✔️ No rushed mornings or dangerous fatigue
This pacing makes the weekend challenging but totally doable — even if you’re not a hardcore hiker.
Where to Eat in Carlsbad
After long hike days, these spots hit the spot:
YellowBrix Restaurant – Great for dinner and cocktails
El Diamante Restaurant– Delicious Mexican food
Blue House Bakery – Perfect for breakfast before heading out
What I’d Do Differently Next Time
Start Guadalupe Peak earlier (sunrise if possible)
Bring trekking poles for the descent
Is This Weekend Trip Worth It?
Absolutely — if you: ✔️ Want fewer crowds ✔️ Love unique landscapes ✔️ Don’t mind earning your views ✔️ Want a national park trip that feels different
This is one of those weekends that sticks with you long after the sore legs fade.
Planning This Trip?
I’m putting together easy, realistic road trip itineraries (with honest hiking info, kid-friendly notes, and where-to-stay tips) — no fluff, just practical planning.
👉 Subscribe to my blog so you don’t miss future trips like this one.
Waterfall hikes are some of the most rewarding trails in the United States—short walks with big payoffs, dramatic canyons, and photo ops that stop people in their tracks. Whether you’re planning a national park vacation or road-tripping through small mountain towns, these waterfall hikes deserve a spot on your bucket list.
Below, you’ll find a guide to some of the most breathtaking waterfall trails in the country, including reader favorites like Fall Creek Falls, Stephan’s Gap, Flume Gorge, and more.
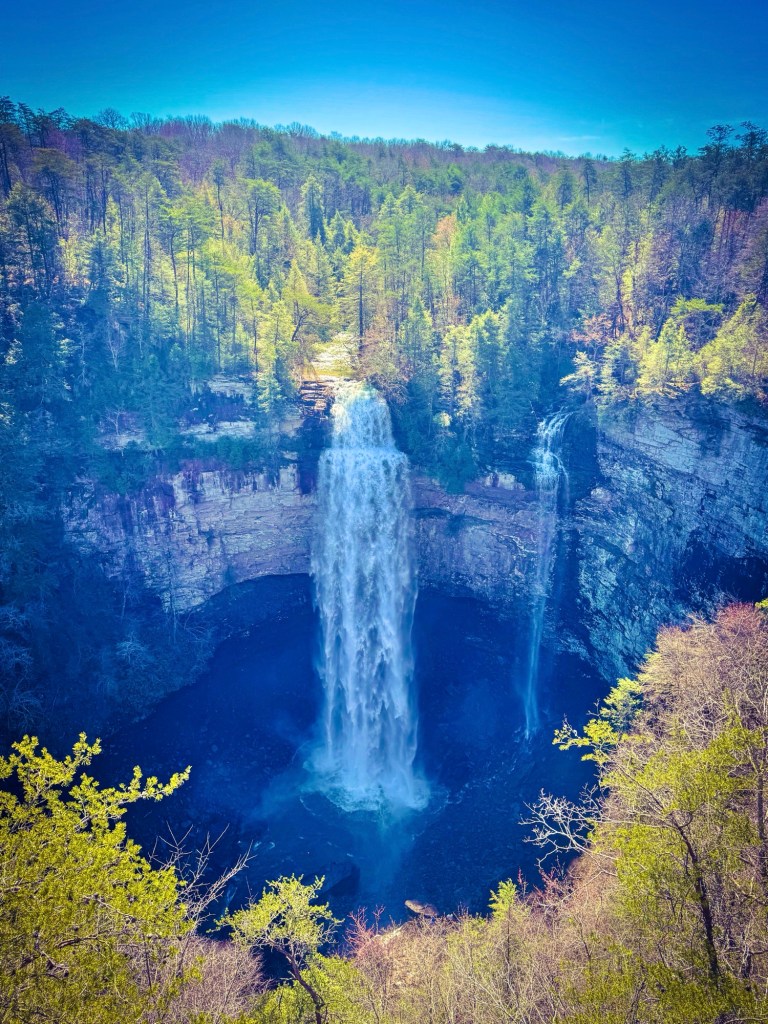
1. Fall Creek Falls – Tennessee
Difficulty: Moderate | Length: 0.8 miles round trip
One of the tallest waterfalls in the eastern U.S., Fall Creek Falls State Park offers breathtaking views and multiple trails. The hike to the base and back up is about 0.8 miles and accessible for most hikers. For a more panoramic experience, try the overlook trails.
Why it’s worth it: Incredible viewpoints, kid-friendly overlooks, and one of the most photographed waterfalls in Tennessee.
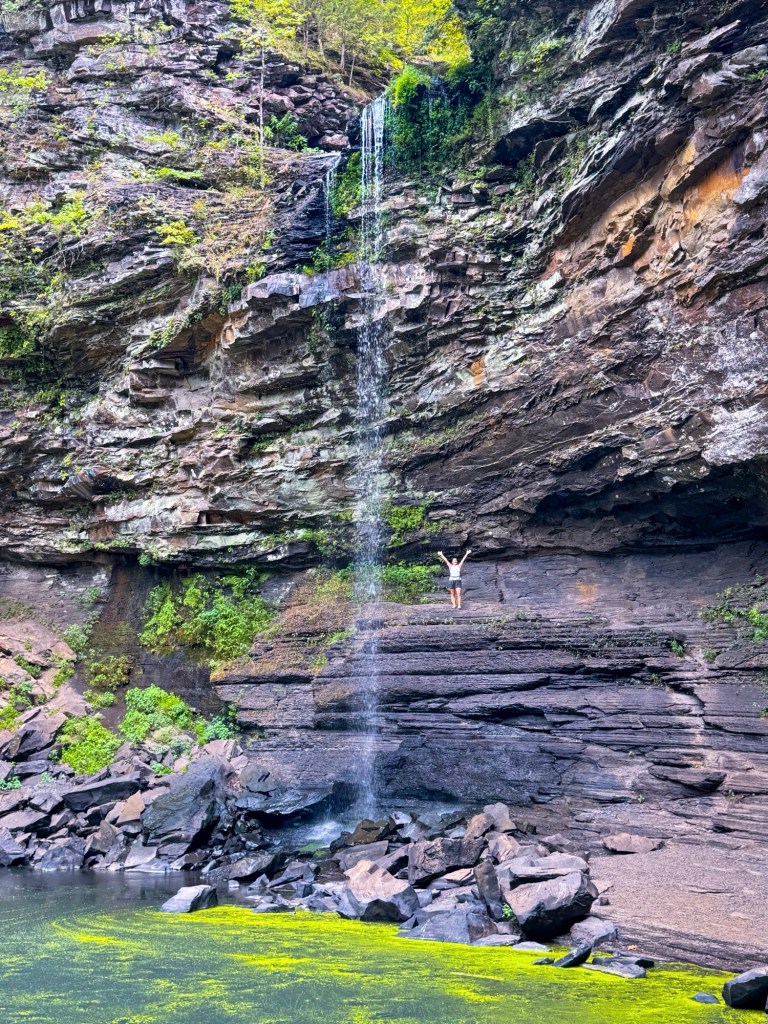
2. Stephan’s Gap – Alabama(Callahan Cave Preserve)
Difficulty: Moderate | Length: 1.4 miles
This dramatic, cave-like waterfall pours through a vertical gap in the rock and creates a moody, cinematic scene. It’s a favorite among landscape photographers and adventurers.
Why it’s worth it: Unique setting—not your typical waterfall; perfect for photographers.
Hidden in the Green Mountains, Bingham Falls is a short but steep hike with a rewarding plunge pool at the bottom. Best visited in the summer, this waterfall is perfect for a quick refreshing stop during a Vermont road trip.
Why it’s worth it: Quick, accessible, and stunning in every season.
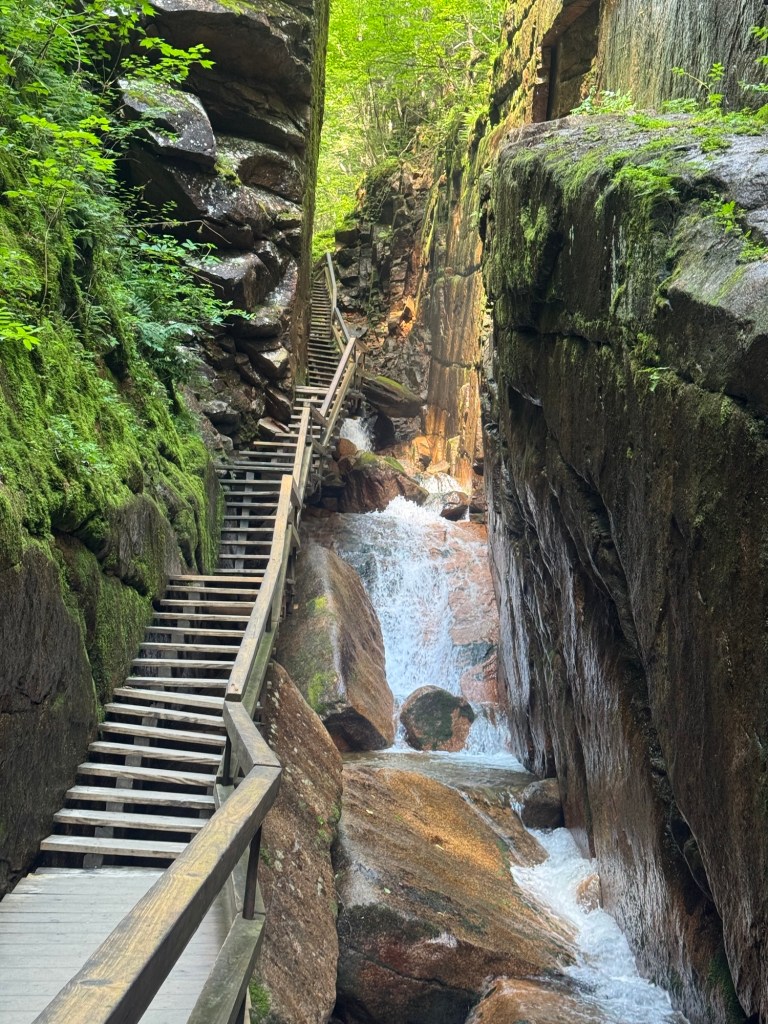
4. Flume Gorge – New Hampshire
Difficulty: Easy | Length: 2 miles
A natural wonder in Franconia Notch State Park, Flume Gorge is a family-friendly trail featuring waterfalls, covered bridges, and granite walls. The 2-mile loop is easy to moderate, making it perfect for kids and photographers alike. Although it’s famous for its boardwalks, steep granite walls, and covered bridges, the Flume also features stunning cascades as the Flume Brook flows through the canyon.
Why it’s worth it: Scenic and safe for kids, with tons of photo spots.
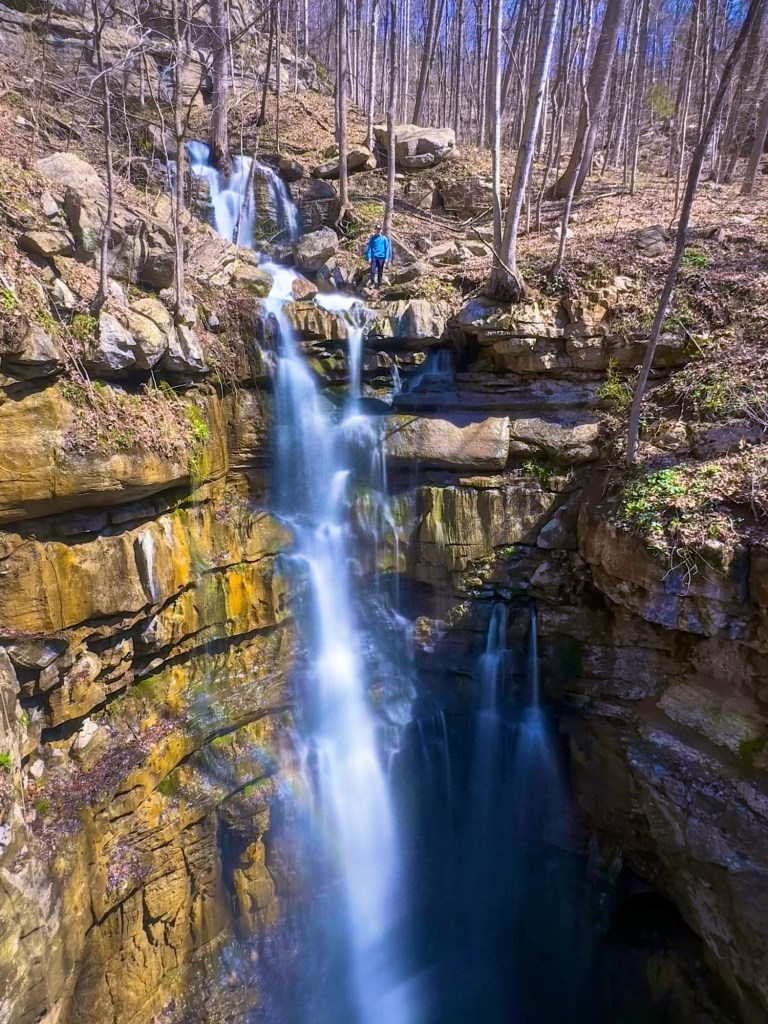
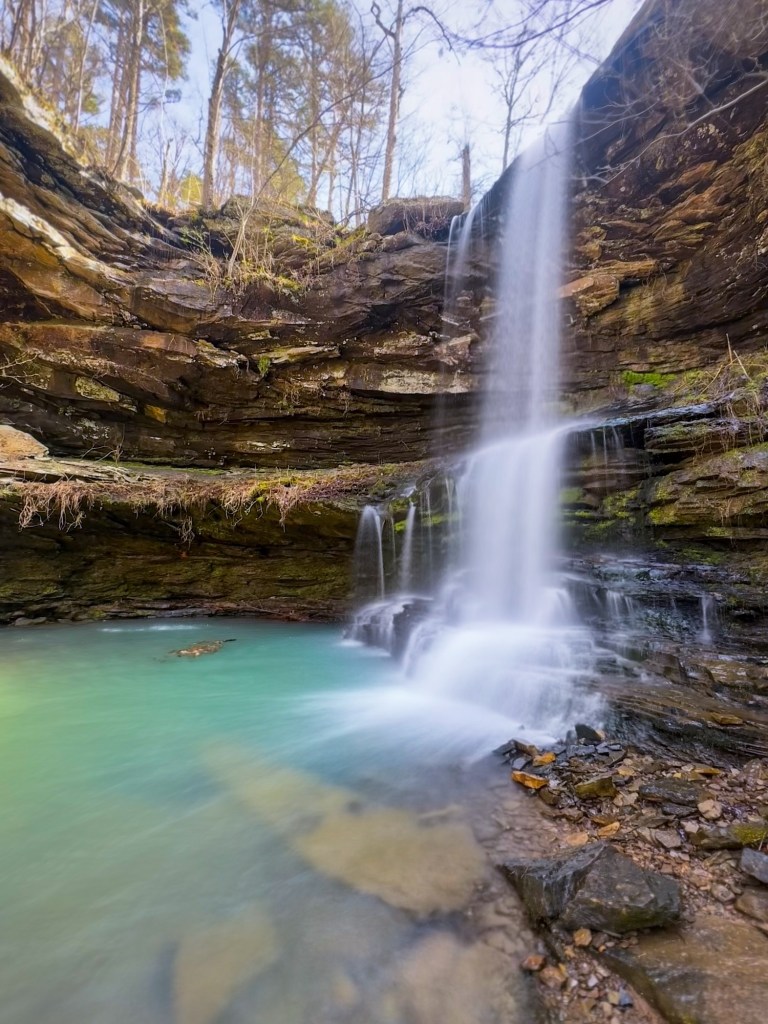
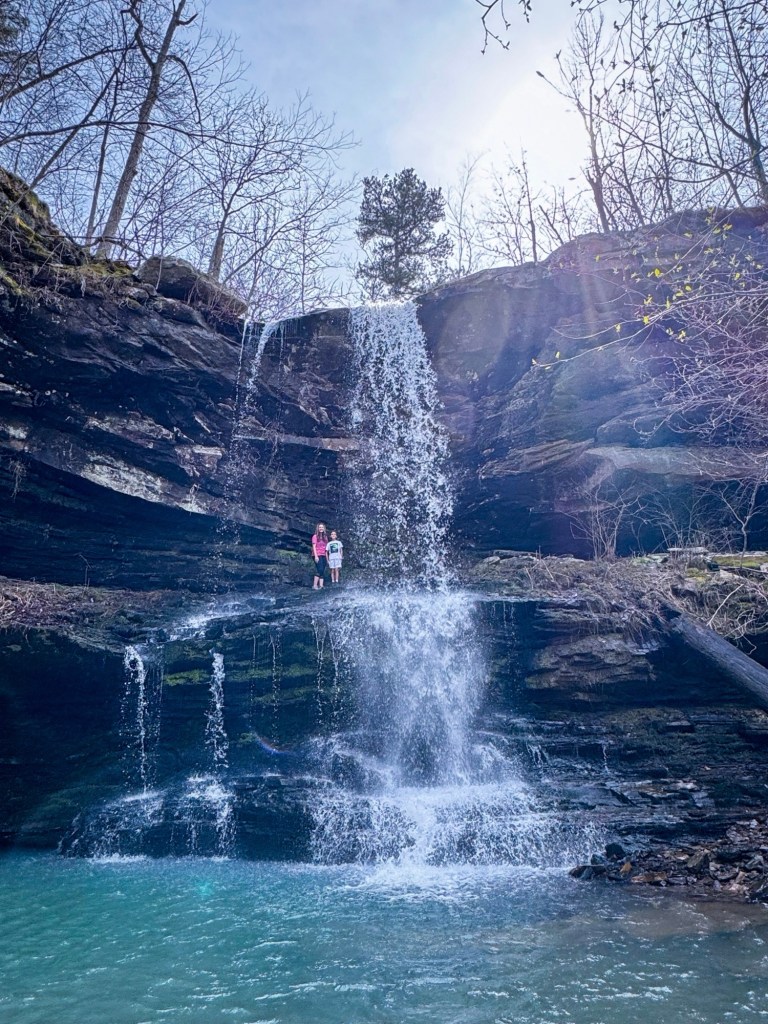
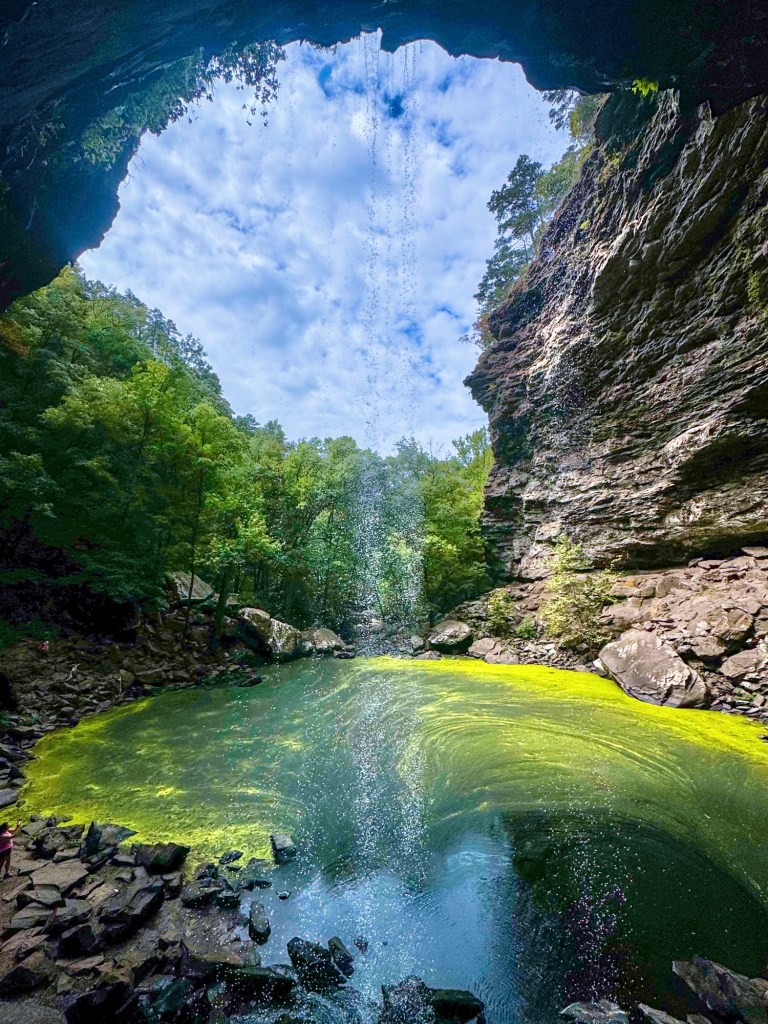
5. Fern Falls – Arkansas (Ozark- St. Francis National Forest)
Difficulty: Easy | Length: 1.5 miles
This lesser-known Arkansas gem features a delicate veil of water falling into a mossy grotto. It’s peaceful, quiet, and ideal for families looking for a gentle adventure. Nestled in the Ozarks, Fern Falls is a quieter waterfall destination with scenic hiking trails. The hike is moderate and shaded, making it a great escape on a hot day. Pair it with nearby Hawksbill Crag hike for a full-day adventure.
Why it’s worth it: Great for beginners and one of the most peaceful waterfalls in the region.
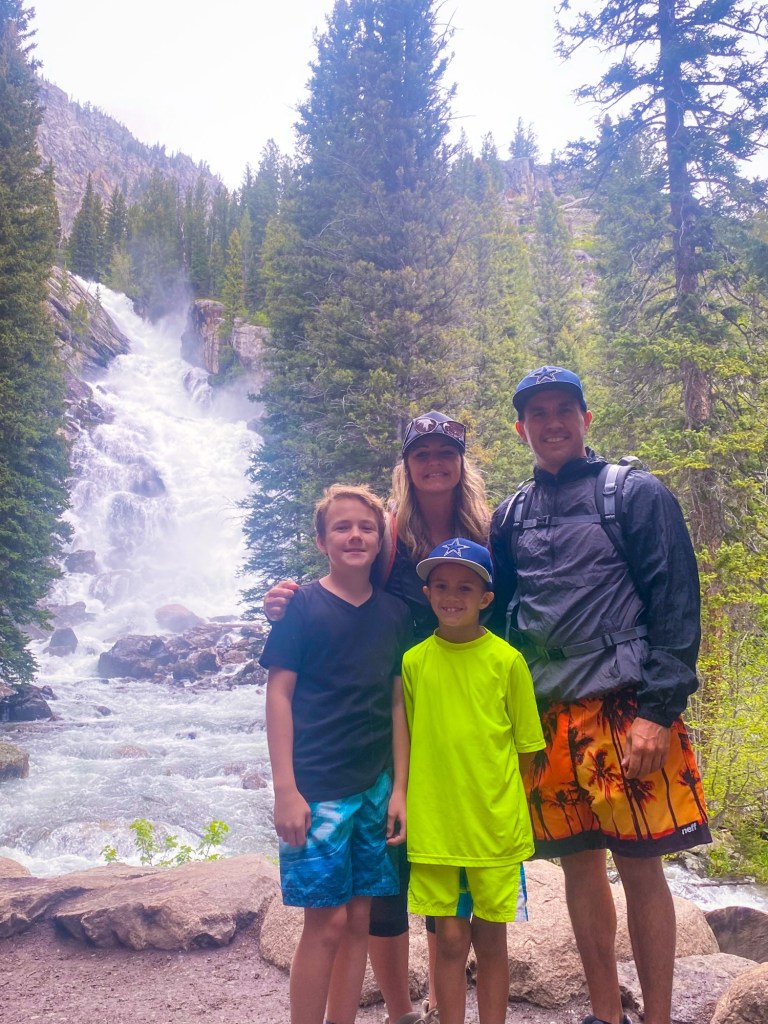
6. Hidden Falls – Grand Teton National Park (Wyoming)
Hidden Falls is one of Grand Teton’s most family-friendly waterfall hikes, delivering big views with minimal effort. The trail begins at Jenny Lake—either by boat shuttle or on foot—and gently winds through pines until you hear the roar of the falls. At 100+ feet, Hidden Falls impresses with its powerful cascade framed by rugged granite and lush greenery, making it a perfect stop before continuing on to Inspiration Point.
Why it’s worth it: Stunning mountain views, peaceful lakeside scenery, and a serene waterfall that feels like a hidden gem.
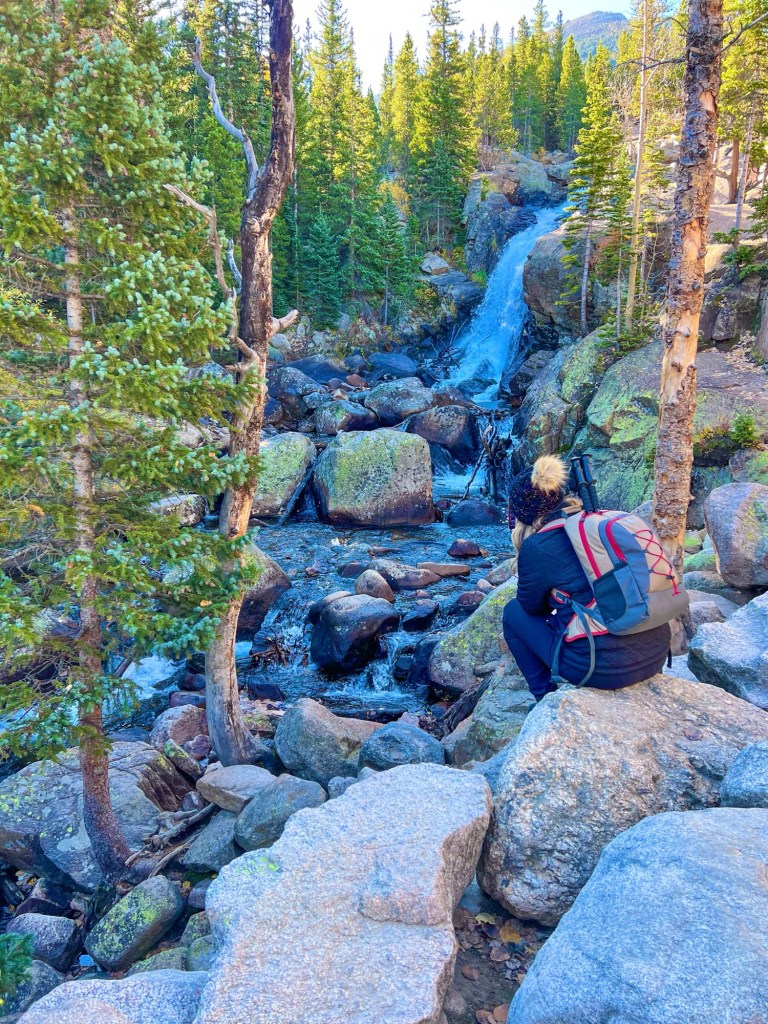
7. Alberta Falls – Rocky Mountain National Park (Colorado)
A quick, scenic hike in Rocky Mountain National Park leads you to Alberta Falls, a beautiful cascade framed by lush forest and rugged mountain peaks. Perfect for a family stroll or a quick nature escape.
Why it’s worth it: Easy access, photogenic scenery, and a refreshing waterfall set in the heart of the Rockies.
8. Cascade Falls – Ouray, Colorado
Just a short walk from downtown Ouray, Cascade Falls offers a dramatic plunge into a narrow canyon, surrounded by towering cliffs and alpine scenery. Perfect for a quick stop or a family-friendly adventure.
Why it’s worth it: Easy access, stunning cliffside views, and a waterfall that captures the charm of Ouray’s rugged beauty.
9. Cedar Falls – Petit Jean State Park (Arkansas)
A moderate hike through lush forest leads to Cedar Falls, one of Arkansas’ most impressive waterfalls, cascading over sandstone cliffs into a serene pool below. Great for families and nature lovers alike.
Why it’s worth it: Scenic forest trails, a powerful waterfall, and one of the most iconic spots in Petit Jean State Park.
Tips for Chasing Waterfalls Across the US:
Check trail conditions before you go—some waterfalls are seasonal.
Bring layers and water-resistant shoes; trails can be slippery.
Pack or wear a swimsuit in case you want to take a dip!
Early morning visits help avoid crowds and capture the best light for photos.
Consider packing a picnic—many parks have beautiful spots to rest and enjoy the scenery.
Must Have Hiking & Photography Gear
This post contains affiliate links. I may earn a small commission, at no extra charge to you, if you purchase items using any of the links provided. Thank you!
No matter which waterfall you choose, each offers its own unique beauty, adventure, and perfect photo opportunity. From serene forest cascades to dramatic mountain plunges, these hikes are well worth the journey. For more travel tips, waterfall inspiration, and behind-the-scenes adventure, follow me on Instagram @road.trip.queen and join the journey!
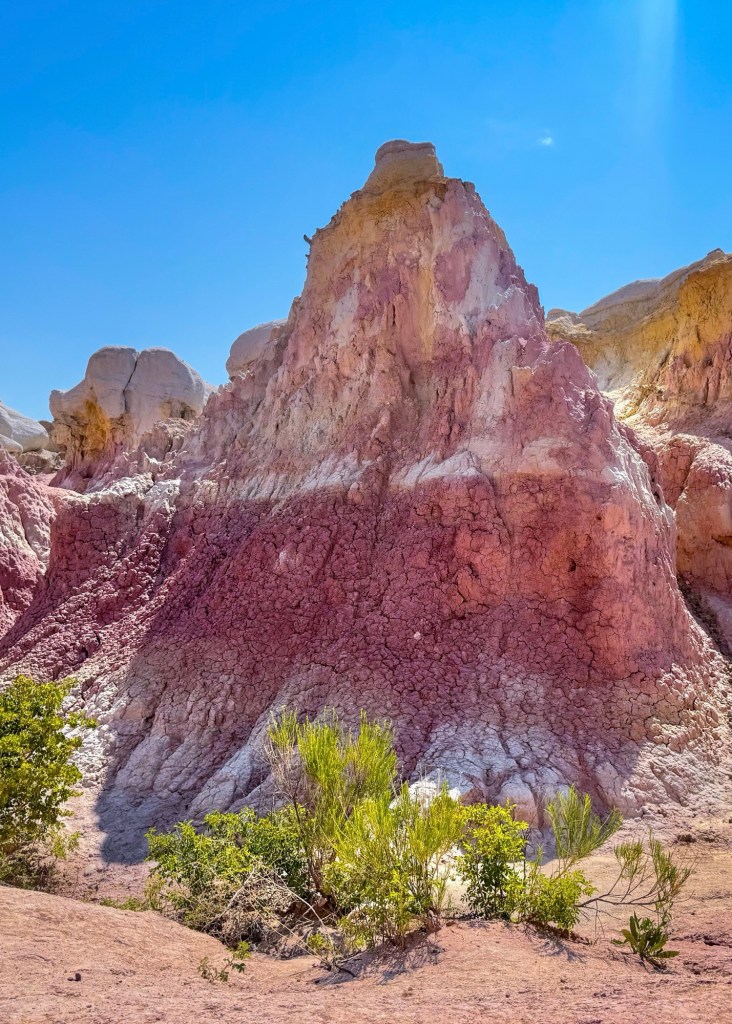
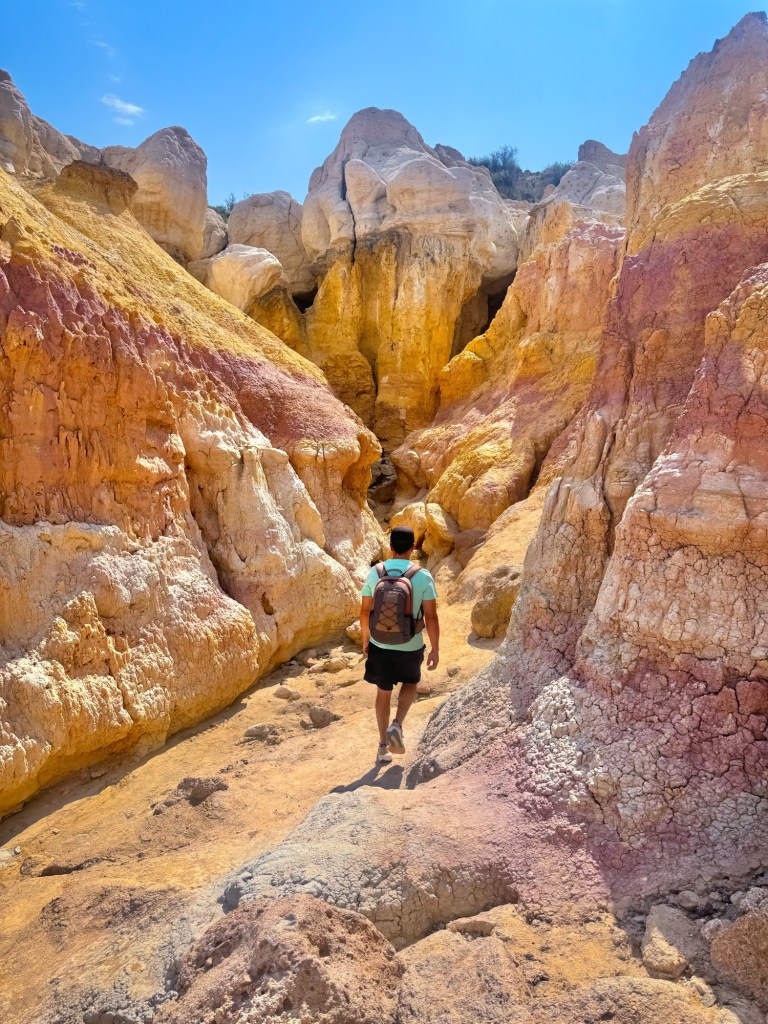
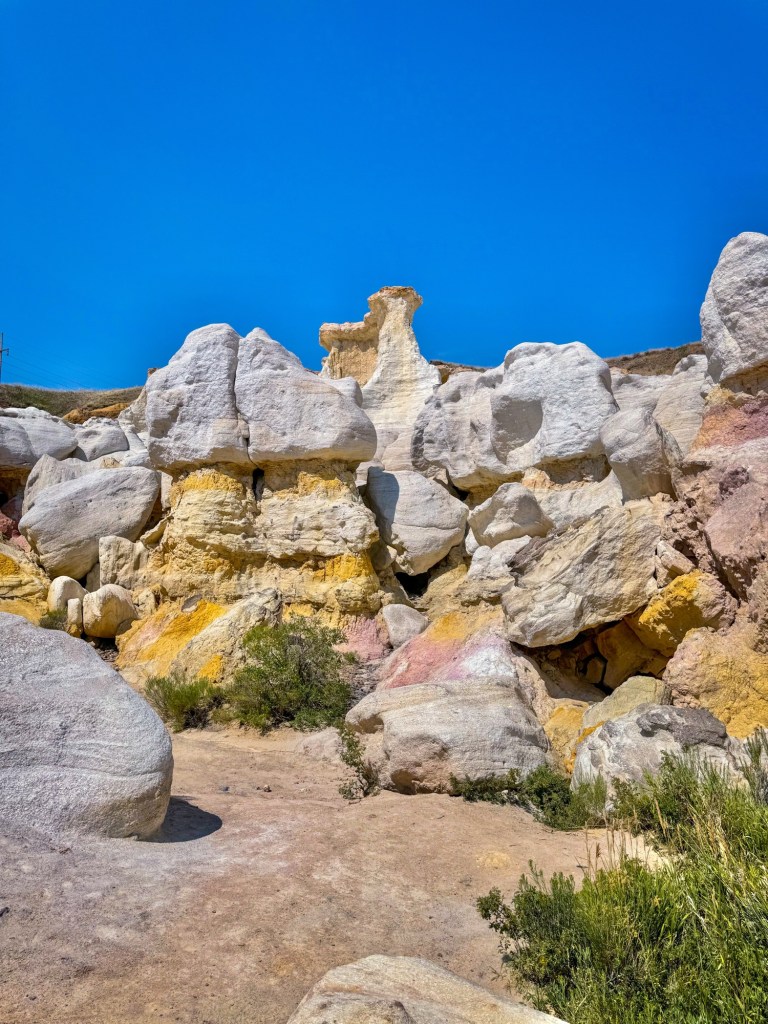
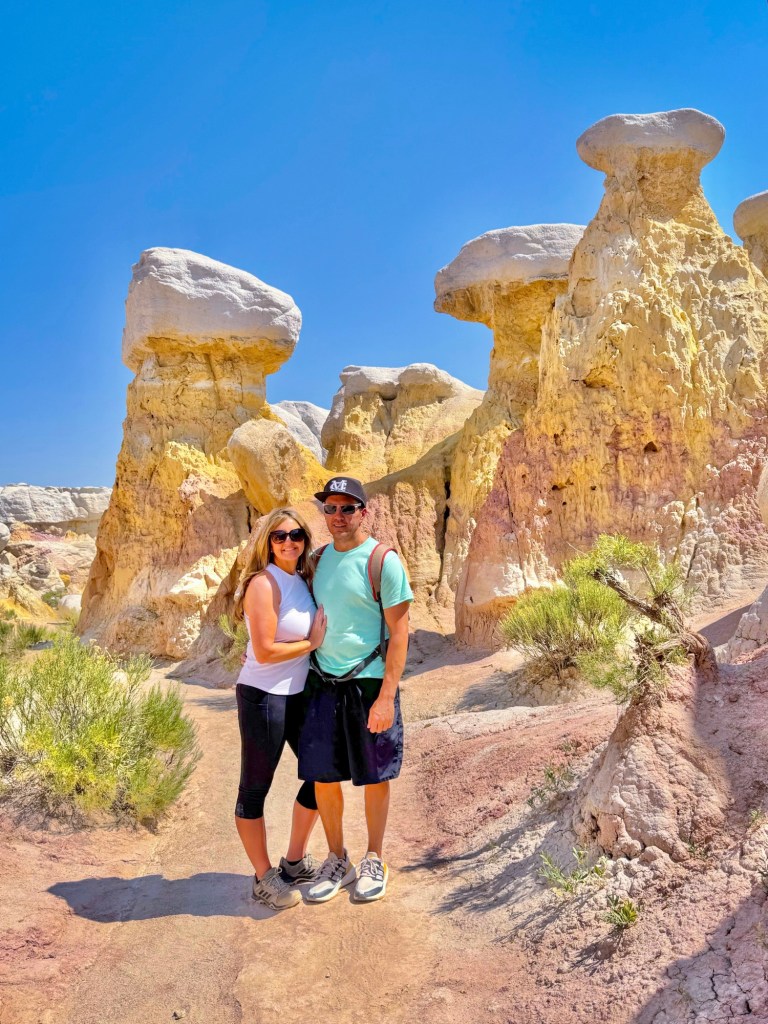
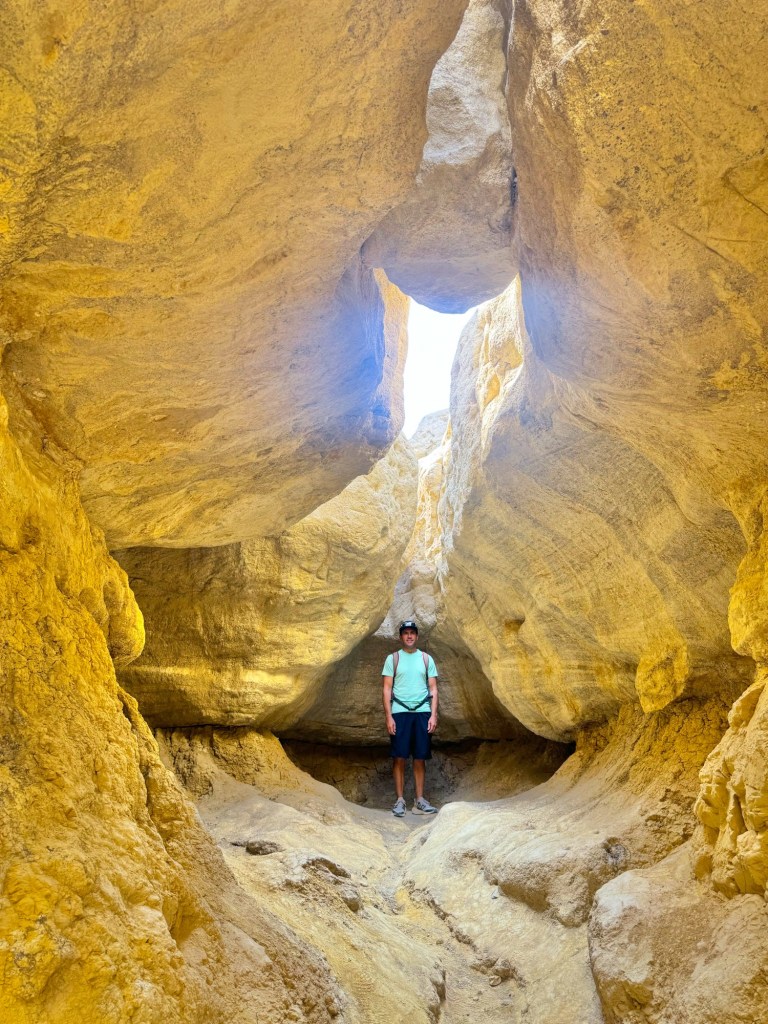
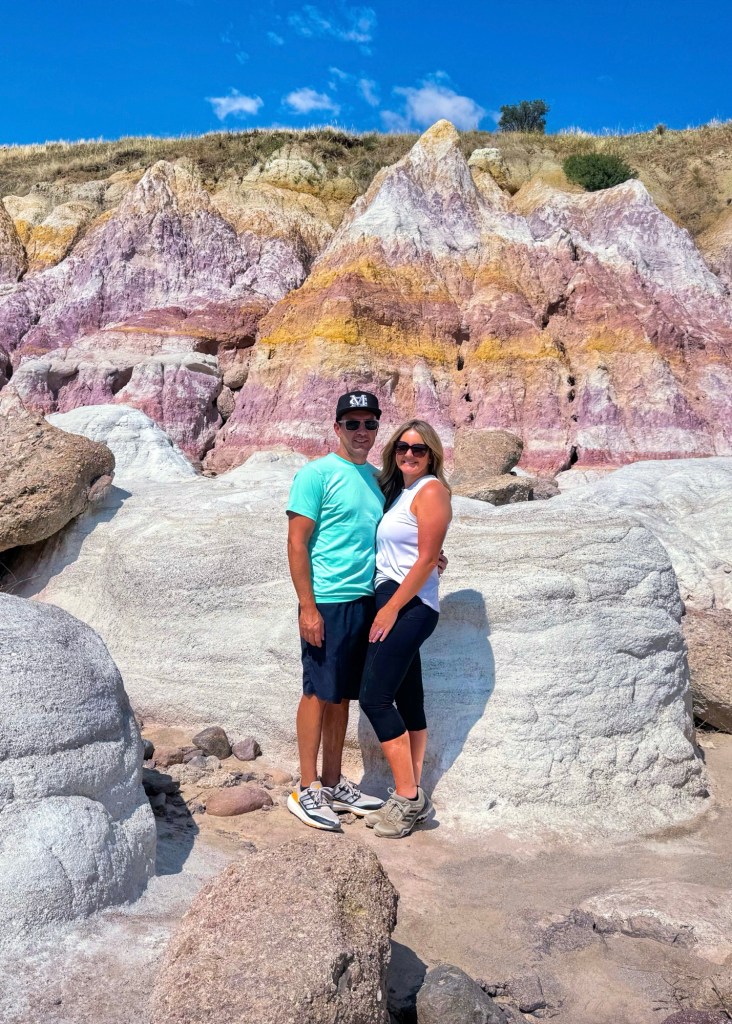
Nestled in the rolling prairies of eastern Colorado lies a hidden gem that seamlessly blends natural beauty, rich history, and geological wonder—the Paint Mines Interpretive Park. This 750-acre park is renowned for its vibrant, multicolored clay formations, sculpted over millennia by the forces of nature.
Trail Overview
Distance: Approximately 3.4 miles (loop)
Elevation Gain: Around 334 feet
Difficulty: Easy to moderate
Estimated Time: 1.5 to 2 hours
Trail Type: Loop with several interpretive stops
Best Time to Visit: Early morning or late afternoon for optimal lighting and cooler temperatures
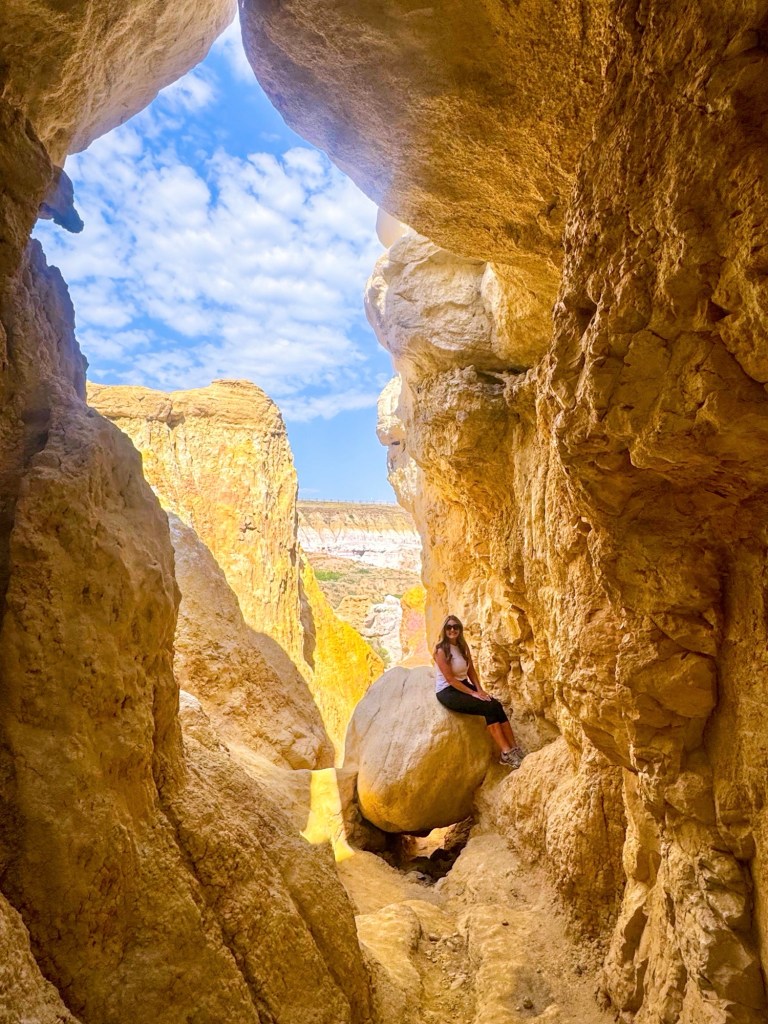
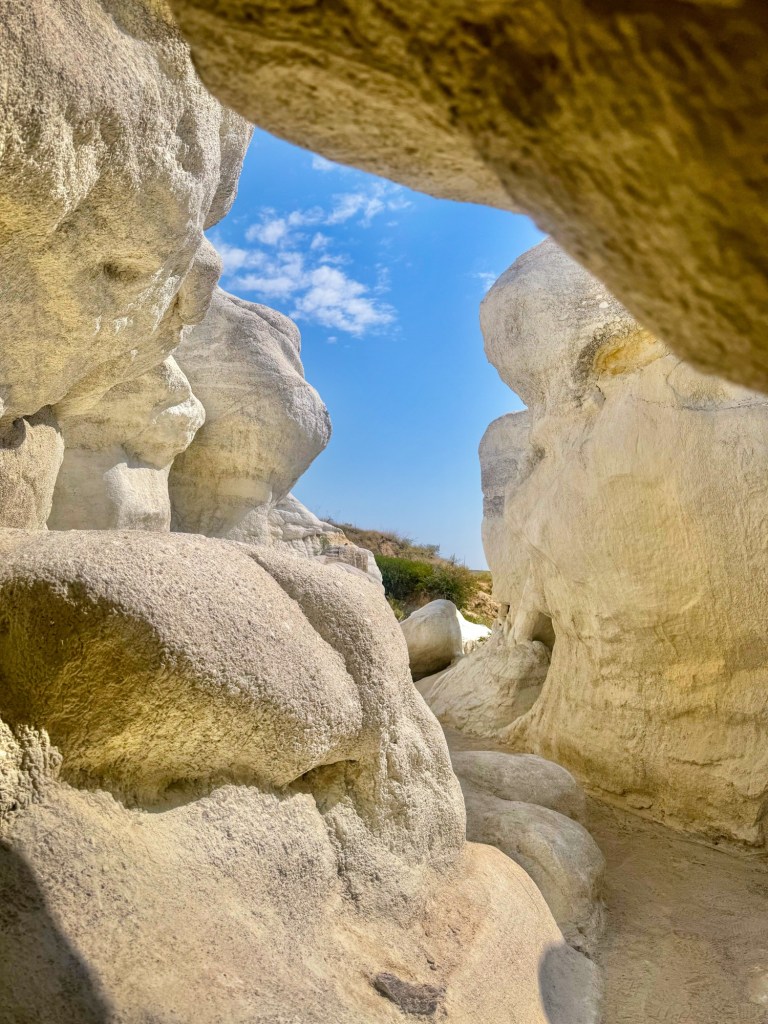
The main loop trail meanders through diverse terrains, including open prairies, colorful badlands, and unique geological formations. Along the way, hikers encounter five interpretive sites focusing on ecology, prehistory, history, geology, and an overlook offering panoramic views of the park.
What Makes the Paint Mines Unique?
The park’s namesake formations are composed of brightly colored clays—ranging from pinks and purples to golds and whites—created by oxidized iron compounds. These clays have been sculpted into hoodoos, spires, and gullies, presenting a surreal landscape that feels otherworldly.
Rich Human History
Archaeological evidence indicates that Native American tribes utilized the area for thousands of years, extracting the colorful clays for pottery and ceremonial paints. Artifacts such as arrowheads and stone tools have been discovered, underscoring the site’s historical significance.
Ecological Diversity
Beyond its geological and historical importance, the park is home to a variety of wildlife, including coyotes, mule deer, songbirds, and falcons. The diverse habitats—prairies, wetlands, and badlands—support a rich tapestry of plant and animal life.
Tips for a Responsible and Enjoyable Visit
Stay on Designated Trails: The formations are fragile; walking off-trail can cause irreversible damage.
No Climbing: Climbing on the formations is prohibited to preserve their integrity.
Pets: Dogs and other pets are not allowed in the park.
Facilities: Restrooms are available at the main parking area, but there are no facilities along the trail.
Preparation: Wear sturdy, closed-toe shoes suitable for uneven terrain. Bring plenty of water, sunscreen, and a hat, as shade is limited.
Weather Considerations: Avoid visiting during or after heavy rains, as trails can become slippery and dangerous.
Getting There
Paint Mines Interpretive Park is located at 29950 Paint Mine Road, Calhan, CO 80808. From Colorado Springs, take Highway 24 east for approximately 31 miles to Calhan. Turn right on Yoder Street/N Calhan Highway for 0.7 miles, then left on Paint Mines Road. The main parking lot will be on your left after about 1.4 miles.
Embarking on the Paint Mines Interpretive Trail offers more than just a hike; it’s an immersive experience into the natural, historical, and cultural tapestry of Colorado’s eastern plains. Whether you’re a geology enthusiast, history buff, or simply seeking a unique outdoor adventure, the Paint Mines promise a memorable journey through time and color.
Must Have Hiking & Photography Gear
This post contains affiliate links. I may earn a small commission, at no extra charge to you, if you purchase items using any of the links provided. Thank you!
If you’re dreaming of more colorful trails, family-friendly hikes, and hidden gems across the U.S., be sure to follow along on Instagram @road.trip.queen! I’m always sharing our real-life road trip moments, travel tips, and the best scenic stops to inspire your next adventure. Whether it’s chasing waterfalls, climbing hoodoos, or wrangling snacks in the backseat with kids—there’s never a dull moment. See you on the road!
If you’re craving a road trip packed with adventure, natural beauty, and a little slice of Americana, Kentucky is calling your name. This state has it all—underground kayaking, jaw-dropping hikes, epic caves, and a stop at one of baseball’s most iconic landmarks. Buckle up, because this Kentucky road trip is one for the books!
Stop #1: Kayak Underground
Kicking off the adventure in the most unique way possible—paddling through an underground cave! The Gorge Underground offers an unforgettable kayaking experience through a flooded limestone mine. Picture glowing waters, eerie rock formations, and total silence except for the dip of your paddle. Whether you’re a kayaking pro or a total newbie, this is a must-do.
Pro Tip: Book your tour in advance—they fill up fast, especially in peak seasons! Make reservations here.
Stop #2: Hike the Red River Gorge Geological Area
Once you’re back above ground, it’s time to stretch those legs with some epic hiking. Red River Gorge is packed with stunning rock formations, towering cliffs, and lush forests. Whether you want a short scenic stroll or a challenging backcountry trek, there’s a trail for you.
Must-Do Hikes:
• Natural Bridge Trail – A moderate hike leading to a massive natural rock arch.
• Auxier Ridge Loop – Jaw-dropping panoramic views of the gorge.
• Sky Bridge Trail – A short hike to another incredible rock arch.
After your hike, grab a bite at Miguel’s Pizza, a local favorite known for fueling hungry adventurers with delicious, fresh-made pizza.
Stop #3: Step Up to the Plate at the Louisville Slugger Museum
Next, it’s time for a little history and nostalgia in Louisville. Baseball fan or not, the Louisville Slugger Museum is an absolute blast. You’ll get to see how the legendary bats are made, check out memorabilia from some of baseball’s greatest players, and even hold game-used bats from legends like Babe Ruth and Derek Jeter.
Don’t forget to take a photo with the giant bat outside—it’s the world’s largest baseball bat, standing at 120 feet tall!
Stop #4: Explore Carter Caves State Park
No Kentucky road trip is complete without exploring its underground wonders, and Carter Caves State Park is the perfect place to do just that. With over 20 caves, scenic trails, and natural bridges, this park is an adventurer’s paradise.
Top Experiences:
• Natural Bridge Trail – A short but scenic hike to a unique rock bridge.
• X-Cave & Cascade Cave Tours – Walk through massive underground passageways and see stunning rock formations.
• Horn Hollow Trail – Short hike that leads to a little “wild caving!” You will need a permit, easily obtained at the visitor center!
Final Thoughts
This Kentucky road trip is the perfect mix of adventure, nature, and history. From underground kayaking and hiking through towering rock formations to swinging by one of baseball’s most famous museums, this journey has something for everyone.
Have you road-tripped through Kentucky before? What was your favorite stop? Drop a comment and let me know!
If you’re looking for a family-friendly getaway packed with adventure, stunning scenery, and a little bit of luxury, Fall Creek Falls State Park is a must-visit. We recently took a trip with the kids and stayed at theLodge at Fall Creek Falls, and let me tell you—it was an unforgettable experience!
Where We Stayed: The Lodge at Fall Creek Falls
Photo from Trip Advisor website
We booked aking suite at the lodge, and it was absolutely worth it. The spacious room, modern amenities, and beautiful views made it the perfect place to relax after a long day of exploring. The kids loved having space to spread out, and I loved the cozy yet upscale feel of the lodge.
Dining at the Lodge
We ate at the restaurant inside the lodge, and the food was great! It’s so convenient to have an on-site dining option, especially after a day of hiking and adventure. The menu had something for everyone, including kid-friendly options, and we left full and happy every time.
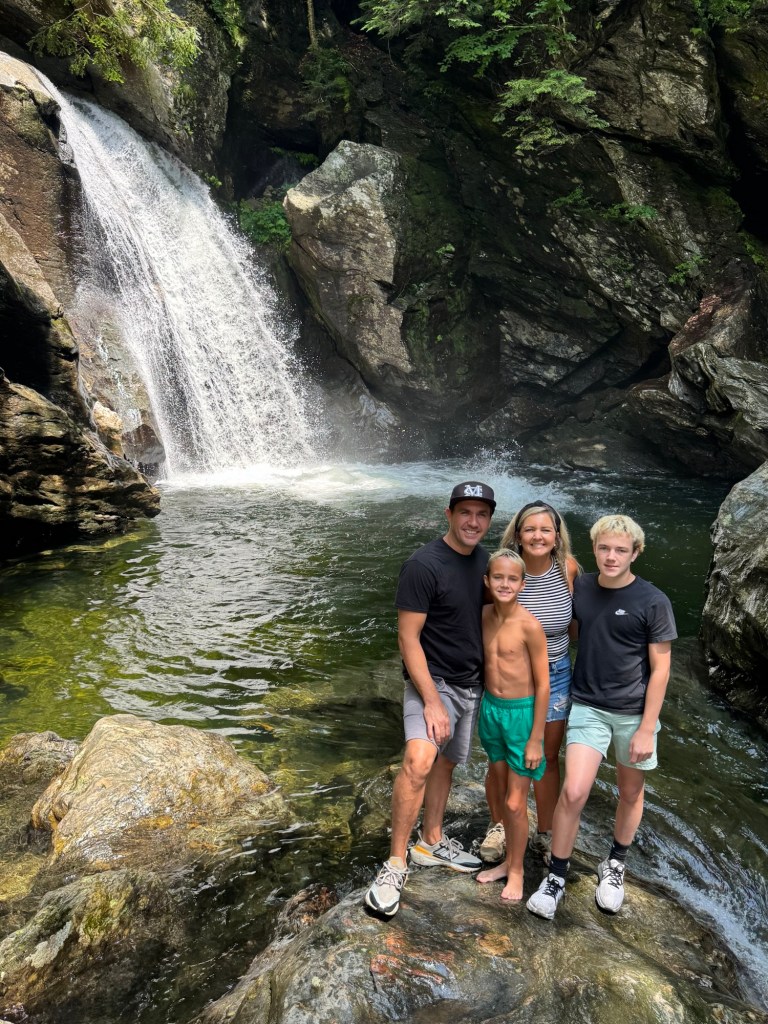
Hiking to the Base of Fall Creek Falls
One of the highlights of our trip was hiking down to the base of Fall Creek Falls. It’s a short but steep hike, and when we reached the bottom, the view was breathtaking.
The kids had a blast scrambling over the rocks, and we all got completely soaked from the mist! It was so worth it. If you go, be sure to bring waterproof shoes, a raincoat, and a change of clothes—you’ll thank me later.
Exploring the Other Waterfalls in the Park
While Fall Creek Falls is the star of the show, the park is home to several other waterfalls that are just as stunning and worth visiting.
• Cane Creek Falls – This waterfall is easily accessible and offers a beautiful view from an overlook. There’s also a suspension bridge nearby, which the kids loved crossing!
• Cane Creek Cascades – A short walk from the Nature Center, this cascade is a fun spot where the kids enjoyed splashing in the water. It’s a great place to take a break and let them explore.
• Piney Falls – A bit more off the beaten path, Piney Falls is another scenic waterfall with a dramatic drop. We enjoyed the peacefulness of this spot compared to the more popular areas of the park.
• Rockhouse Falls – Located near Cane Creek Falls, this one is a bit smaller but still beautiful, especially after a good rain.
If you have time, I highly recommend checking out as many waterfalls as possible—each one has its own unique beauty!
Exploring the Overlooks
Fall Creek Falls has some of the best scenic overlooks, and we made it a mission to visit them all. Each one offered a different perspective of the park’s stunning waterfalls, gorges, and forests. The kids loved peering over the railings and taking in the views, and it was a great way to see a lot without too much hiking.
A fun way to view waterfall overlooks is by accessing suspension bridges at Fall Creek Falls. Each one offers an exhilarating way to experience the park’s stunning landscapes. As you cross these swaying bridges, you’ll be treated to breathtaking views of lush forests and deep gorges, making it a perfect spot for nature lovers and adventure seekers alike. The bridges add a sense of thrill to your hike while providing a unique perspective of the cascading falls and the surrounding beauty. It’s a must-do for anyone visiting the area!
Horseback Riding Outside the Park
For a fun and unique experience, we also went horseback riding. The guided trail ride was a relaxing way to explore the area, and the kids were so excited to ride their own horses. It was a great mix of adventure and calm, and we all agreed it was one of the best parts of our trip.
Tips for Visiting Fall Creek Falls with Kids
Stay at the Lodge – The suite was perfect for families, and having a restaurant on-site made meals easy.
Bring extra clothes – If you’re hiking to the base of the falls, expect to get wet!
Plan for a mix of activities – Between hiking, scenic overlooks, waterfalls, and horseback riding, there’s something for everyone.
Check trail difficulty – Some hikes are short and easy, while others can be steep. Know what to expect before heading out with little ones.
Our trip to Fall Creek Falls was an amazing family adventure, and we can’t wait to go back! Have you visited with kids? Let me know your favorite part in the comments!
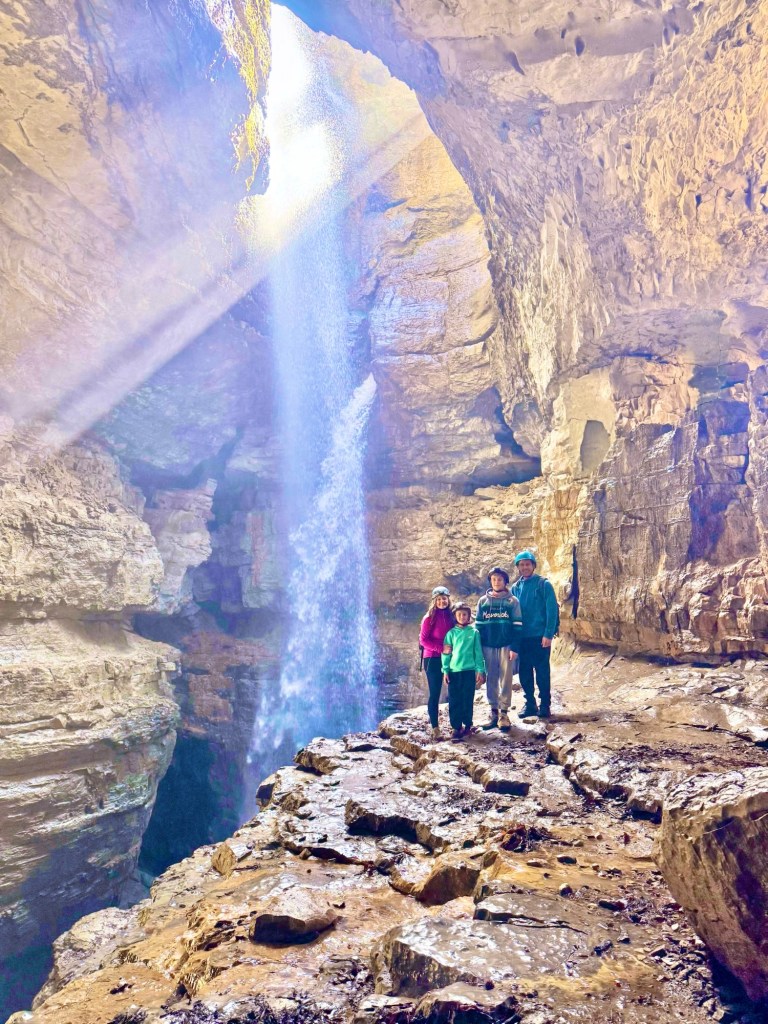
Nestled in the heart of Alabama, Stephens Gap Callahan Cave Preserve is a breathtaking destination for adventure seekers, photographers, and nature lovers alike. This stunning cave is known for its dramatic 143-foot pit, enchanting waterfalls, and awe-inspiring light beams that filter through the entrance, creating a surreal atmosphere. Whether you’re a seasoned caver or a casual hiker, this preserve offers a unique and unforgettable experience.
Getting There
Stephens Gap is located in Jackson County, Alabama, near the town of Woodville. To visit, you’ll need a permit, grab yours here. Because this is a protected area, visitor numbers are limited to help preserve its natural beauty.
The hike to the cave entrance is about 1.4 miles round trip and is rated as moderately difficult. While not overly strenuous, the trail can be rocky and muddy, so sturdy hiking boots are recommended.
What to Expect
Upon reaching Stephens Gap, visitors are greeted with two main entrances:
1. Walk-in Entrance: This leads to a spacious, sloping chamber where you can explore without technical caving gear. The most famous feature here is the rock pedestal, often used by photographers to capture stunning images of light beams shining through the cave’s opening.
2. Vertical Pit Entrance: This 143-foot drop is for experienced cavers with the proper gear and training in single-rope techniques. If you plan to rappel, you must bring your own equipment and know how to ascend safely.
Best Time to Visit
While the cave is open year-round, the best time to visit is early in the morning or late afternoon when the sun is at the right angle to create the famous light beams. Visiting after rainfall can also enhance the waterfalls inside the cave, adding another layer of beauty to the experience.
Safety and Conservation
Permits are required, and you must follow Leave No Trace principles.
You must wear sturdy boots and helmets are required.
No guided tours are available, so come prepared with proper hiking or caving knowledge.
Do not attempt the rappel unless properly trained—rescues are difficult and dangerous.
Be mindful of slippery rocks and fragile cave formations to help preserve the cave for future visitors.
Final Thoughts
Stephens Gap Callahan Cave Preserve is one of Alabama’s most remarkable natural wonders. Whether you’re standing on the iconic rock pedestal, marveling at the light beams, or descending into the abyss with a rope, this destination offers a true adventure. If you love exploring hidden gems, make sure to add this cave to your bucket list!
Have you visited Stephens Gap? Share your experience in the comments!
Waterfall hikes are by far my favorite. When we planned our drive to Crested Butte, I was thrilled to discover Zapata Falls! I knew right away that this was the perfect hike to cap off the year. Keep reading to discover more about this incredible winter hike to a stunning frozen waterfall!
This post contains affiliate links of products that we use and love! I may earn a small commission, at no charge to you, if you purchase any items using the links provided. Thank you!
Zapata Falls in winter is a breathtaking sight, where the cascading water freezes into intricate ice formations that glisten in the cold, mountain air. Surrounded by rugged cliffs and a serene landscape, the falls create a tranquil, almost otherworldly scene.
Getting There
Address: Zapata Falls is located off Highway 150, just a few miles from the Great Sand Dunes National Park entrance. It’s within the San Isabel National Forest.
Trailhead: The trailhead is marked, and you can drive to the Zapata Falls parking area. From there, the hike to the falls is about 1/4 mile (0.4 km) and is relatively short, but it involves some scrambling through rocky terrain and can be slippery in winter due to ice and snow.
The Hike – Distance: 0.8 miles | Time: 30 minutes | Level: Moderate
This hidden gem of a hike provides a stunning view of a 25-foot frozen waterfall nestled inside a cave. The hike to the falls is an easy, gravel trail that meanders through the trees. To reach the cave itself, you’ll need to trek on top of a chilly, frozen creek, and to see the waterfall, you will need to enter the cave.
Winter Hiking Conditions
Trail Difficulty: The short trail can be steep and potentially icy during winter, especially as you get closer to the waterfall. It’s important to wear sturdy, waterproof boots with good tread and consider investing in microspikes or crampons to improve traction on icy surfaces.
Ice and Snow: The falls themselves are often frozen in winter, creating a beautiful scene of cascading ice formations. However, the surrounding rocks, water, and trail can be slick, so proceed cautiously.
Cold Temperatures: Winter temperatures in the area can drop significantly, especially at higher elevations. Be sure to wear warm, layered clothing, and bring hats, gloves, and scarves.
Clothing and Gear
Dress in layers to regulate your body temperature and wear moisture-wicking fabrics. Be sure to pack warm gloves, hats, and a scarf or neck gaiter to protect against cold winds. Consider bringing trekking poles for added stability on slippery terrain. My heated jacket was the perfect outer layer for this hike!
If you plan to spend time near the falls, the mist and cold air can cause the surroundings to freeze, making it a beautiful, icy spectacle. Waterproof outer layers can keep you dry in these conditions.
The trail to Zapata Falls is typically accessible year-round, but in winter, there may be snow and ice, making the path slippery. Wear sturdy, waterproof boots with good traction and consider bringing traction devices like microspikes or crampons.
Safety Tips
Stay Safe Around Ice: Be cautious when walking near the frozen waterfall, as ice can be slippery. Keep a safe distance from the edge of any ice-covered areas.
Cell Service: There may be limited or no cell service in the area, so it’s a good idea to tell someone your plans and estimated return time.
First Aid Kit: Always carry a basic first aid kit, as the trail can be tricky, especially when icy.
Other Winter Activities Nearby
If you’re in the area for hiking, you might also want to explore other winter activities near Great Sand Dunes National Park, such as snowshoeing or sledding on the sand dunes, which create a surreal experience in winter.
Image credit: Great Sand Dunes National Park website
Overall, Zapata Falls in winter is a stunning and serene destination, with fewer crowds and a peaceful atmosphere. If you’re well-prepared and take necessary precautions, it can be a memorable winter hike!
As someone that’s always looking for the next trail to hike, I cannot believe that I didn’t make the trip to Palo Duro Canyon sooner! I was absolutely blown away that this State Park exists… in Texas! Here are 3 hikes you can’t miss in Palo Duro Canyon State Park.
Photo taken from inside the Big Cave
This post contains affiliate links of products that we use and love! I may earn a small commission, at no charge to you, if you purchase any of the items using the links provided. Thank you!
Park Information
Palo Duro Canyon is located in the Texas Panhandle.
Park Address: 11450 Park Road 5, Canyon, TX 79015.
Daily Fees: $8 per adult, children under 12 are free
Hours: 7 am – 9 pm
Park Map
Things to Know
Palo Duro Canyon is known as the “Grand Canyon of Texas!”
This canyon is the 2nd largest canyon in the US!
Palo Duro Canyon spans 120 miles and is 800 feet deep.
The best time to visit is spring and fall.
Summer visits can be dangerous because of the heat and high temps.
Make sure to bring more water than you think you’ll need during your hikes!
Palo Duro Canyon is a great place for a weekend getaway!
It only takes about 45 minutes to drive the loop through the Park.
You can stay nearby in the town of Canyon, TX.
My best friend and I visited Palo Duro Canyon in mid-February. We were pleasantly surprised with the weather and really enjoyed the hikes we were able to squeeze in during our weekend visit! Keep reading to learn more about the three hikes you can’t miss in Palo Duro Canyon!
Photo taken at the beginning of the Lighthouse Trail hike
The Hikes
The Lighthouse Trail – Distance: 5.9 miles | Time: 2.5 hours | Level: Moderate
This is the Lighthouse!
Our favorite hike was the Lighthouse Trail. This 6 mile hike is fairly easy until you get closer to the “Lighthouse” rock formation. At this point the hike gains slightly in elevation and you have to make a climb to get close to the Lighthouse.
Gorgeous landscape along the Lighthouse Trail
The Lighthouse Trail took us about two and a half hours to complete. I was very impressed with how well the entire trail was marked. And, my friend and I felt very safe the entire time we were hiking!
The stunning desert landscape and dramatic colors make for an excellent hike. These unique colors of Palo Duro Canyon represent different geologic time periods spanning 240 million years!
The Big Cave – Distance: short walk from parking spot | Time: 30 min. | Level: Easy
The Big Cave
Our second hike of the day was more of a short walk. We drove under two miles from the Lighthouse Trail parking lot to reach the Big Cave. You will see a sign for The Big Cave on the side of the road past the Juniper Campground.
I have a new love of exploring caves… especially on my own without a guide or a group! This cave is BIG and was so fun to explore at our own pace. Even better, it’s only a short walk from the parking spots near the trailhead.
I had so much fun exploring this short trail and the cave. If you have children with you, this hike is a must! They’ll love the cave and all the climbing around it!
The Caves Trail – Distance: 0.9 | Time: 30 min | Level: Easy
This is another really cool hike with several caves to explore at your own pace! I wish we would’ve spent more time here, but we were pretty tired after the other two hikes of the day.
The beginning of the Caves Trail
If I had it to do all over again, or if I had my boys with me, I would like to start the day on this trail. There is a small parking lot right at the trailhead, but unlike the hike on the Lighthouse Trail, this one is not very well marked.
I recommend bringing headlamps or a flashlight to go deeper into some of the caves. It was cloudy off and on during our visit and kind of dark at times. You may not need them, but I wished that I would’ve had mine on this hike!
Palo Duro CanyonHighlights
Well marked trails
I had excellent cell service in most areas of the Park
Stunning views and colors
The Park was easy to navigate
No crowds
The trails were scenic and not too hard
Hiking Essentials
These are some of my tried and true hiking essentials that I cannot trek without! I really do consider myself a minimalist when I hike, but I do feel like you need to be prepared for anything when you’re out in the wilderness. Here are the things I never hike without.
Hiking shoes – I’ve been wearing these instead of my tall hiking boots and love the comfort of them!
Hiking backpack – This backpack is the perfect size for me. My husband carries a larger one, but this one is great for a smaller amount of stuff.
Cell phone arm band – I like the ease of this phone case. I can easily grab my phone and put it up throughout the hike as needed.
Camera stand– I love capturing family photos, but I don’t like having to ask other people to take them. This is great for all kinds of traveling, not just hiking!
Headlamps– these are the ones I own and won’t hike these trails again without!
Where to Stay
If you’re planning a trip to Palo Duro Canyon, I recommend lodging in Canyon, TX which is only about 19 miles/33 minutes from the entrance of Palo Duro Canyon State Park. We stayed at the Holiday Inn Express & Suites. The room was clean and cozy and we enjoyed the free breakfast buffet in the morning!
The Hiker’s 365 Adventure!
On a final note, my best friend and I signed up for the Hiker’s 365 Adventure Challenge! We’ve set a goal to hike 365 miles in 365 days. Whether you’re a seasoned hiker or a beginner, this challenge offers the perfect opportunity to connect with nature one mile at a time! We’d love for you to join this community of hikers, too! If you’re interested, register today using my Hiker’s 365 Adventure referral link!
I’m so excited to share all the information you’ll need about Utah’sfamily-friendly ride and rappelslot canyon tour with Roam Outdoor.
We visited Utah over our spring break in March. Most of our trip was centered around hiking, so I really wanted to add in a unique experience for our boys, because hiking is not their favorite pastime! This adventure was epic for our boys ages 9 and 13. I recommend this option for families with younger kiddos or for anyone that has never rappelled before. We did four rappels, all while hiking through the stunning Ladder Canyon near Orderville, Utah.
Our adventure started at the Roam Outdoor business in Orderville, Utah at 10:00 am. First, we were fitted with all of our rappelling gear. Then, we were driven on an ATV by our fantastic guide, Bryson, to Ladder Canyon. From here, it was a short climb to begin our hike and rappel tour!
As you can see from the photos, it was an adventure every step of the way! But we always felt very safe and comfortable while riding, hiking, and rappelling!
To enter the slot canyon, we actually had to rappel down into it! We all felt well prepared to make the first rappel and it started off small at only 10 feet. We alternated between hiking though the slot canyon and rappelling down to the next section. And, we gradually increased the distance of each rappel as we went along, and finished with a 45 foot rappel!
We had a fantastic adventure “learning the ropes” as we hiked and explored Ladder Canyon! It was a little chilly, so we did need jackets and two layers of gloves. I suggest bringing along hand warmers and extra layers just in case the weather is colder than you’re used to.
Highlights
This was a family favorite and an unforgettable experience!
Our guide was so patient with our boys!
There are many photographic opportunities along the entire hike through Ladder Canyon.
Safety was the number one priority!
Once we finished rappelling, we were able to explore more of the canyon and then we enjoyed the ATV ride back to Roam Outdoors. Again, I was so impressed with our guide and his willingness to take our family photos and tell us the history of the canyon during our tour. It was a fantastic day and both of the boys agreed it was the best of adventure of the entire trip!
Have you heard of the Kanab Sand Caves, also known as Moqui Caves? This place is fascinating! I highly recommend checking it out if you’re ever near Kanab in Southern Utah. You don’t need a lot of time here and the hike is pretty easy!
What are Sand Caves?
The Kanab Sand Caves are mad-made caves that were once used for sand mining. This process was short lived, and now these caves are a little hidden gem for hikers and tourists to explore!
Getting There
This is such a unique place, right off the main highway that leads to Bryce Canyon or Zion National Park, just five miles outside of Kanab! We parked right off Highway 89 in a large, marked parking lot for the Sand Caves. You can’t miss it!
The hike to the caves was very simple. Once you park, you’ll follow a sandy path that takes you under the caves.
Keep following the path and you should see a hill that you can begin walking up. It looks steep, but as long as you keep going, it will be easy to maneuver. When you get to the top, the trail flattens out and you can continue the walk to the caves.
Once inside, we realized that the caves were a lot bigger than we had expected! We explored as deep as we could go, took in the views, and had a small photoshoot. It was a super fun adventure close to the town of Kanab, which is where we were staying.
Highlights
This hike was very short and easy! You only need an hour or so to enjoy the caves.
It’s FREE to park and take the hike!
It was not too crowded at all inside the caves.
The views were amazing!
Things to Know
Location: US-89, Kanab, UT 84741. You’ll see a sign for Best Friends Animal Sanctuary and the parking lot is nearby!
There is a semi-steep climb up to the caves and back down. For us, it was easy, but we did notice some people struggling on the way down.
Always bring water & snacks when hiking.
Keep close watch of your kids, the caves are open to steep ledges and drop-offs.
The final day of our spring break trip to Southern Utah was a fun one! This was our first visit to the area, so we wanted to pack in as much as we could during our week in Kanab. We visited Bryce Canyon National Park, Zion National Park, and hiked the Toadstool Hoodoos! But, hiking Peek-A-Boo Slot Canyon was the highlight of our trip!
What is a Slot Canyon?
A slot canyon is a narrow, deep canyon with steep, vertical walls formed by the erosive power of flowing water. These canyons are typically formed in regions with soft sedimentary rock, such as sandstone or limestone, where water has carved intricate channels over thousands or millions of years.
As unique as slot canyons are, they can also be dangerous during rainstorms or flash floods, because water can rapidly fill the narrow canyon walls, posing a significant risk to anyone caught inside.
Getting There
First, a high clearance four wheel drive vehicle is extremely necessary. I drive a 4WD Expedition and it would not have made the drive to the canyon. Luckily we had borrowed my mom’s Jeep for this trip and had no trouble off-roading the 3+ miles to the slot canyon. The trail is easy and fun, the sand is just very deep!
To find Peek-A-Boo Slot Canyon from Kanab, follow Highway 89 North out of Kanab for about nine miles. You will see a sign for Peek-A-Boo and a parking lot area on the right hand side of the road. Turn into the parking lot and then immediately turn left. This will take you onto BLM Route 102. Follow this until you reach the wash (almost like a dry riverbed). Here, turn left and follow the wash, this will be on BLM Route 106H and it will lead you straight to the slot canyon.
From the parking area, you’ll embark on a short hike to reach the entrance of the slot canyon. Once inside, you’ll be greeted by towering walls of red rock that rise dramatically on either side of you.
This easy hike involves navigating through narrow passages, twisting turns, and occasional obstacles such as boulders or small drop-offs.
Highlights
This is a very easy hike!
The views are incredible and change with each turn!
Off-roading to the trailhead is super fun!
We had the entire trail to ourselves!
It’s free and requires no guide or reservation!
Things to Know
Get familiar with the drive to Peek-A-Boo before you begin your adventure.
Download a map, cell service & GPS do not work well on this trail.
Check the weather before you visit any slot canyon. Even a small amount of rain can cause flash flooding, which can be extremely dangerous for hikers.
Take water and snacks on any trail you hike.
Bring your camera! Even an amateur like me will get great shots along the trail.
We finally got to explore Zion National Park and man, we were blown away! The views just driving through were like nothing we’d ever seen before. Keep reading to learn all about how to spend a day in Zion National Park with Kids!
Zion National Park Information
Address: 1 Zion Park Blvd., Springdale, UT 84767
Phone: 435-772-3256
Fees: $35 per vehicle
Hours: Open year round, 24 hours a day
Shuttle Service: Website (shuttle service is mandatory for certain areas of the Park)
This was our first trip to the area, so we wanted to pack in as much as we could during our spring break in Utah. We stayed in Kanab and visited Bryce Canyon National Park, Zion National Park, explored slot canyons, hiked the Toadstool Hoodoos, and more! We only dedicated one day to Zion National Park, and while we had a great visit, we could’ve spent the entire week just at this Park!
Hiking
Full disclosure, it was pretty crowded during our visit over spring break. Because of the crowds, it was hard to find parking and the shuttle lines were insane. We opted to hike two trails in East Zion that did not require the shuttle, and we highly recommend both!
Zion Canyon Overlook Trail – Distance: 0.9 miles | Time: 30-45 minutes | Level: Easy
If you only have a day in the Park, you don’t want to miss this easy hike. The overlook is truly impressive and the entire trail has views for day, just check out the photos below!
Lower Pine Creek Waterfall Trail – Distance: 0.7 miles | Time: 1 hour | Level: Moderate
The second trail we hiked was by happenstance when a spot opened up in the parking lot as we were driving by. I’m so glad we decided to stop here, we ended up having the entire trail to ourselves! And the best part, this hike ended at a gorgeous waterfall!
We really enjoyed the rock scramble to get to the falls! If you have kiddos, they will really love the adventure that this trail provides!
Driving
If you’re unable to hike, you can still see many impressive views just driving through! Just be mindful that from March through November, it is mandatory to take the free shuttle on the Zion Canyon Scenic Drive!
When to Visit
April through November is considered the best time to visit Zion National Park. The fall months provide the best weather for hiking and the crowds begin to thin. Summer is usually the most popular time to visit, so expect crowds and longer wait times for parking and shuttle lines. We visited in March and the weather was very pleasant, but it was already very crowded!
Things to Know
Arrive early to ensure you find parking and have enough time for your adventures!
Be aware of the permits and mandatory shuttle services for certain areas of the Park.
Bring plenty of food, snacks, and water if you’re hiking.
Be cautious of the ledges and steep drop offs on some of the trails.
Overall, we had a wonderful day in Zion National Park! In fact, this was my husband’s favorite experience of our entire Utah trip. My only regret is not planning more time in this Park! Whether you go the day or for a week, I’m sure you’ll have a memorable visit!
Every Kid Outdoors Pass
The teacher in me is so excited to share about this amazing opportunity for elementary students in fourth grade! Did you know that with an Every Kid Outdoors Pass, fourth grade students can get into any National Park in the United State for FREE? And really, every person in the whole entire passenger vehicle gets in free, too!
My fourth grader was so eager to get his pass! We completed the information online and printed the confirmation page. Once we visited our first National Park with the printout, my fourth grader was given his very own National Park Pass! These passes are good from September 1st – August 31st! So, be sure to share this information with anyone that has an elementary student! Using my son’s pass we were able to visit Bryce Canyon National Park and Zion National Park for free during our spring break trip!
One of my new favorite National Parks is Bryce Canyon National Park! I cannot wait to tell you about the hikes we chose and share photos of the stunning hoodoos and landscape. Keep reading to learn how to spend a day in Bryce Canyon with kids!
This was our first trip to the area, so we wanted to pack in as much as we could during our week long trip to Southern Utah. We stayed in Kanab and visited Bryce Canyon National Park, Zion National Park, explored slot canyons, hiked the Toadstool Hoodoos, and more! It’s a great place to base from. Even though we only had a day at Bryce Canyon National Park, we feel like it was the perfect amount of time for our family!
One Day Itinerary
Visitor Center / Jr. Ranger Program
Drive to Bryce Canyon from Kanab, UT (1.5 hours)
Sunset Point Overlook
Hike Navajo Loop Trail
Visitor Center / receive Jr. Ranger badge
Hike Mossy Cave Trail
Drive Back to Kanab, UT (1.5 hours)
Visitor Center / Jr. Ranger Program
We always like to stop by the Visitor Center when visiting National or State Parks! Most are similar to a small museum with artifacts and Park information. Plus, my youngest son really likes to participate in the Jr. Ranger Program. We grab the booklet to work on throughout our visit and then stop back by to turn it in when it’s complete so that he can swear in and get his Jr. Ranger badge!
Sunset Point Overlook
Our first glimpse of the magic of Bryce Canyon, was at the Sunset Point Overlook. You can’t miss this one, especially if hiking isn’t your thing! If you do plan to hike, many of the trailheads can be found near Sunset Point, so it’s a great place to park your vehicle!
The Hikes
Now, on to the good stuff…hiking! Based on the trails that were open and hiking with kids ages 13 and 9, we decided to hike the Navajo Loop Trail and Mossy Cave (which is outside of the Park).
The Navajo Loop Trail is the most popular trail in Bryce Canyon National Park! It truly is amazing walking in between huge hoodoos! To find this trail, head to the parking lot area at Sunset Point. You’ll see the trailhead near the overlook area.
This trail can be moderately challenging when hiking back up to Sunset Point. For us, the entire trail was a little tough because of the wet conditions. It was very muddy, which made the hike down a little tricky in spots! The views are amazing, so don’t let a little mud discourage you from making the trek.
Be sure to check the weather before you go. If it has rained or snowed in the days before your trip, I suggest wearing hiking boots and bringing along spikes for mud or ice!!
After finishing the Navajo Loop Trail, we drove about ten minutes to the Mossy Cave Trail. This is a short hike with a small waterfall, rock formations with “windows,” and a cave at the end. The waterfall was more of a trickle when we visited, but we still enjoyed the trail!
Even though this trail is part of Bryce Canyon, it was not as muddy or as crowded as the Navajo Loop Trail within the park. I’ve heard it’s fun to see this waterfall in the winter, because it freezes and you can walk behind it! We really like hiking to caves, but I was a little disappointed that the cave is blocked off by a fence, so you can’t actually explore inside it. But, it was still a fun hike and the views were awesome!
We packed in a lot of time hiking during our one day visit to Bryce Canyon National Park! I know that we didn’t see everything that this amazing Park has to offer, but we really enjoyed our day and the trails that we chose to hike!
Highlights
Bryce Canyon has the largest concentration of hoodoos found anywhere on Earth! What exactly are hoodoos? Well, they are unique, thin spires of rock formed by weathering and erosion that can be caused by wind, ice and rain.
This Park is open and amazing year-round!
The crowds were much smaller than the crowds at Zion National Park!
There are no mandatory reservations, permits, or shuttle rides required.
There are scenic overlooks and viewpoints if you do not enjoy hiking.
It’s a great place for a day trip!
When to Visit
October through May is an ideal time to visit! The crowds are smaller and the temperatures are cooler. Summer is the most popular time to visit, with more crowds and higher temps. Winter is gorgeous with deep blankets of snow! We visited in March and there was still a lot of snow. It was an unexpected surprise, especially since we came from Texas and don’t usually get to see that!
Things to Know
Arrive early to ensure you find a parking spot at the trailhead or overlook area!
Bring plenty of food, snacks, and water if you’re hiking.
Be cautious of the ledges and steep drop offs on some of the trails.
The teacher in me is so excited to share about this amazing opportunity for elementary students in fourth grade! Did you know that with an Every Kid Outdoors Pass, fourth grade students can get into any National Park in the United State for FREE? And really, every person in the whole entire passenger vehicle gets in free, too!
My fourth grader was so eager to get his pass! We completed the information online and printed the confirmation page. Once we visited our first National Park with the printout, my fourth grader was given his very own National Park Pass! These passes are good from September 1st – August 31st! So, be sure to share this information with anyone that has an elementary student! Using my son’s pass we were able to visit Bryce Canyon National Park and Zion National Park for free during our spring break trip!