Sometimes you don’t need a week off to experience an amazing adventure. Within just a few hours of Dallas, you’ll find waterfalls, canyons, beaches, caves, mountains, and even wild bison roaming free.
Whether you’re planning a family getaway, couples trip, or friends’ weekend, these seven destinations are close enough for a Friday afternoon departure and packed with unforgettable experiences.
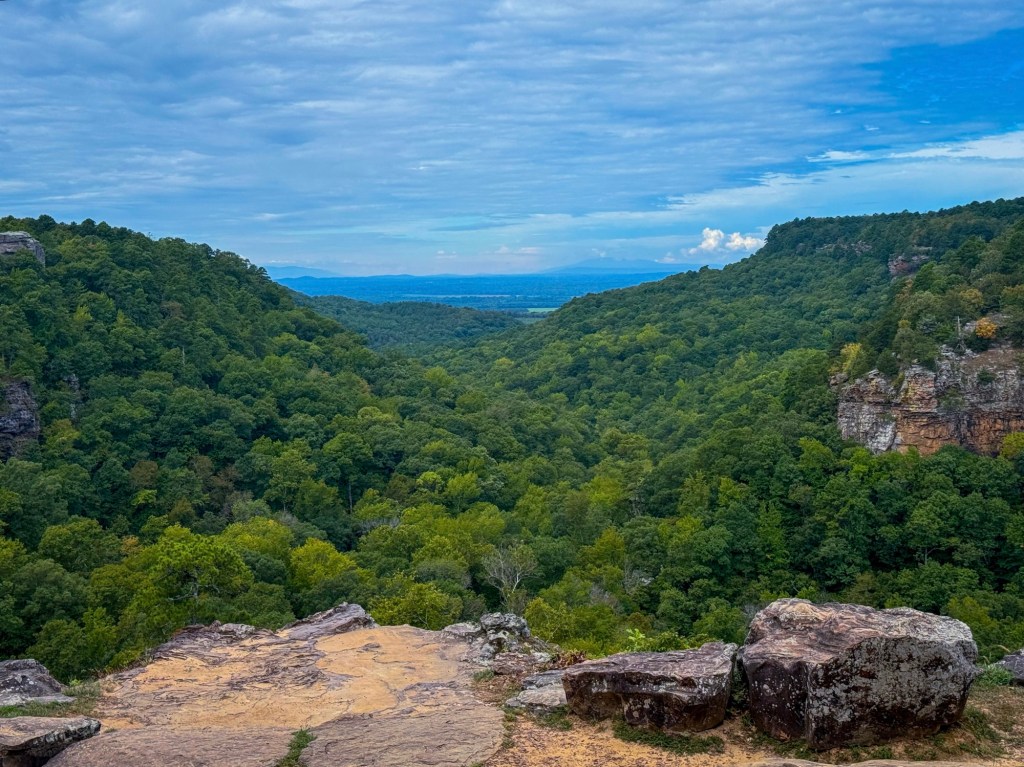
One of the most underrated destinations near Dallas, Wichita Mountains offers granite mountains, free-roaming bison, Texas longhorns, prairie dogs, crystal-clear lakes, and incredible hiking.
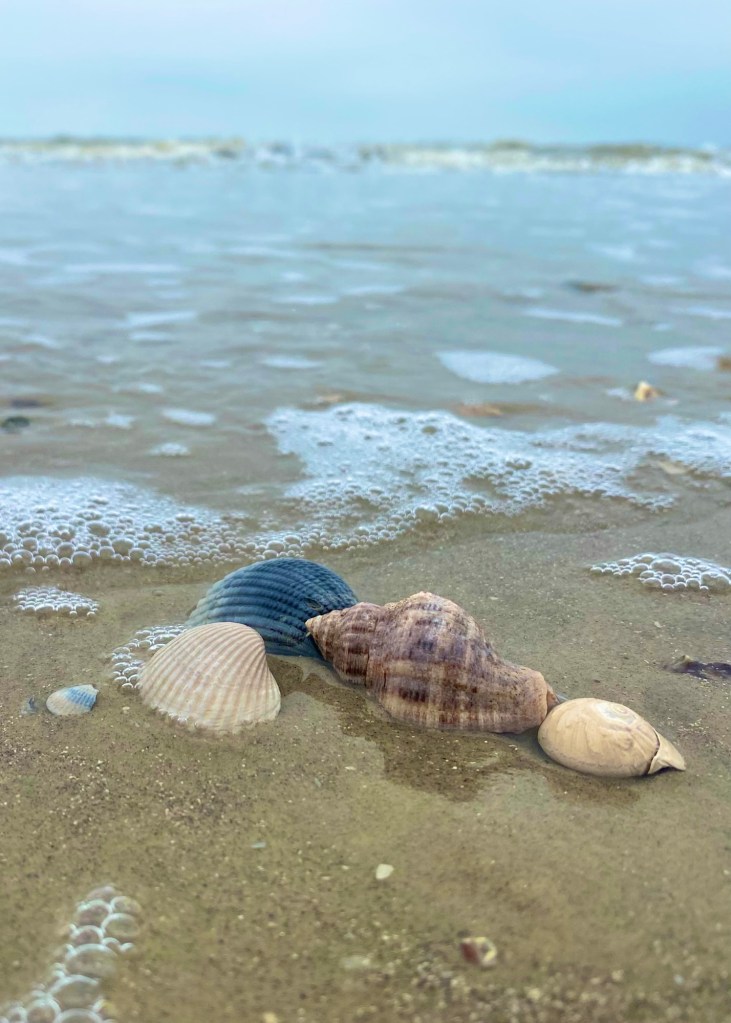
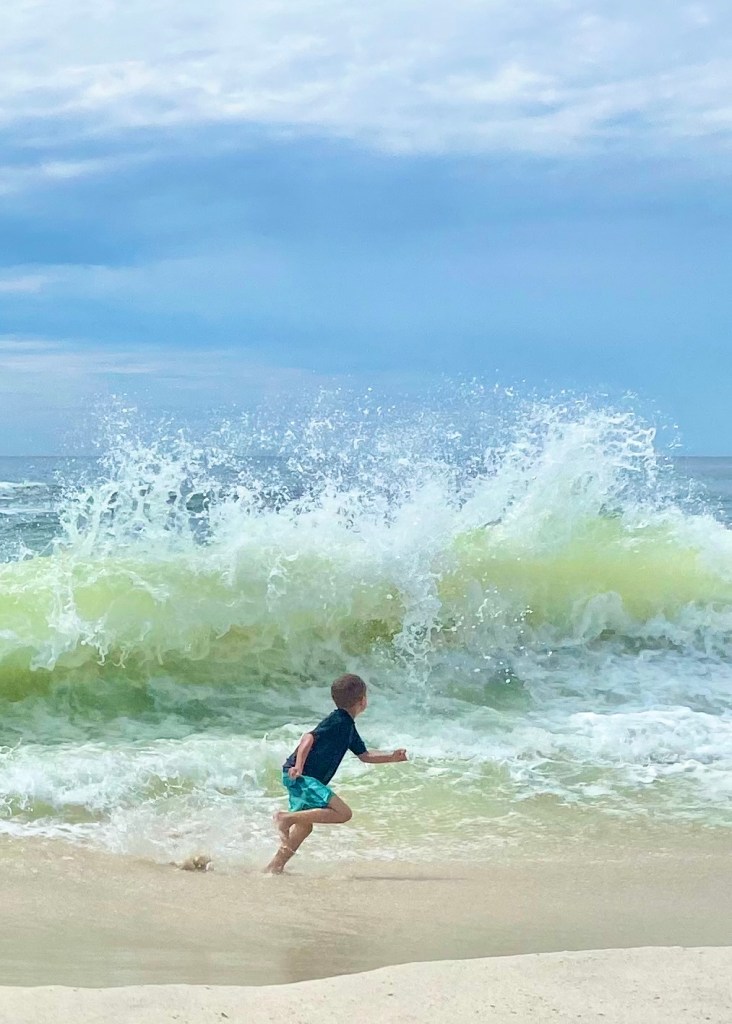
Need a beach escape? Galveston offers sandy beaches, historic charm, fresh seafood, amusement rides, and plenty of family-friendly fun.
Don’t Miss
Stewart Beach
East Beach
Moody Gardens
Pleasure Pier
The Strand Historic District
Galveston Island Historic Pleasure Pier
Dolphin tours
Sunset at Seawall Boulevard
Best Places to Stay
Grand Galvez
San Luis Resort
Holiday Inn Resort Galveston
Great Places to Eat
Gaido’s Seafood Restaurant
Shark Shack Beach Bar & Grill
Katie’s Seafood House
Tips for Planning Your Weekend Road Trip
Leave Dallas Friday afternoon to maximize your weekend.
Book lodging early during spring, summer, and fall weekends.
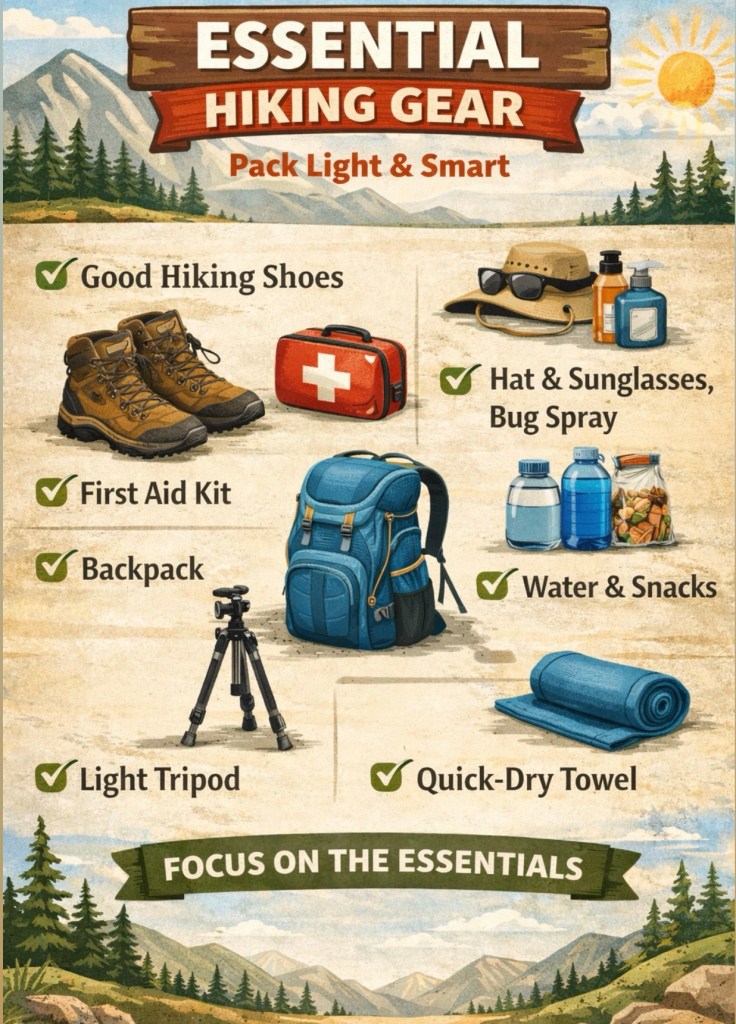
Pack hiking shoes, sunscreen, bug spray, and plenty of water.
Download offline maps before entering state parks.
Check park websites before you go for trail conditions and entrance fees.
Arrive early at popular parks for the best parking and cooler temperatures.
Which Trip Should You Choose?
🌊 Best Beach: Galveston Island
🏜️ Best Scenic Views: Palo Duro Canyon
🦬 Best Wildlife: Wichita Mountains Wildlife Refuge
💦 Best Waterfall: Natural Falls State Park
🕳️ Most Unique Adventure: Alabaster Caverns
🥾 Best Hiking: Petit Jean State Park
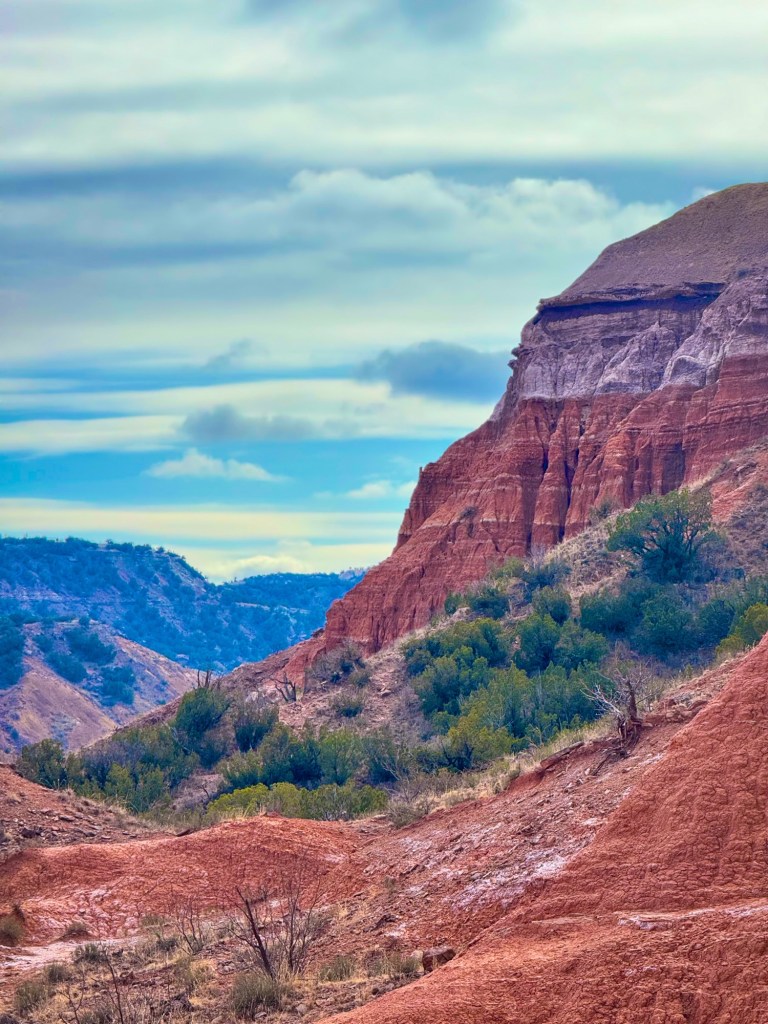
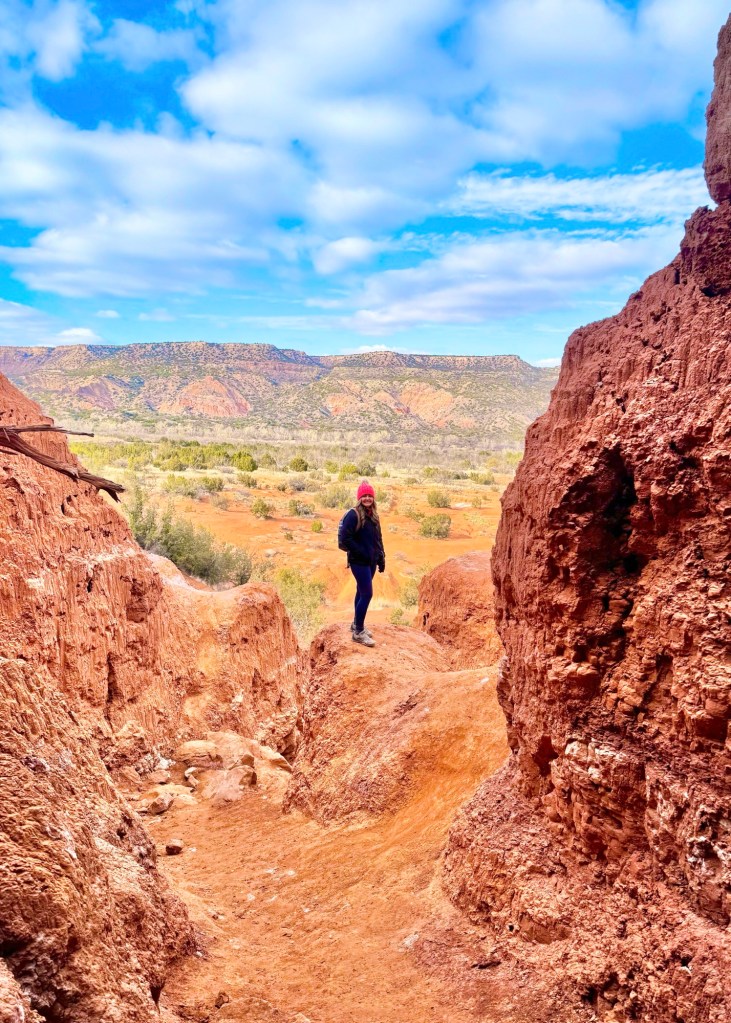
📸 Most Underrated: Caprock Canyons State Park
Final Thoughts
Living in Texas means you’re surrounded by incredible weekend adventures—you just have to know where to look. Whether you’re chasing waterfalls, hiking through canyons, spotting bison, exploring caves, or relaxing on the beach, every one of these destinations is close enough to enjoy without taking a full week off.
So fill up the gas tank, grab your favorite travel buddy, and start checking these bucket-list road trips off your list.
Which destination are you visiting first? Let me know in the comments!
Summer is the perfect time to hit the road, and one of the best things about living in Dallas is that some of the country’s most incredible destinations are within driving distance.
Over the years, my family has road-tripped to destinations all across the country, and these are the places that truly stand out. The ones that made us say, “That drive was absolutely worth it.”
In this guide, you’ll find:
✔ Drive times from Dallas
✔ Best time to visit
✔ Where to stay
✔ Top attractions and activities
✔ Entrance fees and park information
✔ Family-friendly planning tips
✔ Suggested trip lengths
✔ Nearby stops worth adding to your itinerary
Whether you’re planning a long weekend getaway, a week-long family vacation, or simply looking for inspiration for your next adventure, these destinations offer some of the best summer road trips from Dallas.
Quick Comparison Guide
Destination
Drive Time
Best For
Ideal Trip Length
Zion National Park, Utah
17-18 Hours
National Park Adventure
4-5 Days
Fall Creek Falls, Tennessee
11-12 Hours
Waterfalls & Family Fun
3-4 Days
Rocky Mountain National Park, Colorado
13-14 Hours
Mountains & Wildlife
4-5 Days
Gulf Shores, Alabama
10-11 Hours
Beach Vacation
4-7 Days
Alabaster Caverns, Oklahoma
5-6 Hours
Unique Weekend Getaway
2 Days
Wichita Mountains, Oklahoma
3 Hours
Quick Nature Escape
Weekend
Ouray, Colorado
14-15 Hours
Scenic Mountain Town
4-5 Days
Before You Go
A few quick tips before planning your summer road trip:
Book lodging early. Summer is peak travel season for nearly every destination on this list.
Download offline maps. Cell service can be limited in national parks and mountain areas.
Start outdoor activities early. Summer temperatures can be extreme, especially in Utah and Oklahoma.
Build flexibility into your itinerary. Weather, road construction, and wildlife sightings can all impact travel plans.
Don’t try to do everything. One of the biggest mistakes travelers make is cramming too much into a single trip. Leave room to slow down and enjoy the destination.
Now let’s dive into the 7 bucket list summer road trips from Dallas that are truly worth the drive.
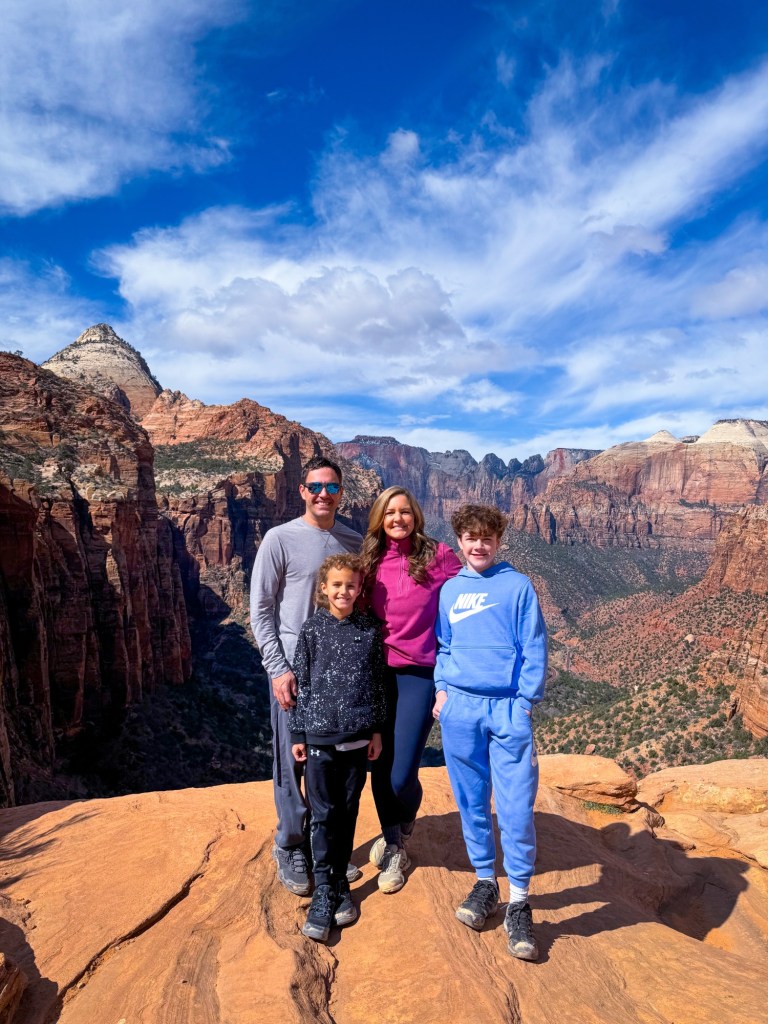
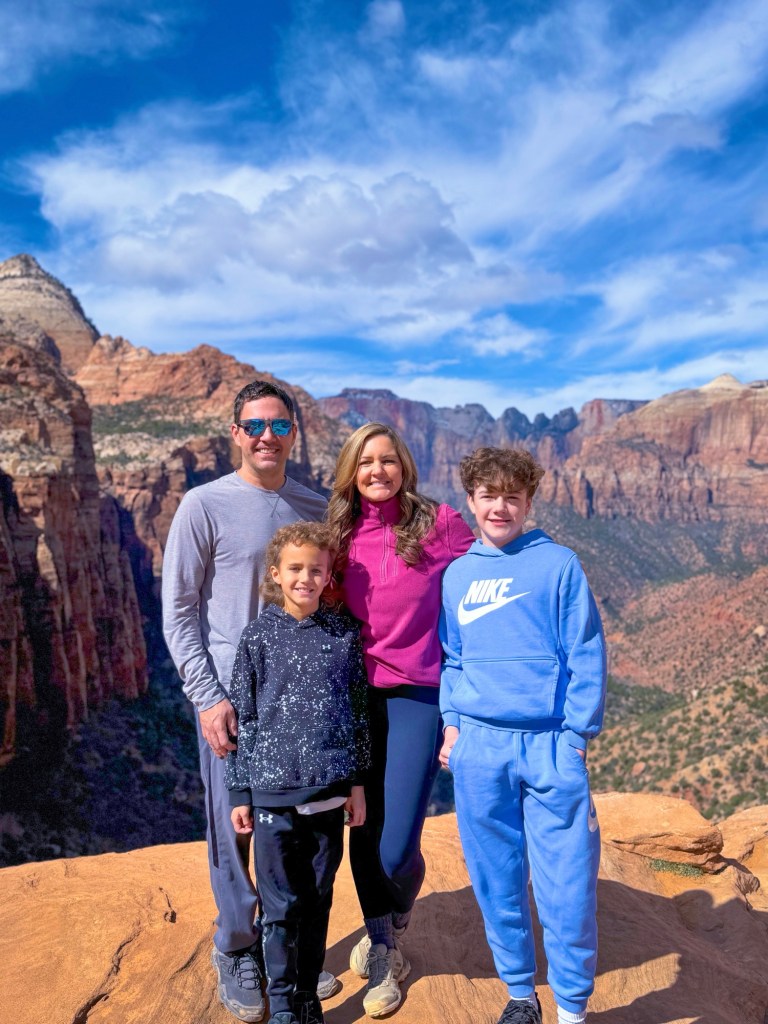
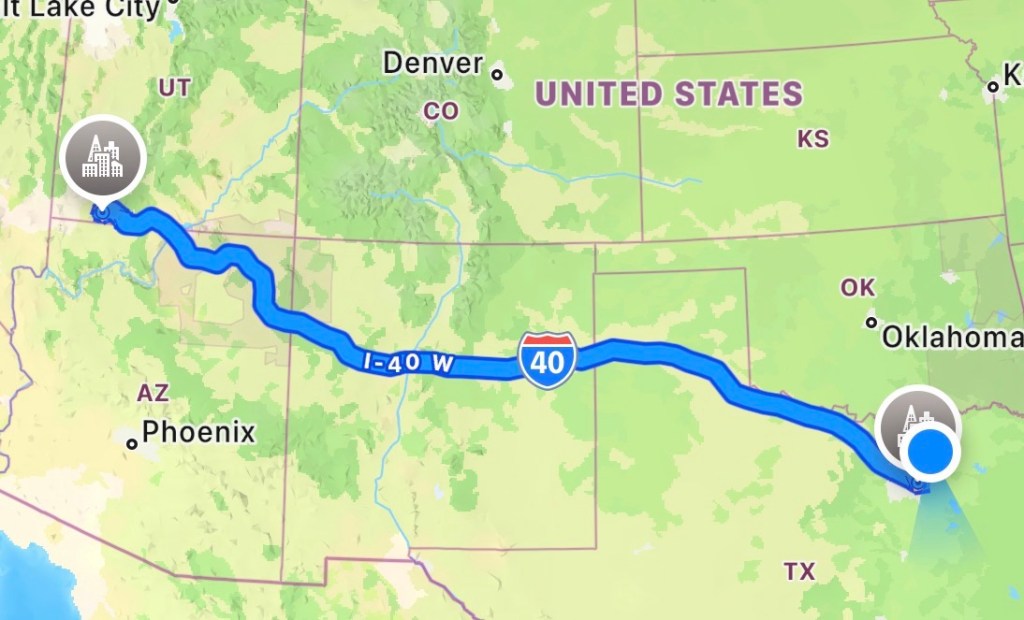
Zion National Park: The Ultimate Summer National Park Road Trip from Dallas
Drive Time from Dallas: Approximately 18-19 hours
Recommended Trip Length: 4-5 Days
Best Time to Visit: Late spring through fall (May-October)
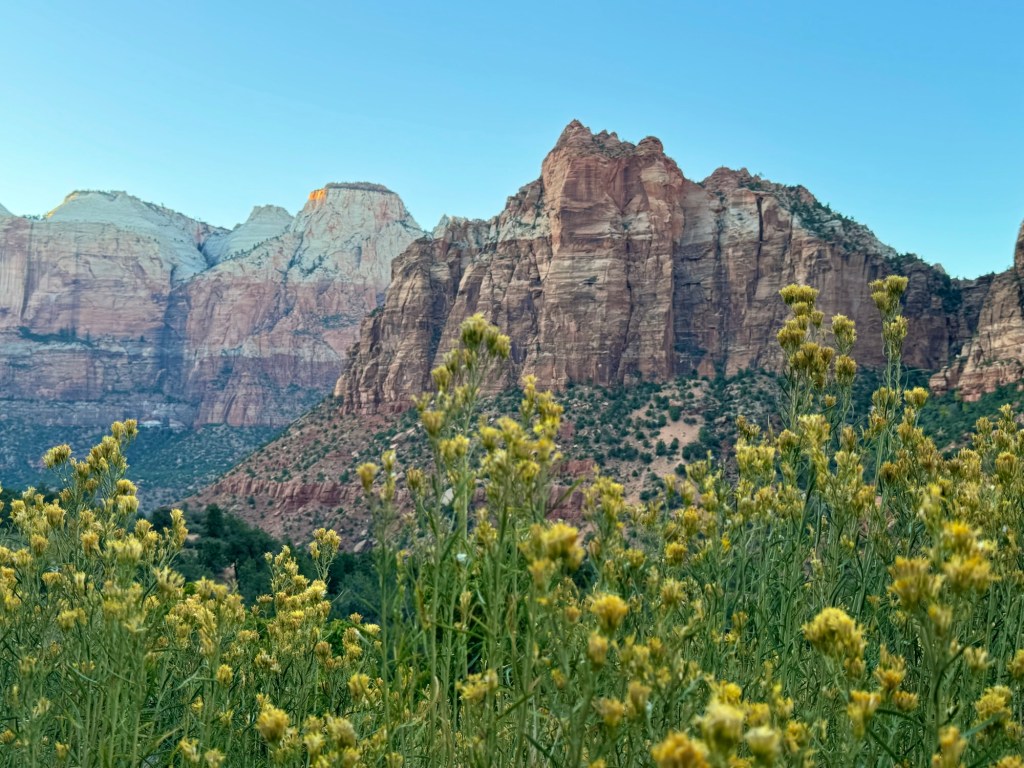
If you’ve been dreaming about visiting one of America’s most iconic national parks, Zion National Park deserves a spot at the top of your bucket list.
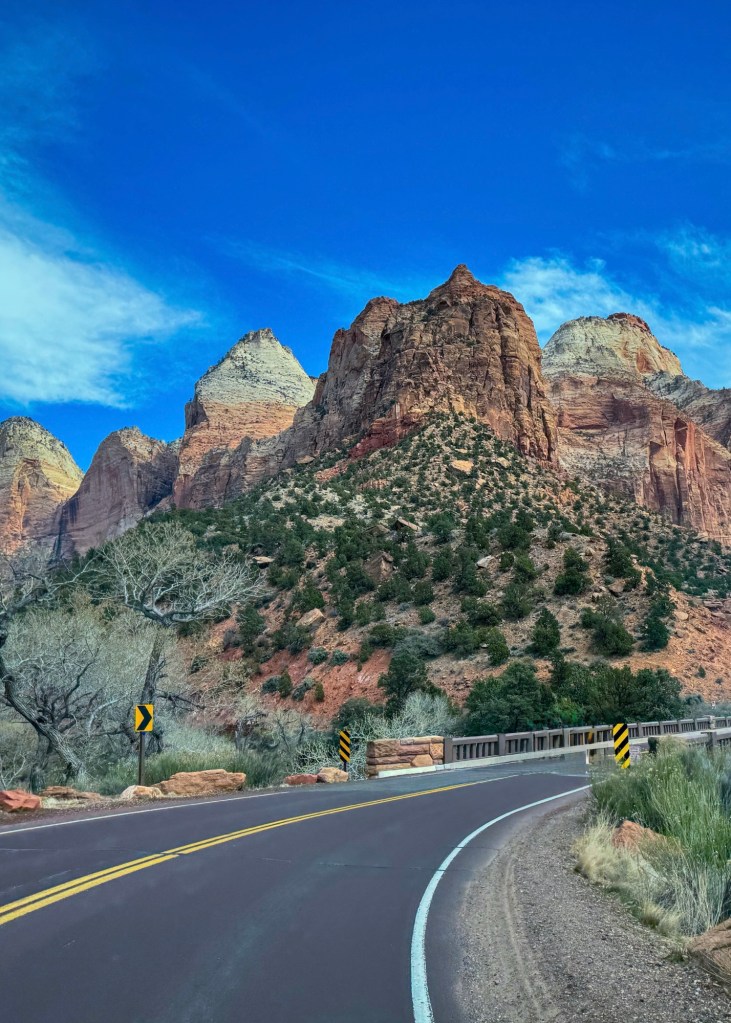
Located in southwestern Utah, Zion is famous for its towering red cliffs, dramatic canyons, emerald pools, and unforgettable hikes. While the drive from Dallas is definitely a commitment, the scenery waiting at the end makes every mile worth it.
Why Zion Is Worth the Drive
The first time you enter Zion Canyon, it’s hard to describe just how massive everything feels.
The sandstone cliffs rise thousands of feet above the valley floor, creating a landscape that looks almost unreal. Unlike some national parks where the best views require long hikes, Zion’s scenery begins the moment you drive into the park.
Families can enjoy easy scenic walks and shuttle rides, while more adventurous travelers can tackle bucket-list hikes like Angels Landing and The Narrows.
If you’re looking for a national park that delivers jaw-dropping views at every turn, Zion is hard to beat.
Summer visitors should also check the park website before arriving for current shuttle schedules, trail closures, and weather conditions.
Best Things To Do in Zion National Park
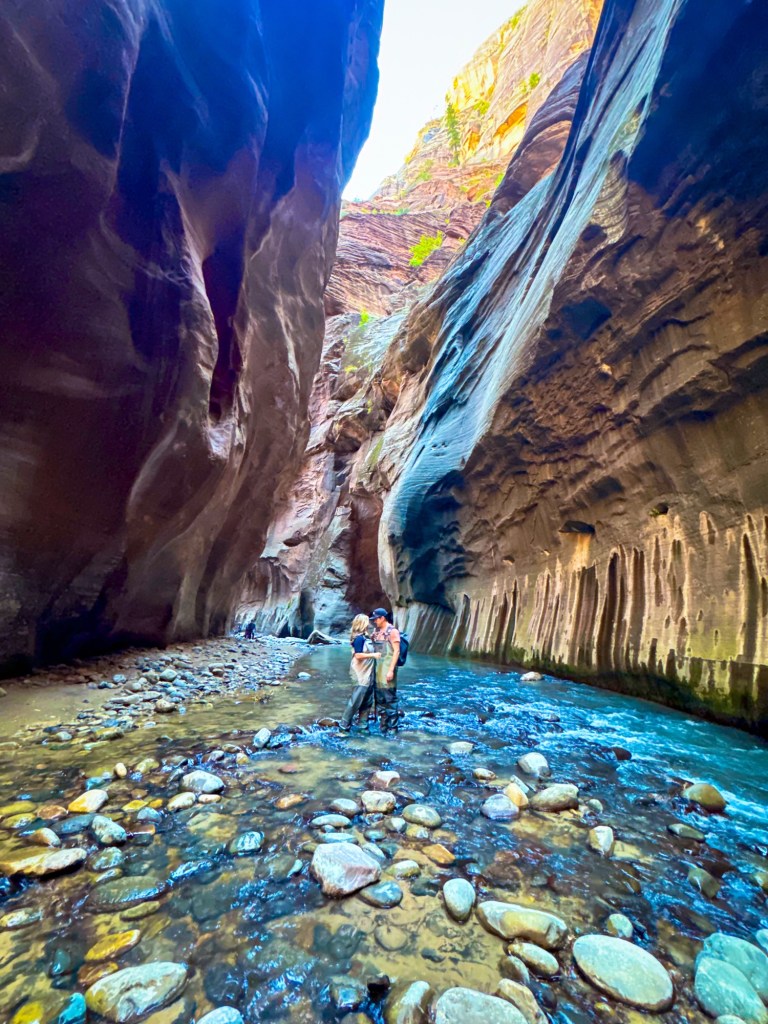
Hike The Narrows
The Narrows is easily Zion’s most famous hike.
Instead of walking on a trail, you’ll actually hike through the Virgin River between towering canyon walls that can reach over 1,000 feet high.
Most visitors complete the Bottom-Up route, which does not require a permit.
Road Trip Queen Tip: Rent water shoes and a walking stick in Springdale if you plan to hike The Narrows.
Explore Emerald Pools
This family-friendly trail system leads visitors to a series of beautiful pools and waterfalls.
Depending on trail conditions, you can choose between Lower, Middle, and Upper Emerald Pools.
This is one of the best hikes for families visiting Zion.
Ride the Zion Shuttle
One of the easiest ways to experience Zion is simply by riding the shuttle through Zion Canyon.
The shuttle stops at the park’s most popular viewpoints and trailheads, allowing visitors to hop on and off throughout the day.
Canyon Overlook Trail
Short on time?
Canyon Overlook Trail provides one of the best views in the entire park for relatively little effort.
The trail is short but delivers a spectacular payoff.
Watch Sunset at Canyon Junction
Bring a chair or blanket and enjoy one of the most beautiful evenings you’ll find anywhere in the Southwest.
Where To Stay Near Zion
Budget-Friendly
Hurricane, Utah: Typically offers the lowest hotel prices near Zion.
La Verkin, Utah: A great option for families wanting to save money while remaining close to the park.
Mid-Range
Springdale, Utah: The closest town to Zion’s entrance. You’ll find restaurants, shops, hotels, and shuttle access.
Unique Stay
Zion Ponderosa Ranch Resort: Located on the east side of Zion and offers cabins, glamping, and family-friendly activities.
Where To Eat
Some visitor favorites include:
Oscar’s Cafe
Zion Canyon Brew Pub
Bit & Spur Restaurant
Deep Creek Coffee Company
Suggested 4-Day Zion Itinerary
Day 1
Arrive in Springdale
Explore town
Watch sunset at Canyon Junction
Day 2
Ride the shuttle
Hike Emerald Pools
Visit Riverside Walk
Day 3
Hike The Narrows
Relax and explore Springdale
Day 4
Canyon Overlook Trail
Scenic drive through the east side of the park
Begin journey home
Family Travel Tips
Start hiking before 8 a.m. during summer.
Bring significantly more water than you think you’ll need.
Temperatures often exceed 100°F in July and August.
Wear sun protection at all times.
Download maps before entering the park.
Book lodging months in advance if traveling during peak summer season.
Estimated Budget
Family of Four (4-5 Nights)
Lodging: $150-$400 per night
Food: $75-$175 per day
Park Entrance: $35 per vehicle
Narrows Gear Rental (Optional): $25-$40 per person
Gas: $300-$500 roundtrip from Dallas (depending on vehicle)
Estimated Total: $1,500-$3,500+
Budget-conscious travelers can lower costs by staying in Hurricane or La Verkin, packing lunches for park days, and taking advantage of free activities throughout Zion
Don’t Miss This
If you only have time for one experience in Zion, make it The Narrows.
Walking through the river between towering canyon walls is unlike anything else in the United States and remains one of the most memorable national park experiences I’ve ever had.
Nearby Bonus Stops
If you have extra time, consider adding:
Bryce Canyon National Park
Kanarra Falls
Coral Pink Sand Dunes State Park
Horseshoe Bend
These destinations pair perfectly with a Zion road trip and can easily turn your vacation into an unforgettable Southwest adventure.
Final Thoughts
What I love most about Zion is that there’s something for everyone. Families can enjoy scenic overlooks and easy walks, adventurous travelers can tackle bucket-list hikes like The Narrows, and photographers will find incredible views around every corner.
If you’re looking for a summer road trip that feels like a once-in-a-lifetime adventure, Zion is worth every mile from Dallas. Don’t be surprised if you leave already planning your next visit.
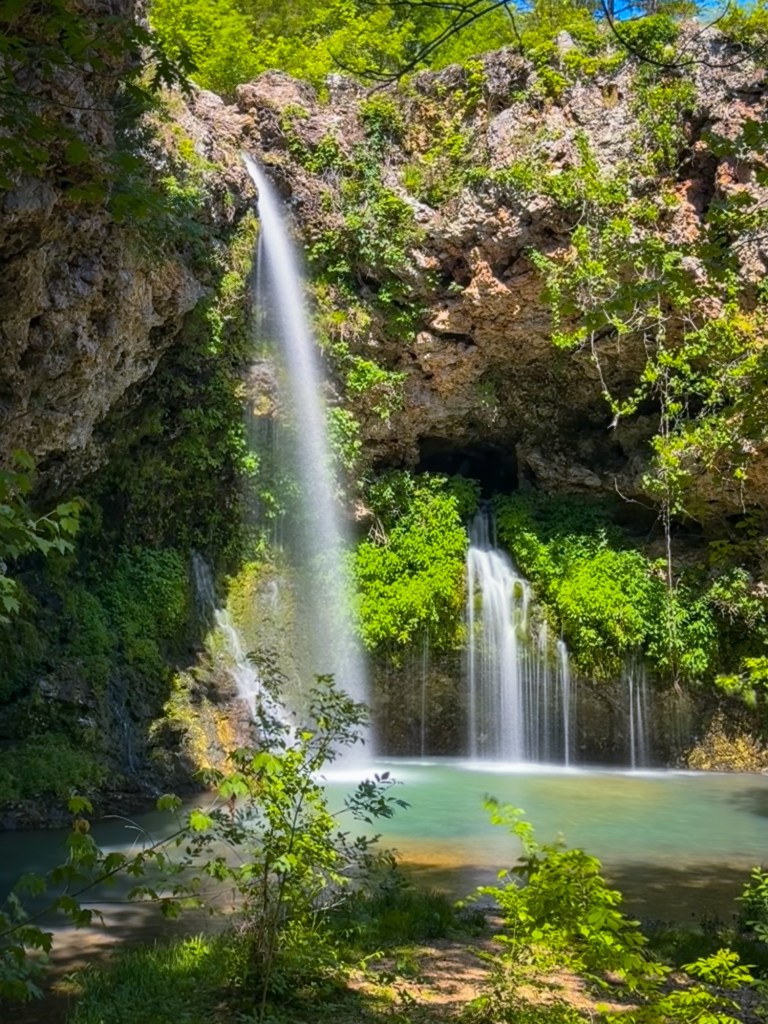
Fall Creek Falls State Park, Tennessee
Drive Time from Dallas: Approximately 11-12 hours
Recommended Trip Length: 3-4 Days
Best Time to Visit: Spring through Fall (April-October)
Best For: Waterfalls, family-friendly hiking, scenic overlooks, outdoor adventures, and a relaxing state park getaway
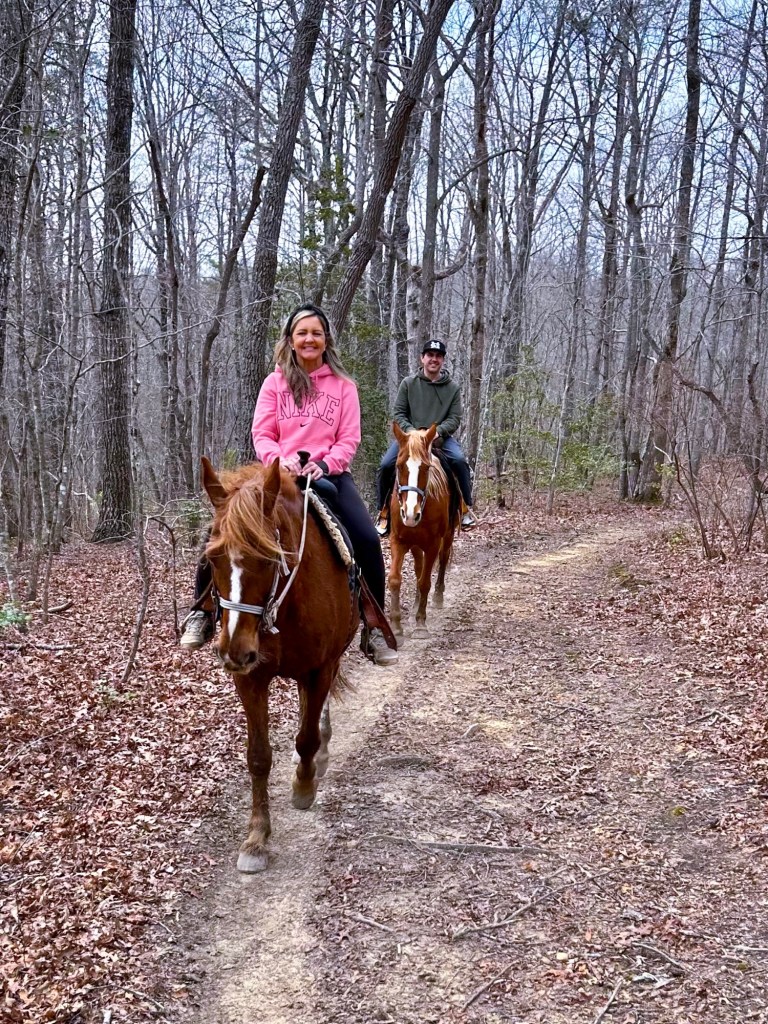
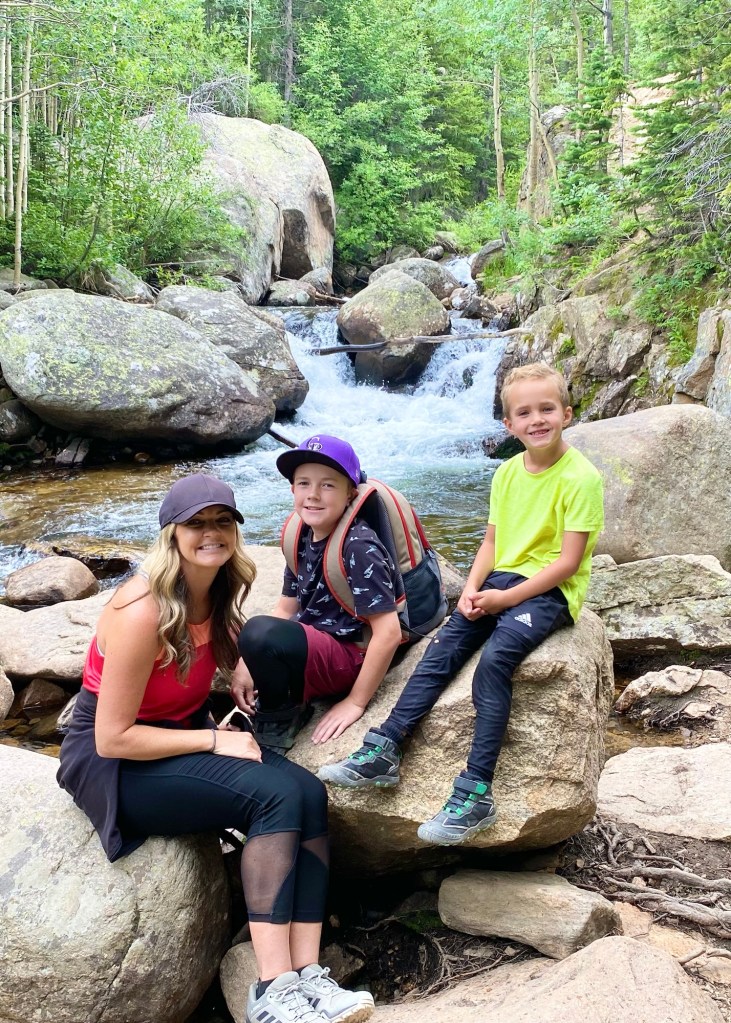
Our family spent several days here and loved how easy it was to combine adventure with relaxation. We stayed at the lodge, enjoyed meals at the restaurant, hiked to the base of the falls, explored scenic overlooks, and even went horseback riding. It’s one of those destinations that offers enough to keep everyone happy without feeling rushed.
Why Fall Creek Falls Is Worth the Drive
There are a lot of state parks in the South, but Fall Creek Falls feels different. The waterfalls are larger, the scenery is more dramatic, and the park itself is incredibly well-maintained. Unlike some destinations where you’ll run out of things to do after a few hours, you could easily spend several days exploring here.
Park Information
Fall Creek Falls State Park
Phone: (423) 881-5298
Website: tnstateparks.com/parks/fall-creek-falls
Entrance Fee: FREE
Parking: FREE
Hours: Open year-round
One of the best things about Tennessee State Parks is that there is no entrance fee, making this one of the most affordable family road trips on this list.
Best Things To Do at Fall Creek Falls
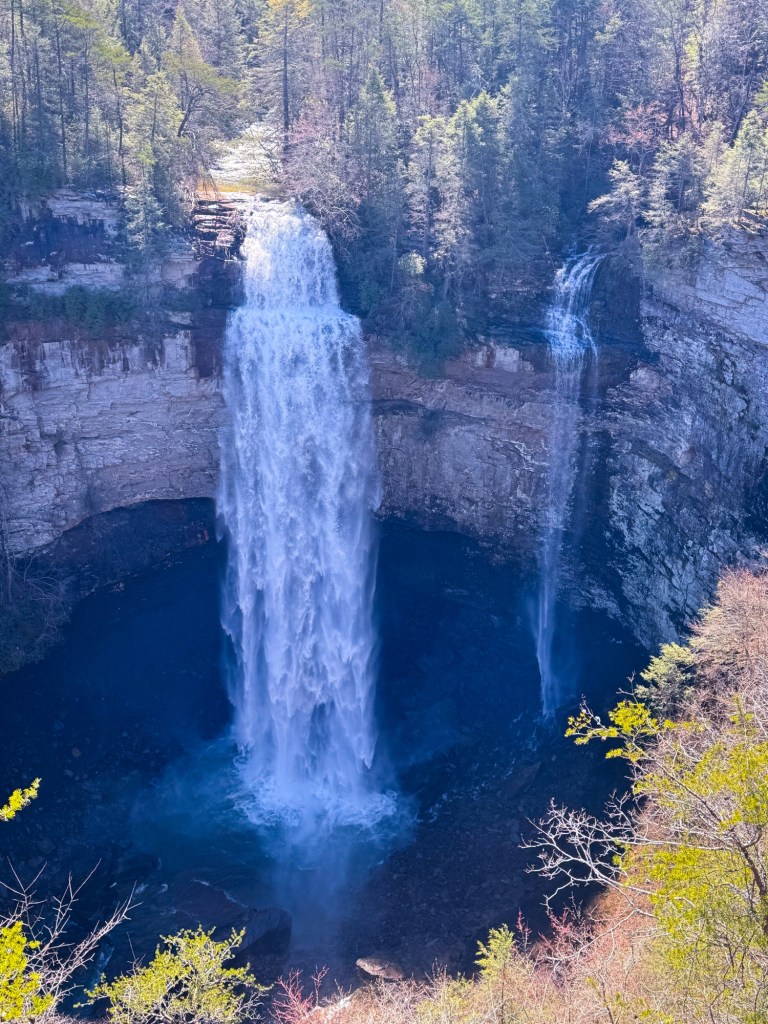
Visit Fall Creek Falls Overlook
This is the park’s most famous attraction and the first stop most visitors make.
The overlook provides an incredible view of Fall Creek Falls as it plunges into the gorge below. After heavy rainfall, the waterfall is especially impressive.
Even if you don’t plan to hike, this overlook is worth the drive.
Hike to the Base of Fall Creek Falls
For a more adventurous experience, hike down to the base of the waterfall.
The trail is considered moderately strenuous and includes stairs and steep sections, but the reward is incredible. Standing at the bottom looking up at the waterfall gives you an entirely different perspective.
Road Trip Queen Tip: Wear sturdy shoes and bring water. The climb back up is much harder than the hike down.
Explore Cane Creek Falls
Many visitors focus solely on Fall Creek Falls and miss one of the park’s hidden gems.
Cane Creek Falls is beautiful and often less crowded. The nearby suspension bridge is also one of the most photographed spots in the park.
Walk Across the Suspension Bridge
The Cane Creek suspension bridge stretches across a dramatic gorge and offers fantastic views.
Kids especially love crossing the bridge and looking down at the water below.
Go Horseback Riding
One of our favorite experiences during our visit was horseback riding through the park.
It’s a fun way to see a different side of Fall Creek Falls and gives families a memorable experience beyond hiking.
Enjoy the Lake
The park’s lake offers opportunities for kayaking, paddle boating, fishing, and relaxing by the water.
It’s a great option if you need a break from hiking.
Where To Stay
One of the things that makes Fall Creek Falls such an easy family destination is the variety of lodging options available.
Best Overall: Fall Creek Falls Lodge
We stayed at the lodge and loved the convenience.
Pros:
Located inside the park
Beautiful views
On-site restaurant
Easy access to attractions
Family-friendly rooms
This is what I recommend for first-time visitors.
Unique Stay: Park Cabins
If you’re traveling with a larger family or group, consider renting one of the park cabins.
Many include full kitchens, fireplaces, and outdoor spaces.
Budget-Friendly: Cookeville Hotels
Cookeville is about 40 minutes away and offers a variety of affordable chain hotels.
This is a good option during busy travel periods when park lodging is booked.
Where To Eat
Fall Creek Falls Restaurant
The restaurant at the lodge is the most convenient option and offers beautiful views overlooking the park.
We enjoyed several meals here during our stay and appreciated not having to leave the park.
Nearby Dining
If you’re staying outside the park, Cookeville offers:
Crawdaddy’s
Seven Senses Food & Cheer
Father Tom’s Pub
Suggested 3-Day Itinerary
Day 1
Arrive at Fall Creek Falls
Check into your lodge or cabin
Visit Fall Creek Falls Overlook
Enjoy dinner at the lodge restaurant
Watch sunset from one of the scenic overlooks
Day 2
Hike to the base of Fall Creek Falls
Explore Cane Creek Falls
Walk across the suspension bridge
Horseback riding experience
Dinner and relaxation
Day 3
Enjoy a leisurely breakfast
Visit any overlooks you missed
Spend time at the lake
Begin the drive home
Family Travel Tips
Bring hiking shoes with good traction.
Pack bug spray during summer months.
Bring swimsuits if visiting during warmer weather.
Download maps before arrival.
Reserve lodge rooms early during peak seasons.
Allow extra time if hiking to the base of waterfalls.
Estimated Budget
Family of Four (3 Nights)
Lodging: $150-$300 per night
Food: $50-$150 per day
Activities: $0-$100
Park Entrance: FREE
Estimated Total: $700-$1,500 depending on lodging and activities
Don’t Miss This
If you only have time for one adventure, make it the hike to the base of Fall Creek Falls.
The overlook is beautiful, but standing at the bottom of the gorge and looking up at the waterfall is an experience you’ll remember long after the trip ends.
Nearby Bonus Stops
Want to extend your trip? Consider adding:
Burgess Falls State Park – One of Tennessee’s most beautiful waterfall hikes.
Cummins Falls State Park – A popular swimming hole and waterfall destination.
Chattanooga, Tennessee – Only about 1.5 hours away and home to the Tennessee Aquarium, Lookout Mountain, and Ruby Falls.
Nashville, Tennessee – Perfect for breaking up the drive home with live music, great restaurants, and family-friendly attractions.
Final Thoughts
Fall Creek Falls is proof that you don’t have to visit a national park to experience incredible scenery.
With stunning waterfalls, family-friendly activities, affordable lodging, and free park admission, it’s one of the best value road trips from Dallas and an easy destination to recommend for families looking for an outdoor adventure.
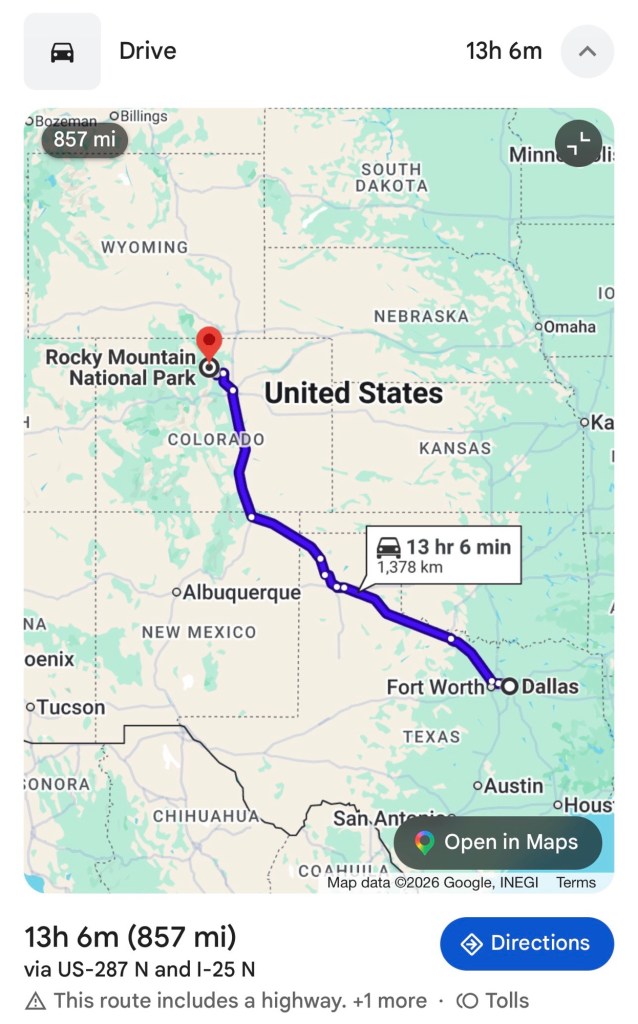
Rocky Mountain National Park & Estes Park, Colorado
Drive Time from Dallas: Approximately 13-14 hours
Recommended Trip Length: 4-5 Days
Best Time to Visit: June through September
Best For: Mountain scenery, wildlife viewing, alpine lakes, family hiking, and escaping the Texas summer heat
If you’re dreaming of cooler temperatures, mountain views, and wildlife sightings, Rocky Mountain National Park should be high on your summer road trip list.
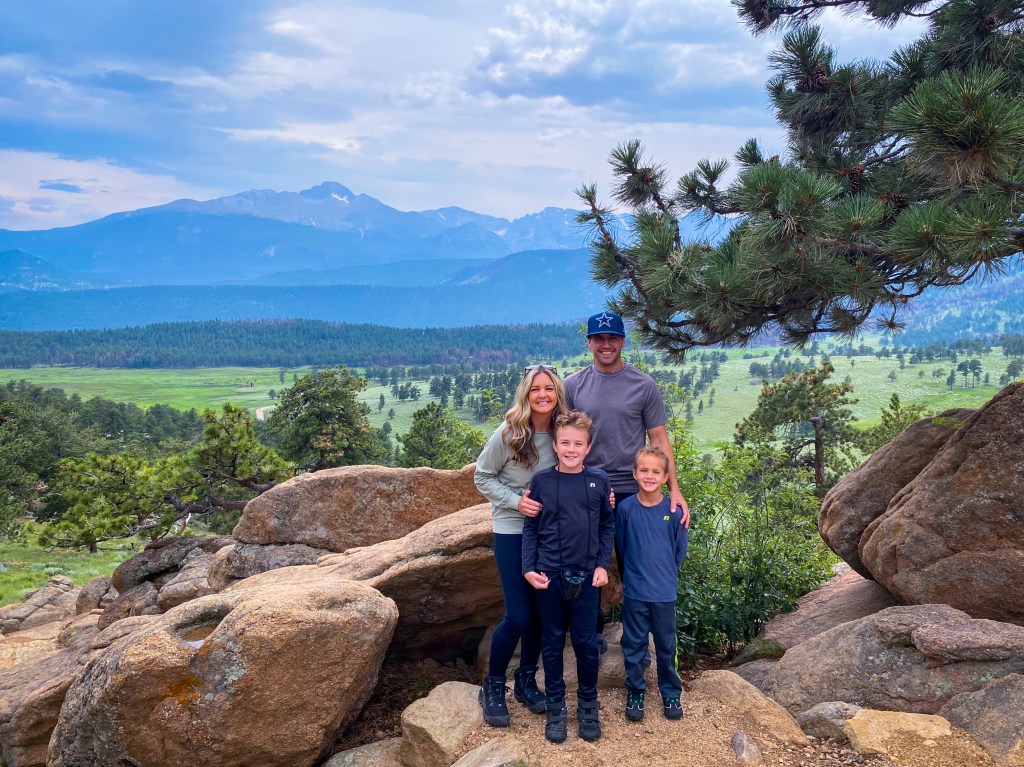
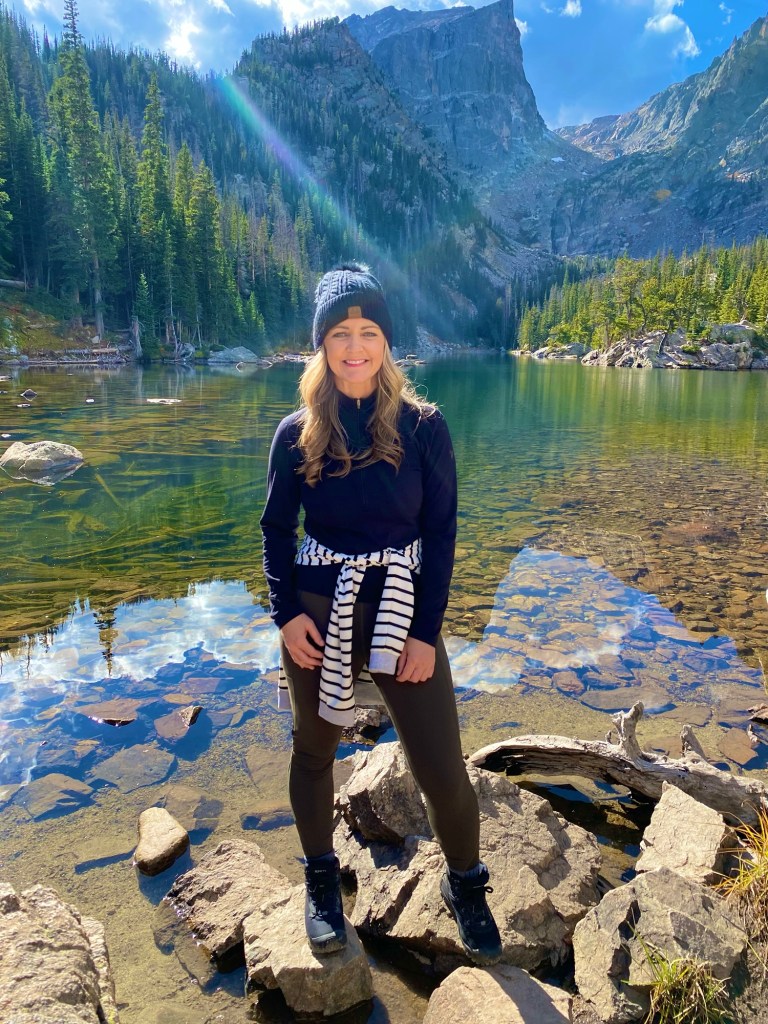
Located just outside Estes Park, Colorado, Rocky Mountain National Park is one of the most visited national parks in the country—and once you arrive, it’s easy to understand why. Snow-capped peaks, alpine lakes, waterfalls, scenic drives, and frequent elk sightings create the kind of vacation that feels completely different from everyday life in Texas.
One of my favorite things about this trip is that it combines incredible outdoor adventures with the convenience of Estes Park, a charming mountain town filled with restaurants, shops, ice cream stops, and family-friendly attractions.
Why Rocky Mountain National Park Is Worth the Drive
Colorado has no shortage of beautiful places, but Rocky Mountain National Park offers an incredible amount of scenery without requiring expert hiking skills.
Many of the park’s most beautiful locations are accessible by scenic drives and short walks, making it perfect for families with younger children, grandparents, or anyone who simply wants amazing views without spending all day on the trail.
Park Information
Rocky Mountain National Park
Phone: (970) 586-1206
Website: nps.gov/romo
Entrance Fee: $35 per vehicle (7-day pass)
Timed Entry Reservations: During much of the summer, timed-entry reservations are required in addition to your park pass. Check the park website before your trip for current requirements.
Best Things To Do in Rocky Mountain National Park
Drive Trail Ridge Road
If you only do one thing in Rocky Mountain National Park, make it Trail Ridge Road.
This scenic highway climbs above 12,000 feet and offers some of the most spectacular mountain views in North America.
There are multiple overlooks along the route, allowing visitors to stop and enjoy panoramic views of the Rockies.
Road Trip Queen Tip: Start early in the morning to avoid afternoon thunderstorms and heavy traffic.
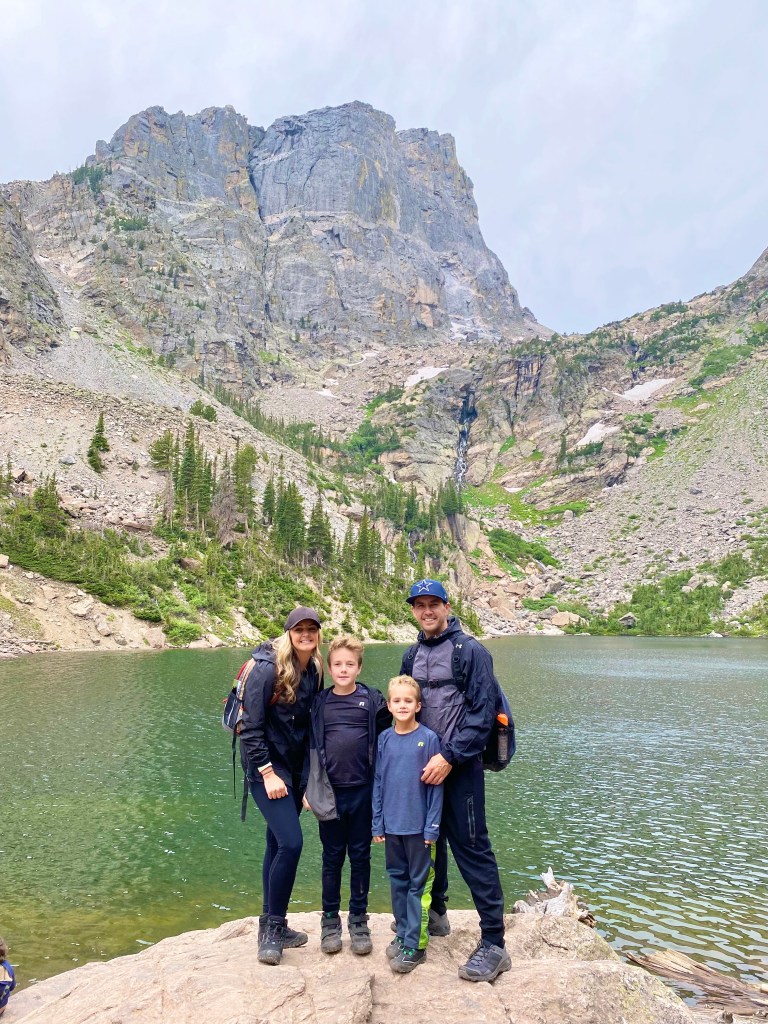
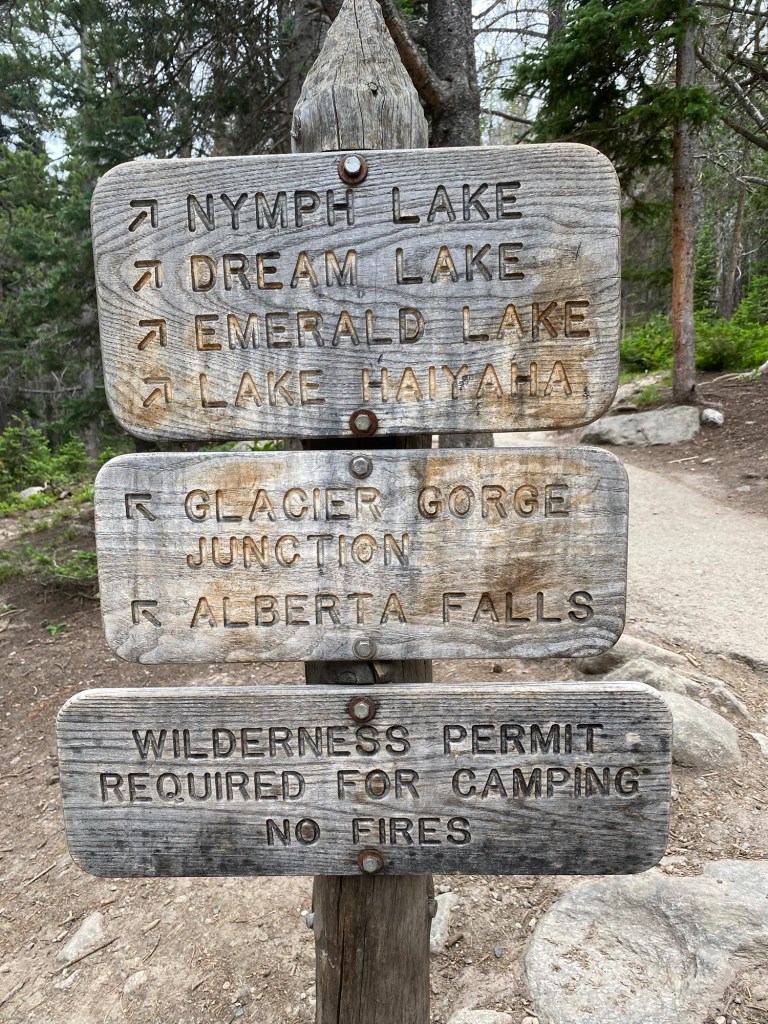
Visit Bear Lake
Bear Lake is one of the most photographed spots in the park.
The easy loop trail around the lake makes this a perfect stop for families, and the mountain reflections on calm mornings are stunning.
Hike to Alberta Falls
This is one of the most popular family-friendly hikes in the park.
The trail is manageable for most visitors and leads to a beautiful waterfall surrounded by mountain scenery.
Explore Sprague Lake
Sprague Lake offers an easy walking path, beautiful reflections, and excellent opportunities for wildlife viewing.
It’s one of the best spots in the park for families with young children.
Watch for Wildlife
One of the highlights of visiting Rocky Mountain National Park is the opportunity to see wildlife.
Keep an eye out for:
Elk
Mule deer
Bighorn sheep
Marmots
Moose (occasionally)
The elk are especially impressive and are often spotted near Estes Park and Moraine Park.
Explore Estes Park
While the national park is the main attraction, don’t overlook Estes Park itself. This mountain town serves as the gateway to the park and offers plenty of activities once you’re done hiking.
Stroll Downtown Estes Park
The downtown area is full of:
Local shops
Candy stores
Ice cream shops
Restaurants
Souvenir stores
Visit Lake Estes
Rent bikes, enjoy a picnic, or simply relax by the water.
Ride the Estes Park Aerial Tramway
For incredible mountain views without a hike, consider taking the aerial tramway to the summit.
Visit the Stanley Hotel
Even if you’re not staying there, it’s worth stopping by one of Colorado’s most famous historic hotels.
Where To Stay
Budget-Friendly
Loveland
Lyons
Longmont
These communities often offer lower lodging prices than Estes Park while remaining within reasonable driving distance.
Mid-Range
Hotels and lodges in Estes Park provide convenient access to both downtown and the national park.
Unique Stay
Mountain cabins
Vacation rentals with mountain views
Lodges near the park entrance
For many families, renting a cabin becomes one of the highlights of the trip.
Where To Eat
Some popular Estes Park favorites include:
Bird & Jim: Known for locally sourced Colorado cuisine.
Claire’s Restaurant & Bar: A longtime Estes Park favorite for breakfast and lunch.
Smokin’ Dave’s BBQ: Great option after a day of hiking.
Kind Coffee: Perfect for coffee and a quick breakfast before entering the park.
Suggested 4-Day Itinerary
Day 1
Drive to Estes Park
Check into lodging
Explore downtown Estes Park
Dinner and sunset views
Day 2
Bear Lake
Alberta Falls
Sprague Lake
Wildlife viewing in Moraine Park
Day 3
Drive Trail Ridge Road
Stop at scenic overlooks
Explore the Alpine Visitor Center area
Dinner in Estes Park
Day 4
Lake Estes
Shopping and sightseeing
Begin drive home
Family Travel Tips
Drink plenty of water. The elevation can affect visitors coming from Texas.
Pack layers. Summer mornings and evenings can be surprisingly cold.
Start hikes early to avoid crowds and afternoon storms.
Download maps before entering the park.
Fill up with gas before entering mountain areas.
Carry snacks for longer scenic drives.
Estimated Budget
Family of Four (4 Nights)
Lodging: $200-$400 per night
Food: $75-$175 per day
Park Entrance: $35
Activities: $0-$100+
Estimated Total: $1,200-$2,500
Don’t Miss This
Sunrise or early morning at Bear Lake. The crowds are smaller, the water is calmer, and the mountain reflections are absolutely incredible.
Nearby Bonus Stops
Want to turn this into an even bigger Colorado adventure?
Garden of the Gods – Located in Colorado Springs and completely free to visit.
Boulder – Great restaurants, hiking, and a fun downtown area.
Peak to Peak Scenic Byway – One of Colorado’s most beautiful drives.
Nederland – A quirky mountain town worth exploring.
Final Thoughts
Rocky Mountain National Park is one of those destinations that truly lives up to the hype.
If you’re looking for a mountain getaway that offers adventure, beauty, and cooler summer temperatures, Rocky Mountain National Park and Estes Park deserve a spot on your road trip bucket list.
Gulf Shores, Alabama: The Ultimate Beach Road Trip from Dallas
Drive Time from Dallas: Approximately 10-11 Hours
Recommended Trip Length: 4-7 Days
Best Time to Visit: March through October
Best For: Beaches, family vacations, seafood, outdoor adventures, and relaxing by the Gulf
If you’re dreaming of white-sand beaches and turquoise water but don’t want to fly, Gulf Shores is one of the best beach road trips from Dallas.
Located along Alabama’s Gulf Coast, Gulf Shores offers everything families love about a beach vacation: soft sand, warm water, fresh seafood, dolphin cruises, and plenty of activities for kids and adults alike.
What makes Gulf Shores especially appealing for Texas families is that it’s significantly closer than many Florida beach destinations while still delivering beautiful beaches and a laid-back coastal atmosphere.
Why Gulf Shores Is Worth the Drive
Not all Gulf Coast beaches are created equal.
Gulf Shores consistently ranks among the best family beach destinations in the South because it combines beautiful beaches with family-friendly attractions, affordable accommodations, and plenty of outdoor activities.
The area is easy to navigate, offers a wide variety of lodging options, and has enough attractions to keep everyone entertained when they’re ready for a break from the sand.
Visitor Information
Website: gulfshores.com
Gulf State Park
Phone: (251) 948-7275
Website: alapark.com/parks/gulf-state-park
Public Beach Access: Free
Gulf State Park: Some activities, parking areas, and rentals may require fees.
Best Things To Do
Relax on Gulf Shores Public Beach
The beach is the main attraction, and for good reason. The sugar-white sand and warm Gulf waters make this one of the most beautiful beaches within driving distance of Dallas. Spend your days swimming, building sandcastles, searching for shells, or simply relaxing with your toes in the sand.
Explore Gulf State Park
This 6,000+ acre park offers far more than just beach access. Visitors can enjoy:
Hiking trails
Biking trails
Fishing
Nature programs
Kayaking
Wildlife viewing
It’s one of the best state parks on the Gulf Coast.
Take a Dolphin Cruise
Dolphin cruises are one of the most popular family activities in Gulf Shores. Many tours offer opportunities to see dolphins swimming and playing alongside the boat.
Visit The Wharf
The Wharf is one of the area’s top entertainment districts and includes:
Shopping
Restaurants
Ferris wheel
Live entertainment
Family attractions
Explore Bon Secour National Wildlife Refuge
This hidden gem offers nature trails, wildlife viewing, and a quieter beach experience away from the crowds.
Where To Stay
Budget-Friendly
Foley, Alabama – Located about 20 minutes inland, Foley often offers lower hotel rates than beachfront accommodations.
Best Overall
Beachfront Condos
Many families prefer condos because they provide:
Full kitchens
Multiple bedrooms
Beach access
More space than a hotel room
Unique Stay
Gulf State Park Lodge
This beautiful beachfront lodge offers direct beach access and easy access to park amenities.
Where To Eat
The Hangout: A Gulf Shores classic and a favorite for families.
LuLu’s: Owned by Lucy Buffett, this popular waterfront restaurant offers food, live music, and family-friendly entertainment.
Original Oyster House: Known for fresh seafood and beautiful waterfront views.
Sea-N-Suds: A longtime Gulf Shores favorite located directly on the beach.
Suggested 5-Day Itinerary
Day 1
Arrive in Gulf Shores
Check into lodging
Walk the beach at sunset
Day 2
Beach day
Dinner at The Hangout
Day 3
Dolphin cruise
Explore The Wharf
Evening beach walk
Day 4
Gulf State Park
Bike trails
Wildlife viewing
Day 5
Morning beach time
Lunch before departure
Begin drive home
Family Travel Tips
Book summer lodging several months in advance.
Bring shade tents or umbrellas for beach days.
Visit the beach early in the morning or near sunset to avoid peak heat.
Pack beach toys and sandcastle supplies for younger children.
Consider a condo with a kitchen to save money on meals.
Estimated Budget
Family of Four (5 Nights)
Lodging: $200-$500 per night
Food: $75-$200 per day
Activities: $100-$300
Gas: $150-$250 roundtrip from Dallas
Estimated Total: $1,500-$4,000+
Costs vary greatly depending on lodging choice and season.
Don’t Miss This
Watching the sunset from the beach. It sounds simple, but it’s one of the most memorable parts of any Gulf Shores vacation. The sky lights up with shades of orange, pink, and purple, creating the perfect ending to a day on the coast.
Nearby Bonus Stops
Orange Beach: Located next door and offers additional beaches, restaurants, and water activities.
Pensacola, Florida: Only about 45 minutes away and perfect for a day trip.
Fort Morgan: A historic coastal fort with beautiful views and fewer crowds.
Final Thoughts
If you’re looking for a beach vacation that doesn’t require a flight, Gulf Shores is hard to beat.
With beautiful beaches, family-friendly attractions, fresh seafood, and plenty of ways to enjoy the outdoors, it’s easy to see why so many Texas families return year after year.
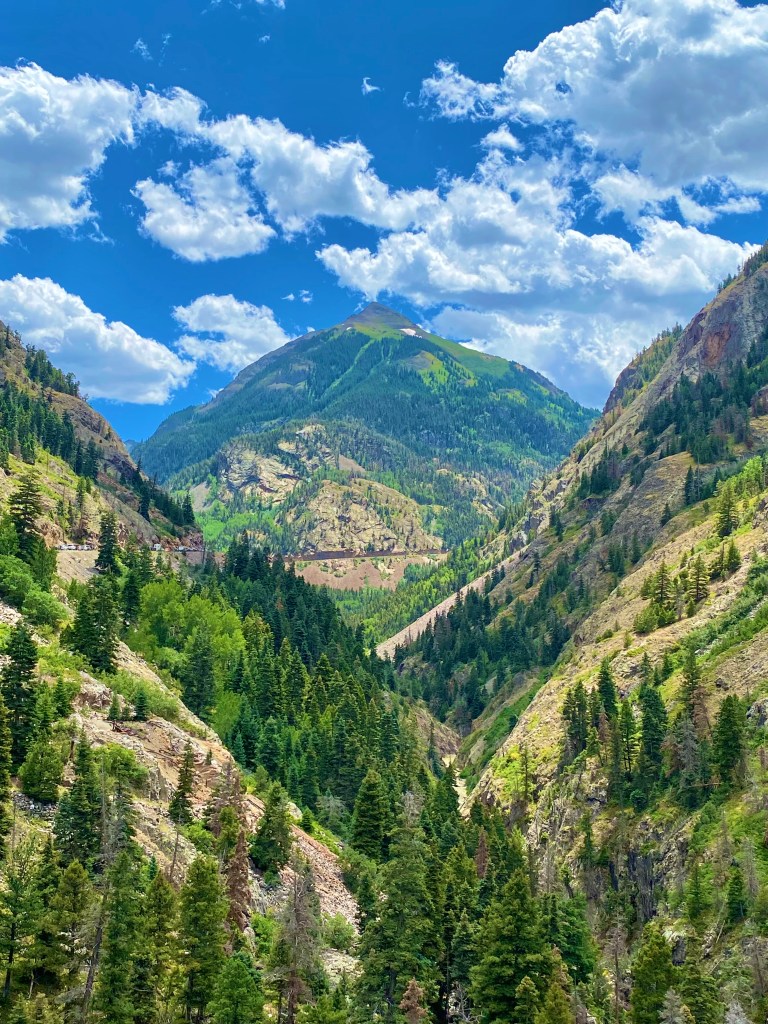
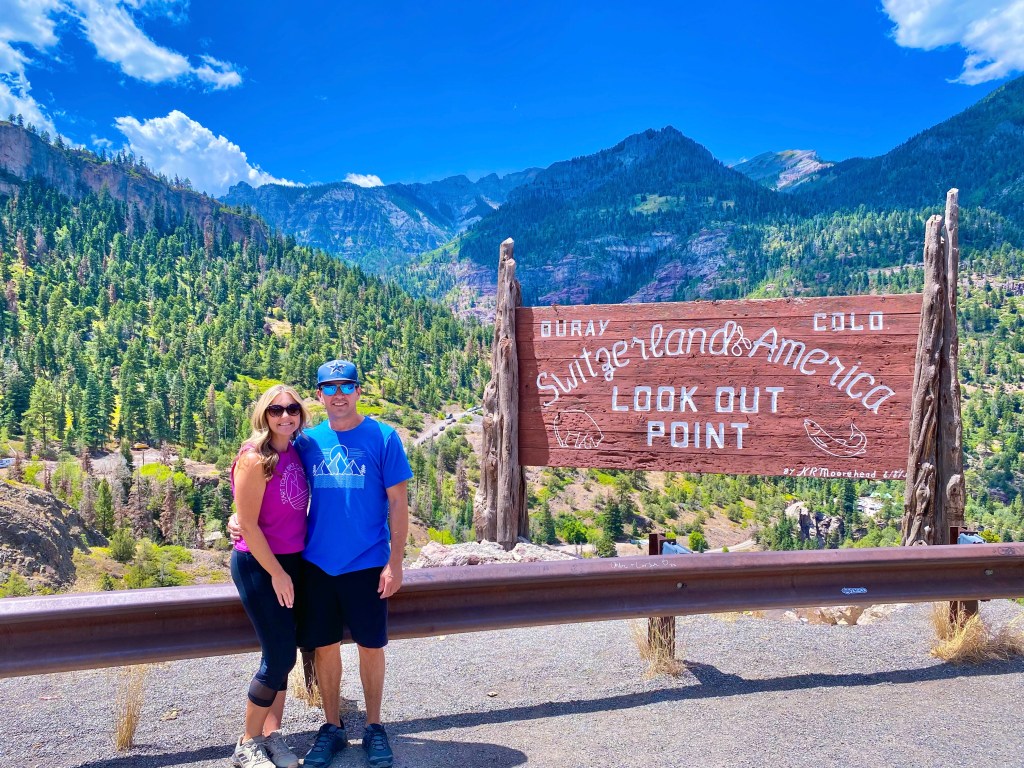
Ouray, Colorado: The Switzerland of America That’s Worth Every Mile from Dallas
Drive Time from Dallas: Approximately 14-15 Hours
Recommended Trip Length: 4-5 Days
Best Time to Visit: June through September
Best For: Mountain scenery, waterfalls, scenic drives, hot springs, hiking, and small-town charm
If there is one destination on this list that consistently leaves people saying, “I had no idea a place like this existed in the United States,” it’s Ouray, Colorado.
Often called the “Switzerland of America,” Ouray is tucked into a narrow valley surrounded by towering mountain peaks, waterfalls, and some of the most breathtaking scenery you’ll find anywhere in the country. The moment you drive into town, you’ll understand how it earned its nickname.
Unlike larger Colorado destinations that can feel crowded and commercialized, Ouray still feels like a hidden gem. It’s small, walkable, incredibly scenic, and packed with outdoor adventures for families, couples, and anyone who loves mountain towns.
Why Ouray Is Worth the Drive
Ouray isn’t just another mountain town. It’s surrounded by 13,000-foot peaks that seem to rise straight out of downtown. Waterfalls tumble down canyon walls, scenic hiking trails begin just steps from town, and nearly every direction offers postcard-worthy views.
What makes Ouray special is that you don’t have to be an experienced hiker to enjoy it. Some of the area’s most beautiful scenery is accessible by car, short walks, or scenic overlooks.
For families, it’s the perfect mix of adventure and relaxation. You can spend the morning hiking to a waterfall, the afternoon soaking in hot springs, and the evening strolling through downtown while eating ice cream and watching the mountains glow at sunset.
Visitors coming from Texas should plan for the higher elevation and stay hydrated.
Best Things To Do in Ouray
Drive the Million Dollar Highway
If Ouray has a signature experience, this is it.
The Million Dollar Highway is one of the most scenic drives in America, connecting Ouray and Silverton through a series of mountain passes, dramatic cliffs, and breathtaking overlooks.
The road winds through the San Juan Mountains and offers incredible photo opportunities around every turn.
Road Trip Queen Tip: Drive this route during daylight hours so you can fully appreciate the scenery.
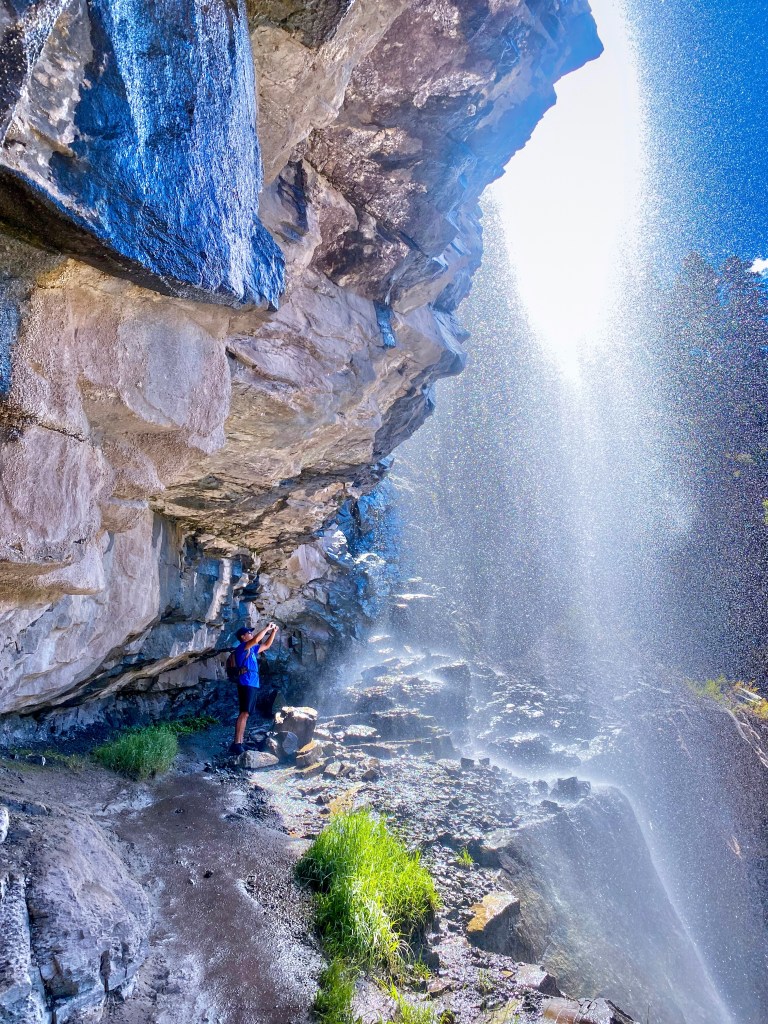
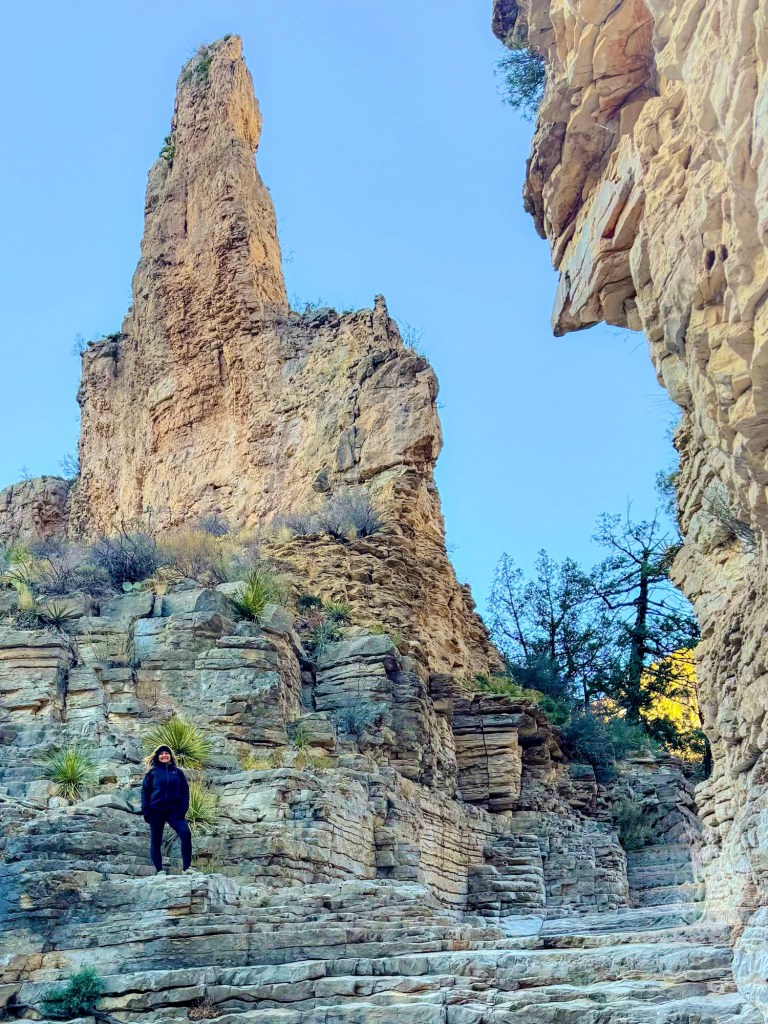
Visit Box Canyon Falls
Located right in town, Box Canyon Falls is one of Ouray’s most popular attractions.
A short walk leads visitors to a dramatic waterfall crashing through a narrow canyon.
The roar of the water and steep canyon walls make this one of the most unique waterfall experiences in Colorado.
Relax at Ouray Hot Springs
After a day of hiking and sightseeing, there’s no better place to unwind.
The Ouray Hot Springs Pool features multiple pools with varying temperatures and incredible mountain views.
Families love it because there are areas for both relaxation and play.
Hike the Perimeter Trail
The Perimeter Trail circles the town and provides access to many of Ouray’s best viewpoints.
You don’t have to complete the entire trail to enjoy it.
Many visitors simply hike shorter sections to waterfalls and overlooks.
Visit Cascade Falls
One of the easiest and most rewarding stops in town. The waterfall is visible from the road and makes a fantastic photo stop.
Explore Downtown Ouray
Downtown Ouray is small but charming.
You’ll find:
Local shops
Restaurants
Ice cream stops
Historic buildings
Mountain views in every direction
It’s the kind of place where you’ll want to slow down and simply enjoy being there.
Take a Day Trip to Silverton
One of the biggest advantages of staying in Ouray is how close you are to Silverton.
Located about 25 miles away via the Million Dollar Highway, Silverton feels like stepping back into Colorado’s mining-era history.
Spend a day exploring:
Historic downtown
Jeep roads
Mountain scenery
Local restaurants
Many visitors say the drive between Ouray and Silverton becomes one of the highlights of the entire trip.
Where To Stay
Budget-Friendly
Montrose – Located about 35 minutes north of Ouray, Montrose often offers significantly lower hotel rates.
Mid-Range
Ridgway – Ridgway provides beautiful scenery and easy access to both Ouray and other San Juan Mountain attractions.
Best Location – Stay directly in downtown Ouray. Being able to walk to restaurants, shops, and attractions is worth it if your budget allows.
Unique Stay
Historic Beaumont Hotel – One of the most iconic hotels in town and a beautiful place to stay if you’re looking for something memorable.
Where To Eat
Maggie’s Kitchen: A favorite breakfast stop for visitors.
Brickhouse 737: Popular for dinner and mountain-town atmosphere.
Goldbelt Bar & Grill: Casual dining with great views.
Mouse’s Chocolates & Coffee: Perfect for a sweet treat while exploring downtown.
Suggested 5-Day Itinerary
Day 1
Arrive in Ouray
Explore downtown
Visit Cascade Falls
Dinner and sunset views
Day 2
Box Canyon Falls
Perimeter Trail
Ouray Hot Springs
Day 3
Drive the Million Dollar Highway
Spend the day in Silverton
Return to Ouray
Day 4
Explore nearby hiking trails
Relax in town
Visit local shops and restaurants
Day 5
Morning hot springs visit
Final scenic drive
Begin journey home
Family Travel Tips
Bring layers. Even summer mornings can be chilly.
Afternoon thunderstorms are common in the mountains.
Stay hydrated due to elevation.
Start hikes early whenever possible.
Keep a camera handy—you’ll use it constantly.
Download maps before arriving.
Estimated Budget
Family of Four (4 Nights)
Lodging: $175-$400 per night
Food: $75-$175 per day
Activities: $0-$100+
Gas: $250-$400 roundtrip from Dallas
Estimated Total: $1,300-$3,000 depending on lodging and activities
Don’t Miss This
If you only do one thing in Ouray, drive the Million Dollar Highway between Ouray and Silverton.
There are plenty of beautiful mountain drives in Colorado, but few compare to the dramatic scenery you’ll experience on this route. It’s one of those drives that makes you pull over repeatedly because the views just keep getting better.
Nearby Bonus Stops
Silverton: A must-visit mountain town located along the Million Dollar Highway.
Ridgway State Park: Great for boating, paddleboarding, and mountain views.
Telluride: About one hour away and perfect for a day trip.
Durango: Historic downtown, restaurants, and the famous Durango & Silverton Narrow Gauge Railroad.
Final Thoughts
Ouray is one of those rare places that somehow exceeds expectations. If you’re looking for a Colorado road trip that feels a little less crowded and a little more magical, Ouray deserves a spot at the very top of your bucket list.
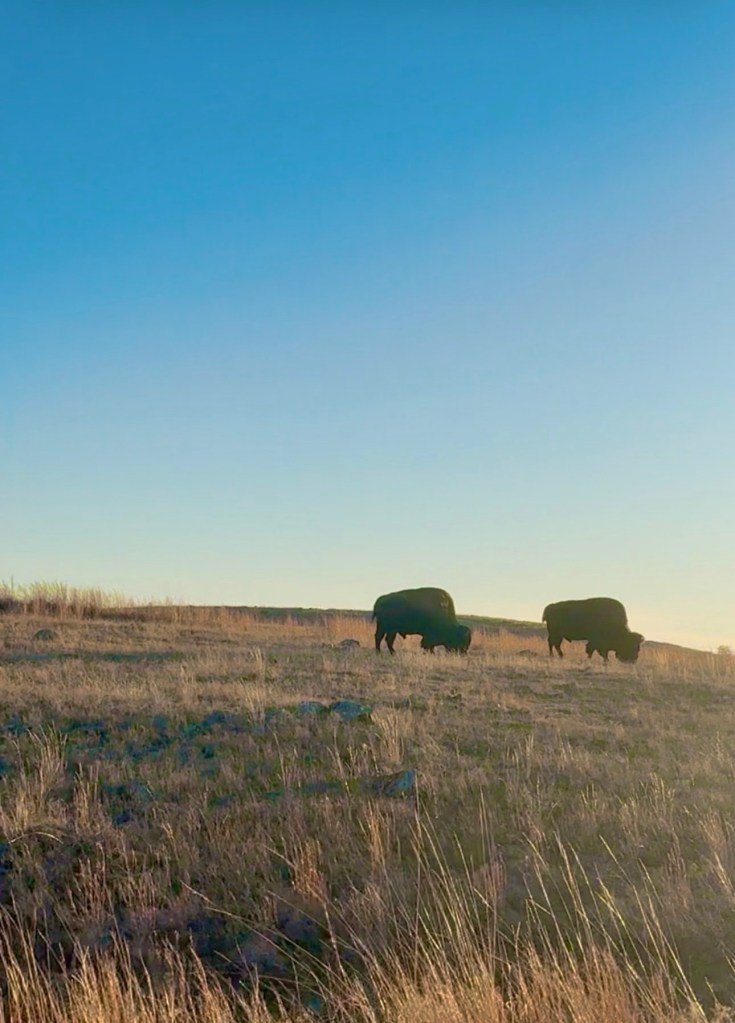
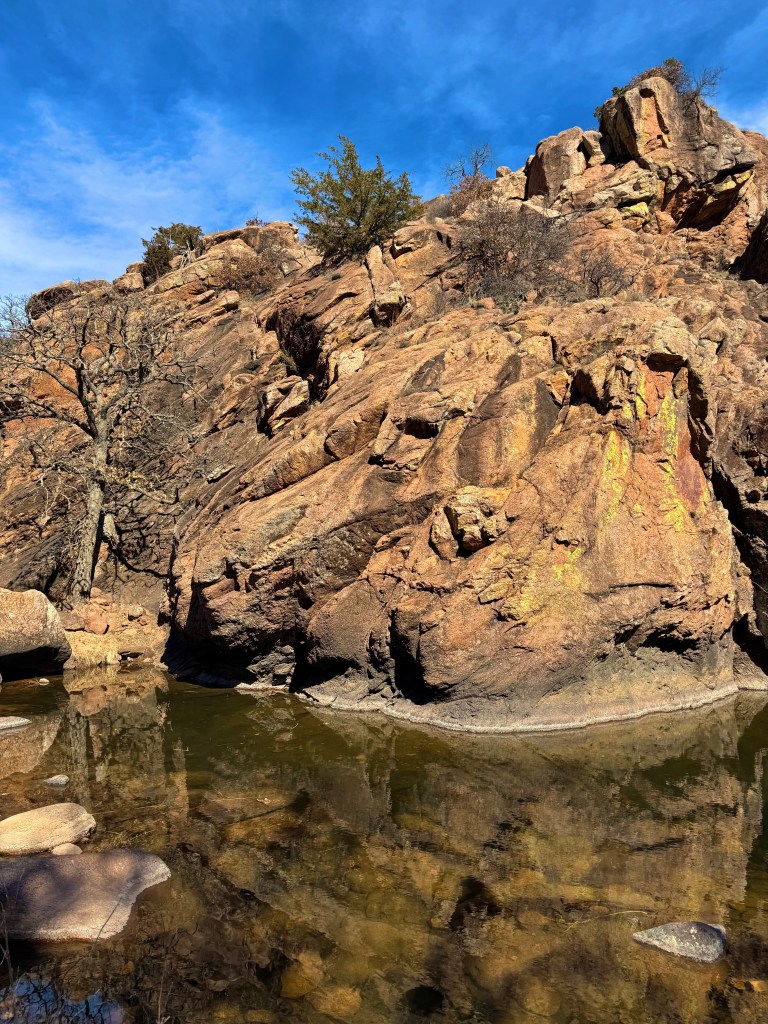
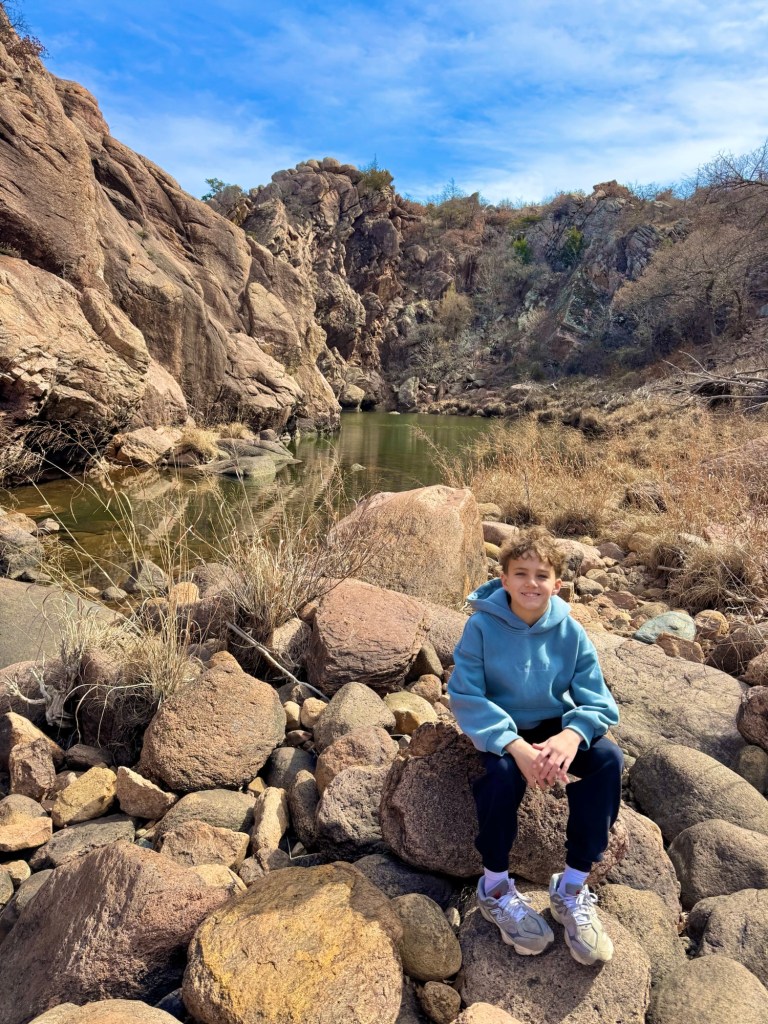
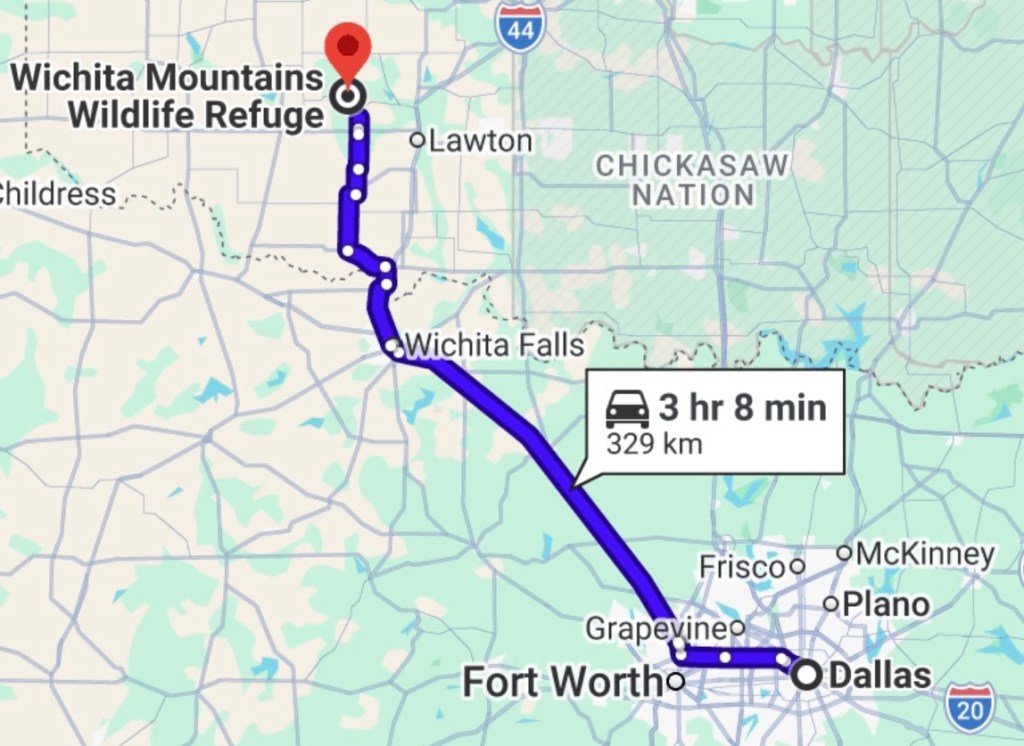
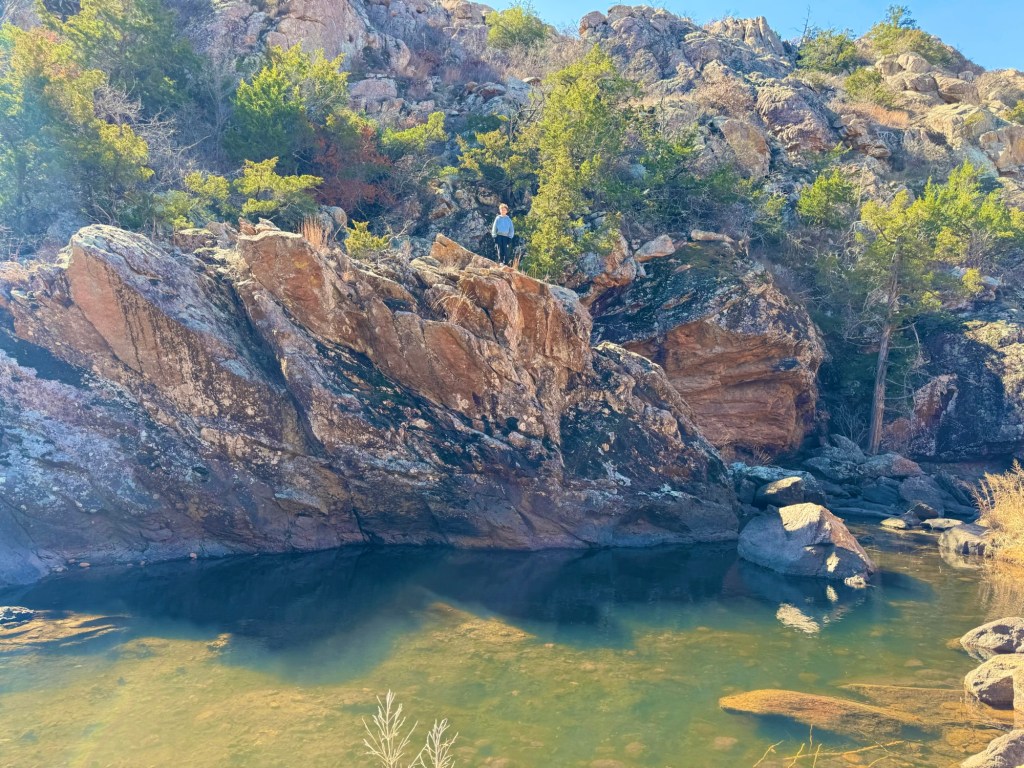
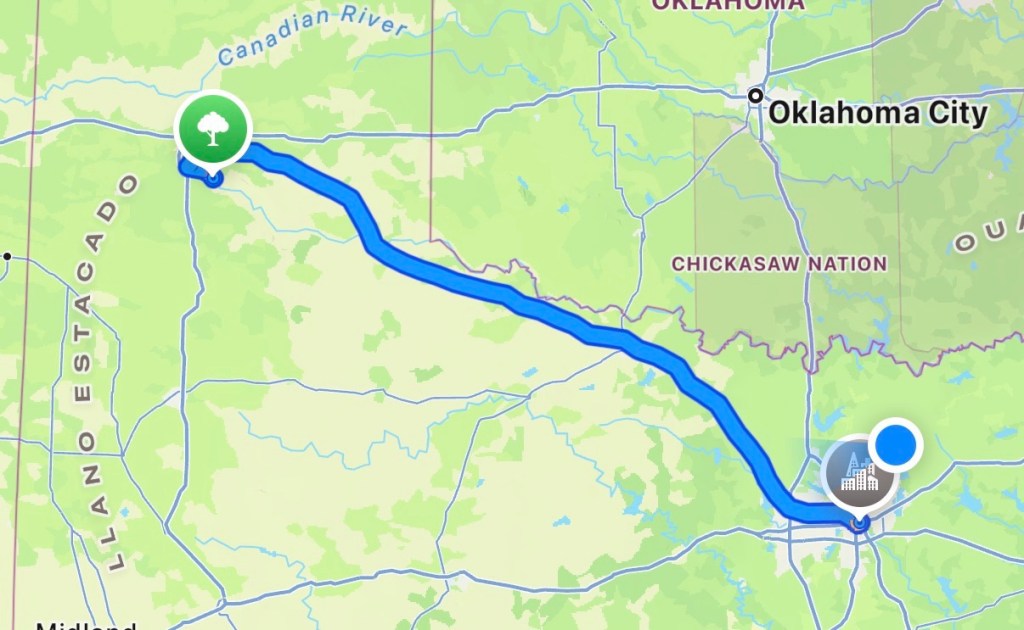
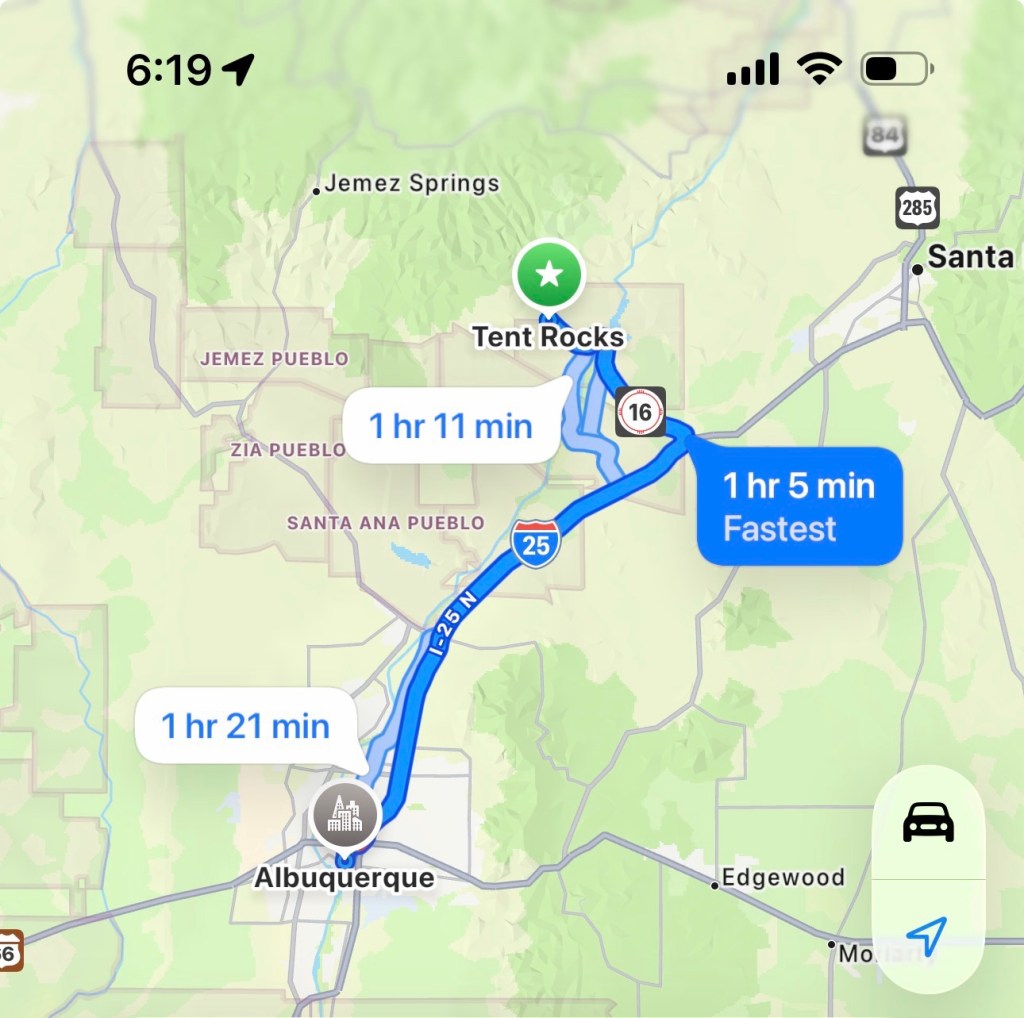
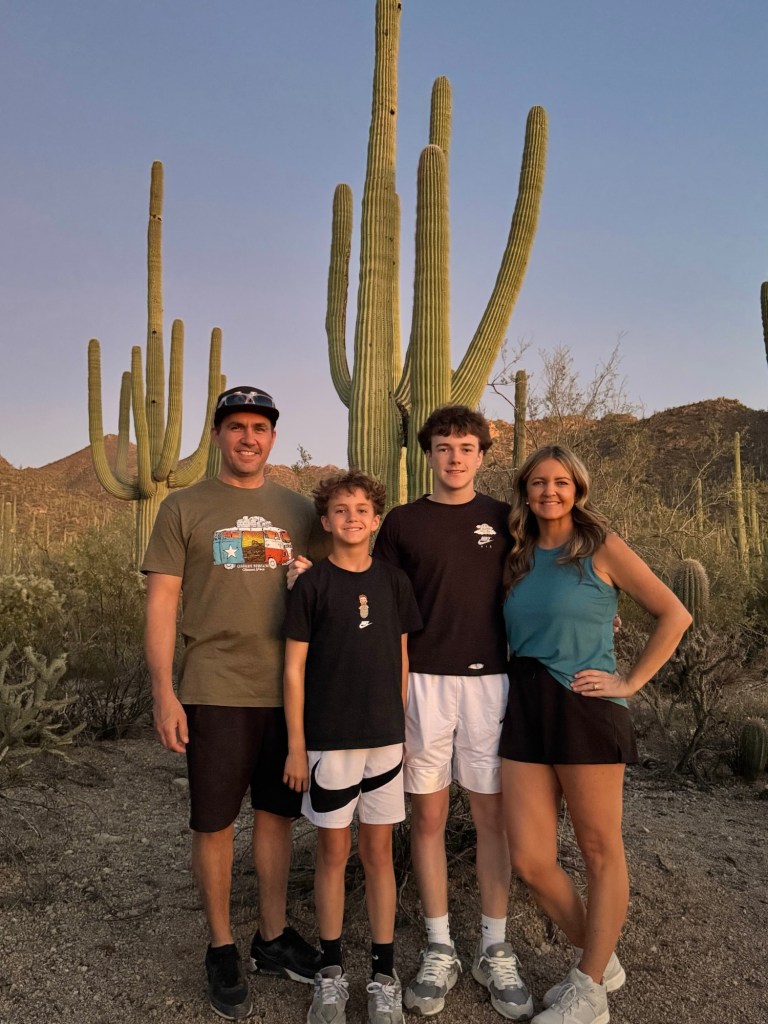
Wichita Mountains Wildlife Refuge: One of the Most Underrated Road Trips from Dallas
Drive Time from Dallas: Approximately 3 Hours
Recommended Trip Length: Weekend (2-3 Days)
Best Time to Visit: Spring and Fall, though summer is still beautiful if you start early and plan around the heat.
Best For: Wildlife viewing, scenic drives, hiking, family adventures, photography, and quick weekend getaways
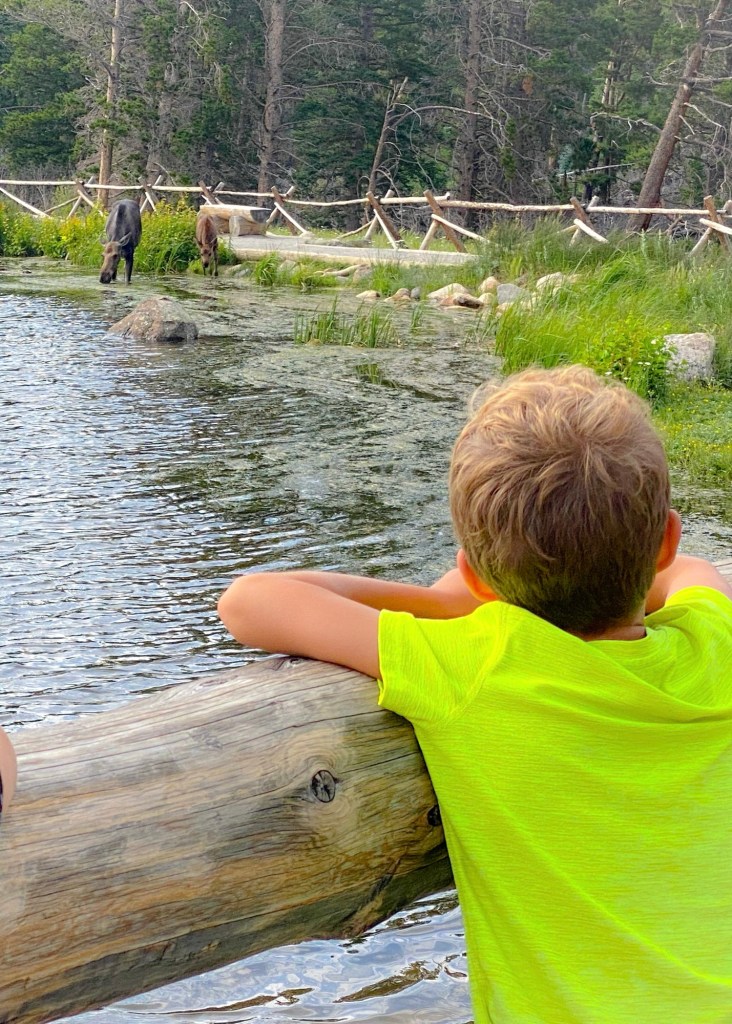
If you’re looking for a road trip that delivers incredible scenery without requiring a full day of driving, the Wichita Mountains Wildlife Refuge might be the best-kept secret on this entire list.
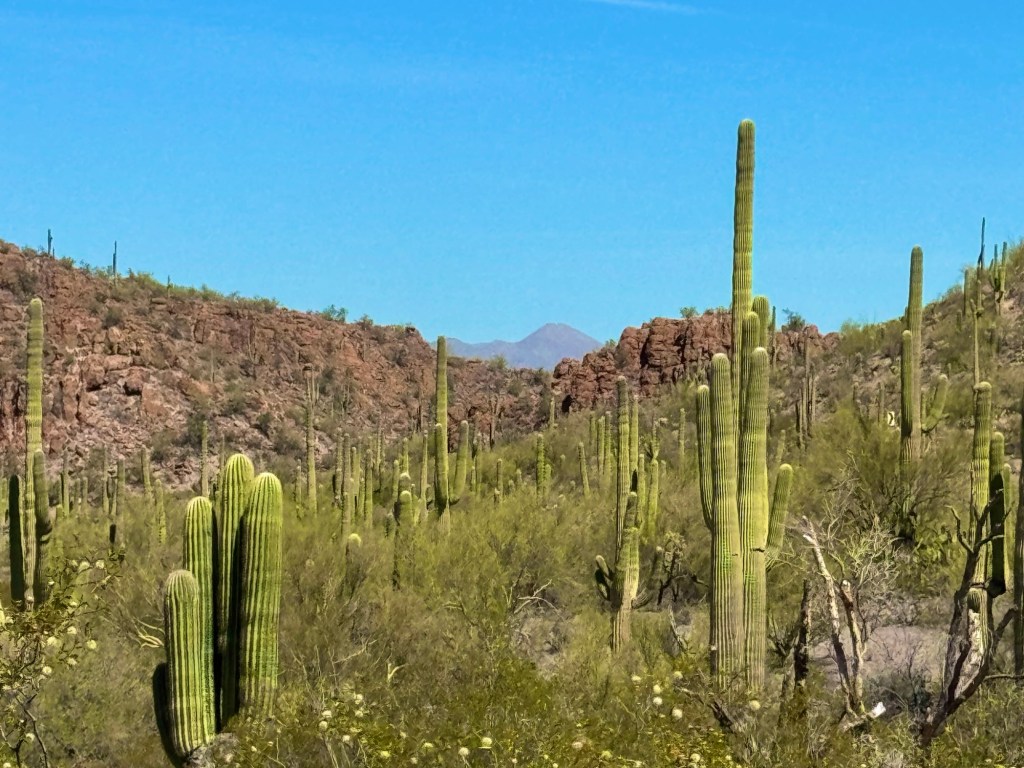
What I love most about the Wichita Mountains is that it feels like you’ve traveled much farther than you actually have. One minute you’re driving through North Texas, and the next you’re winding through rocky mountains while watching bison graze beside the road.
Why Wichita Mountains Is Worth the Drive
Many people think Oklahoma is flat. The Wichita Mountains quickly prove otherwise.
The refuge contains some of the oldest mountains in North America and offers a landscape completely different from what most Texans expect to find just across the state line.
Between the wildlife, mountain views, lakes, hiking trails, and charming nearby town of Medicine Park, there’s enough to keep you busy for an entire weekend.
Even if you only spend one day here, you’ll leave wondering why you waited so long to visit.
Refuge Information
Wichita Mountains Wildlife Refuge
Phone: (580) 429-3222
Website: fws.gov/refuge/wichita-mountains
Entrance Fee: FREE
Open Year-Round
The refuge is managed by the U.S. Fish and Wildlife Service and remains one of the best free outdoor destinations within driving distance of Dallas.
Best Things To Do
Drive to the Top of Mount Scott
If it’s your first visit, make this your first stop.
Mount Scott rises more than 2,400 feet above sea level and provides panoramic views of the refuge, surrounding lakes, and rolling Oklahoma landscape.
The road to the summit is paved and easily accessible for most vehicles.
Road Trip Queen Tip: Visit near sunrise or sunset for the most beautiful lighting and cooler temperatures.
See Free-Roaming Bison
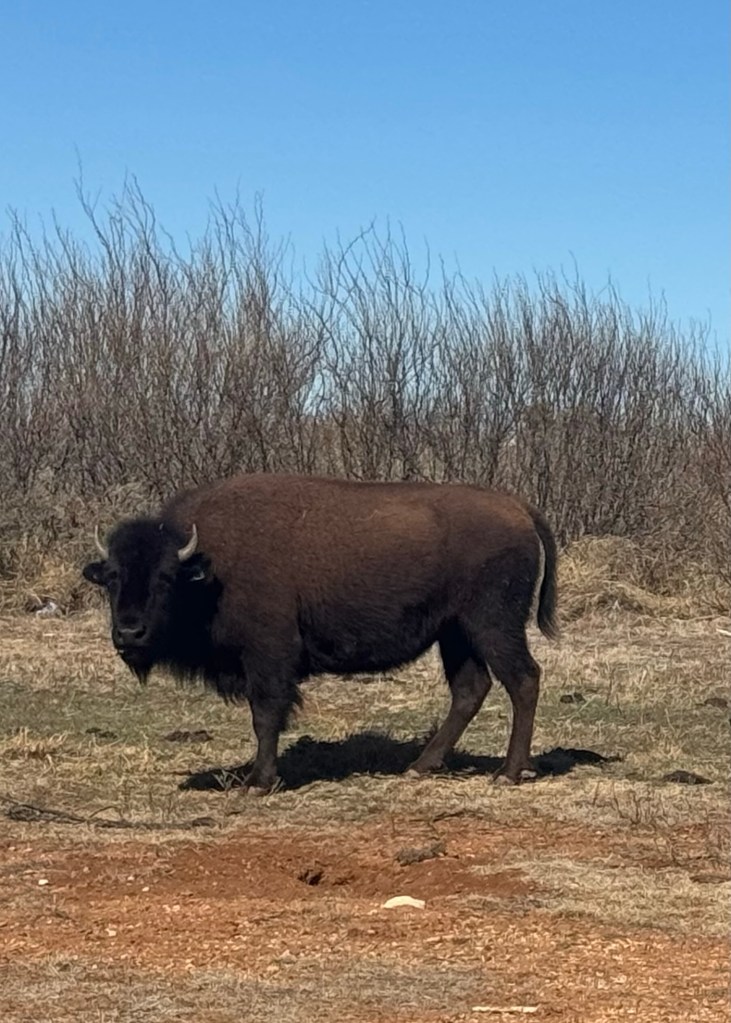
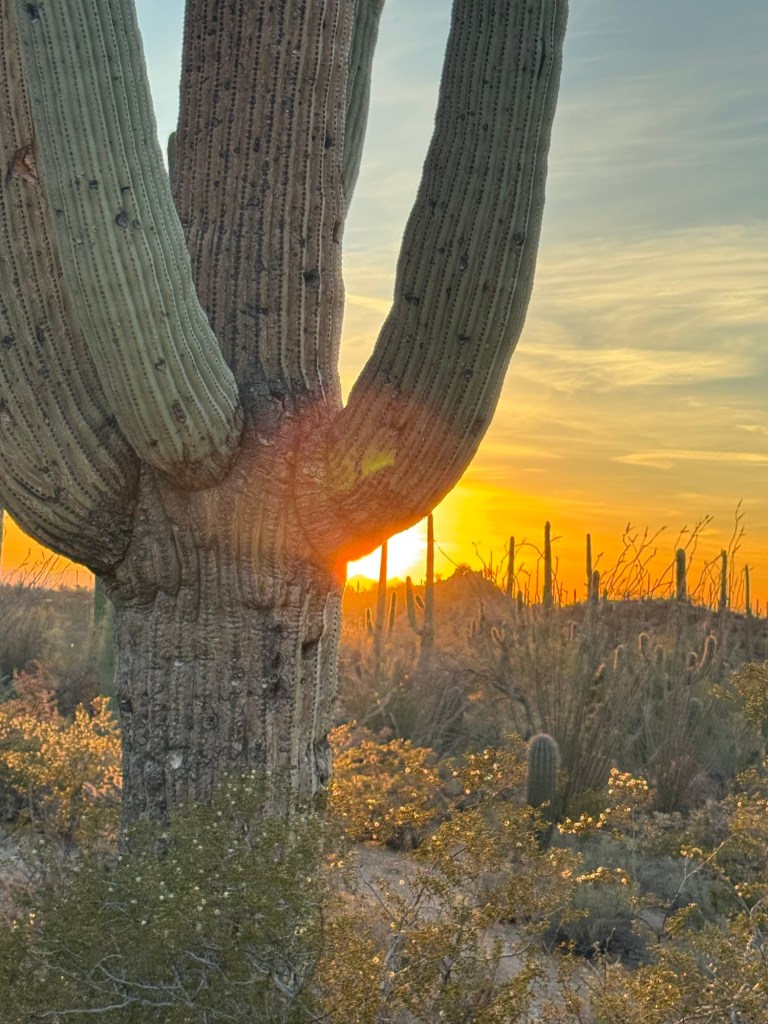
One of the biggest highlights of visiting the refuge is seeing American bison roaming freely across the landscape.
Unlike a zoo, these animals live in their natural environment, and seeing them from the road is an unforgettable experience.
Remember to stay inside your vehicle and give wildlife plenty of space.
Explore Medicine Park
Medicine Park is one of Oklahoma’s most charming small towns.
Located just outside the refuge, it offers:
Unique cobblestone architecture
Local shops
Restaurants
Creekside swimming areas
Small-town charm
Many visitors spend half a day exploring Medicine Park after visiting the refuge.
Visit Prairie Dog Town
Kids especially love this stop.
Watch dozens of prairie dogs pop in and out of their burrows while chirping and interacting with one another.
It’s a quick stop but often becomes one of the most memorable parts of the trip for younger visitors.
Hike Elk Mountain Trail
If you’re looking for a more adventurous experience, Elk Mountain Trail offers some of the best hiking in the refuge.
The trail features beautiful views, rocky terrain, and opportunities to spot wildlife along the way.
Visit Holy City
This unique attraction features a replica biblical village built in the 1920s.
Even if you’re only there for a short visit, it’s an interesting stop that adds a little history to your trip.
Explore Lake Lawtonka
Located near the refuge, Lake Lawtonka offers scenic views, picnic areas, fishing opportunities, and beautiful sunset photography.
Where To Stay
Budget-Friendly
Lawton Hotels – Lawton offers the largest selection of affordable hotels and is only minutes from the refuge.
Best Overall
Medicine Park Cabins – Staying in Medicine Park gives you easy access to both the refuge and the town’s restaurants and shops.
Unique Stay
Vacation cabins near Medicine Park – Many offer beautiful views and a peaceful setting surrounded by nature.
Where To Eat
Meers Store & Restaurant: This is the restaurant most visitors recommend.
Known for its famous longhorn burgers, Meers has become a destination all by itself.
Many travelers plan their entire day around stopping here for lunch.
Old Plantation Restaurant
Located in Medicine Park and known for steaks, seafood, and historic charm.
Small Cafes in Medicine Park
You’ll find several locally owned restaurants and coffee shops perfect for a relaxed meal after exploring the refuge.
Suggested Weekend Itinerary
Day 1
Drive from Dallas
Explore Medicine Park
Check into lodging
Dinner in town
Watch sunset at Lake Lawtonka
Day 2
Sunrise drive through the refuge
Mount Scott
Prairie Dog Town
Wildlife viewing
Lunch at Meers
Afternoon hiking
Holy City
Sunset from Mount Scott
Day 3
Relaxing breakfast
Explore any missed areas
Begin drive home
Family Travel Tips
Bring binoculars for wildlife viewing.
Pack plenty of water during summer months.
Start outdoor activities early to avoid afternoon heat.
Keep a safe distance from bison and other wildlife.
Wear sturdy shoes if hiking.
Download maps before arriving since cell service can be limited in some areas.
Estimated Budget
Family of Four (Weekend Trip)
Lodging: $100-$250 per night
Food: $50-$125 per day
Activities: $0-$50
Refuge Entrance: FREE
Gas: $50-$100 roundtrip from Dallas
Estimated Total: $400-$1,000
This makes Wichita Mountains one of the most affordable destinations on this entire list.
Don’t Miss This
If you only have time for one thing, drive to the top of Mount Scott.
The views stretch for miles, and it’s one of the best places to appreciate just how unique the Wichita Mountains landscape really is.
Nearby Bonus Stops
Medicine Park – A must-visit during your trip.
Lake Lawtonka – Beautiful scenery and great photo opportunities.
Fort Sill National Historic Landmark – History lovers may enjoy exploring this nearby military site.
Chickasaw National Recreation Area – An excellent add-on destination if you’re extending your Oklahoma road trip.
Final Thoughts
The Wichita Mountains Wildlife Refuge is proof that you don’t have to drive across multiple states to find incredible scenery.
Between the free-roaming bison, mountain views, hiking trails, charming small towns, and easy accessibility from Dallas, it’s one of the best weekend getaways in the region.
If you’re looking for a road trip that’s affordable, family-friendly, and packed with outdoor adventure, the Wichita Mountains deserve a spot on your bucket list.
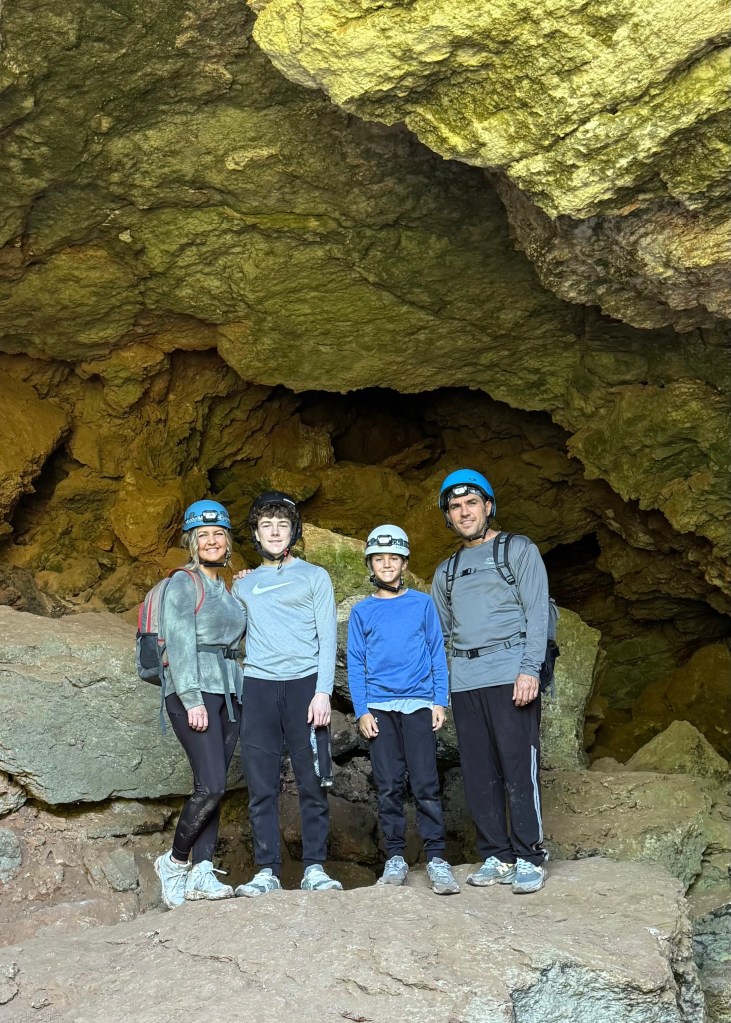
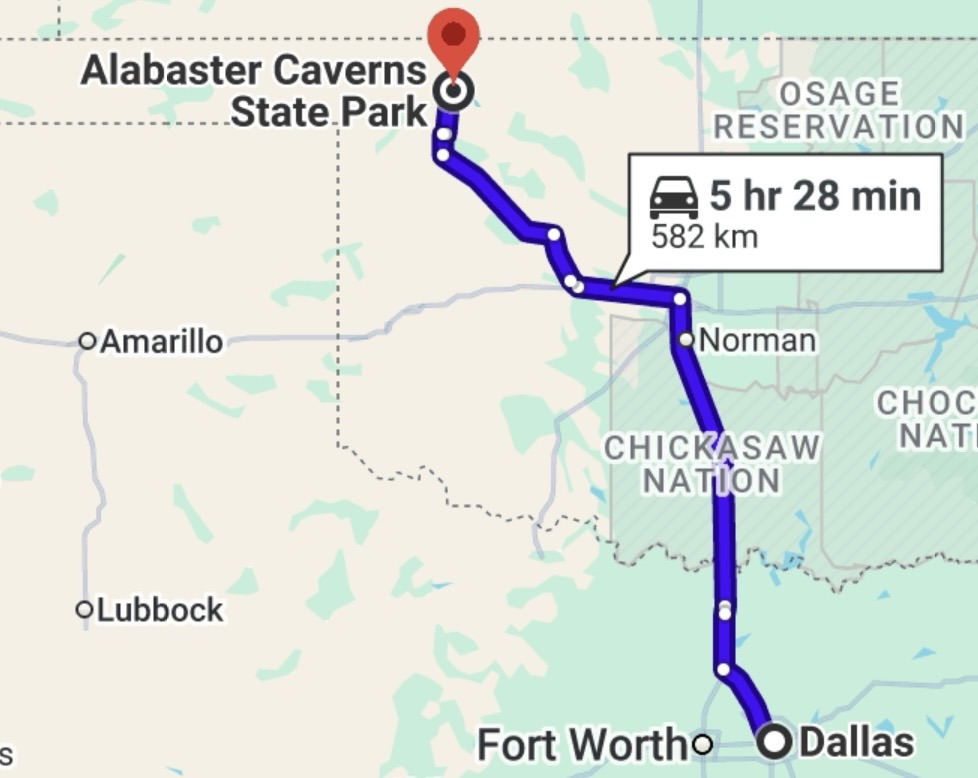
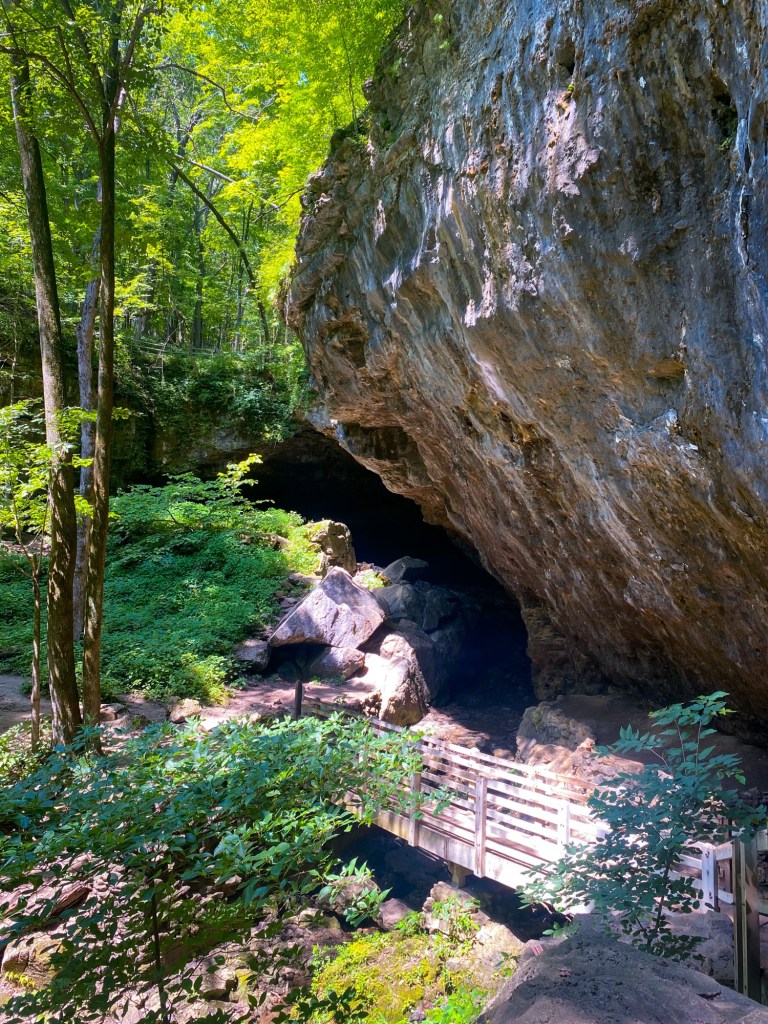
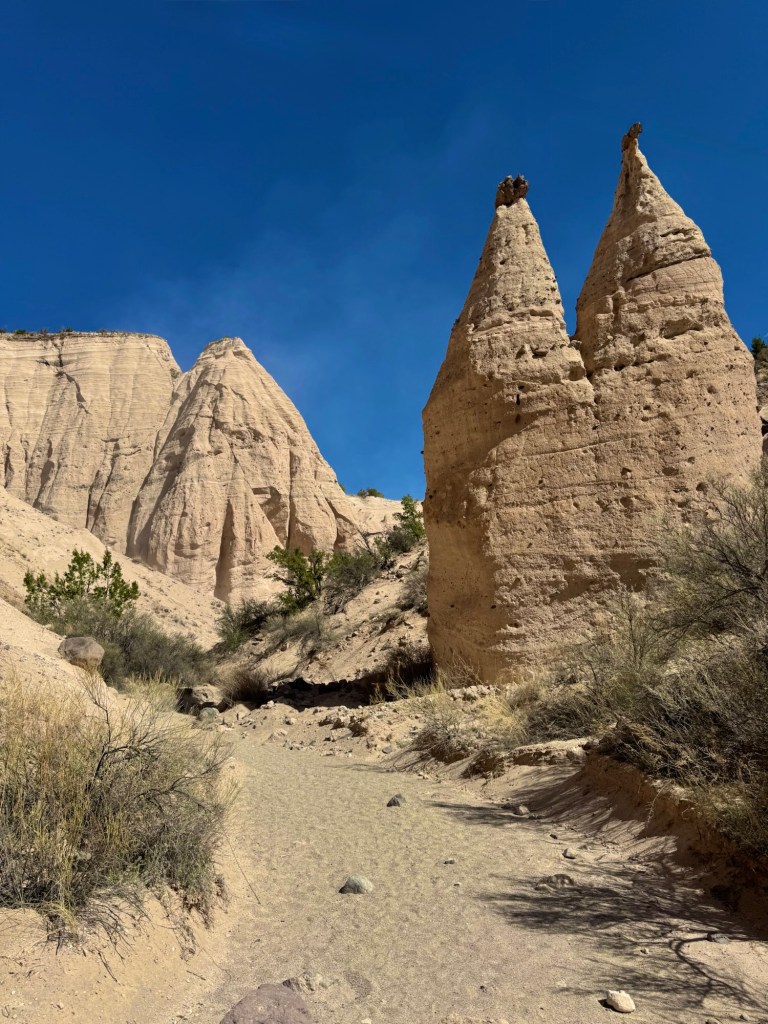
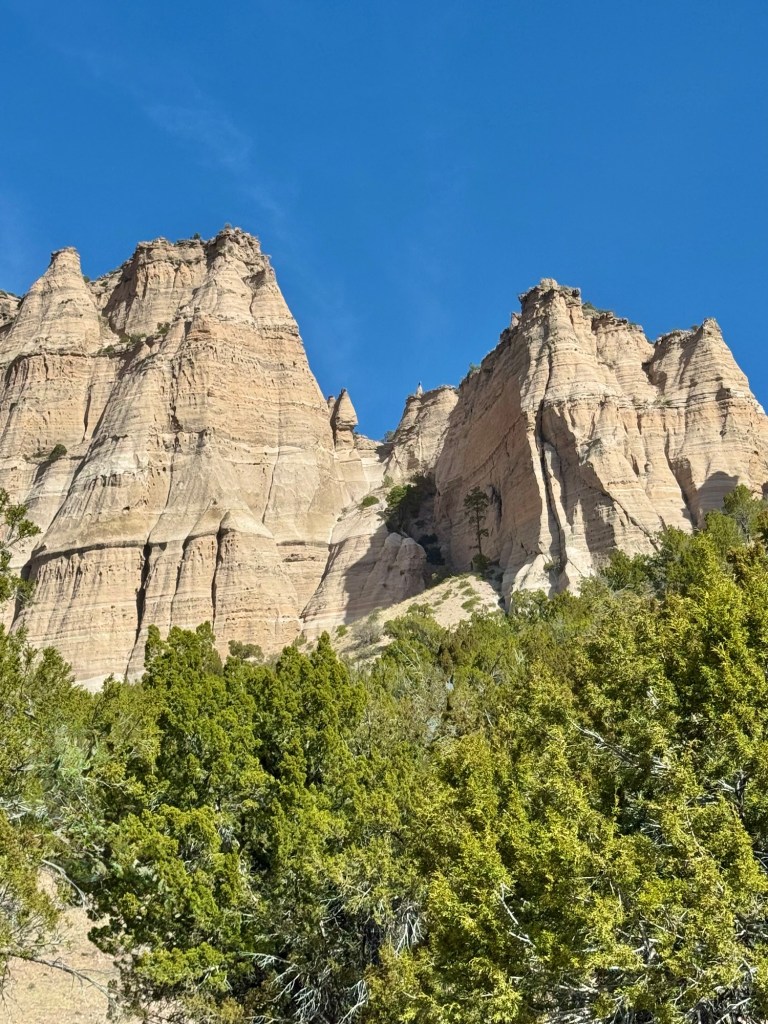
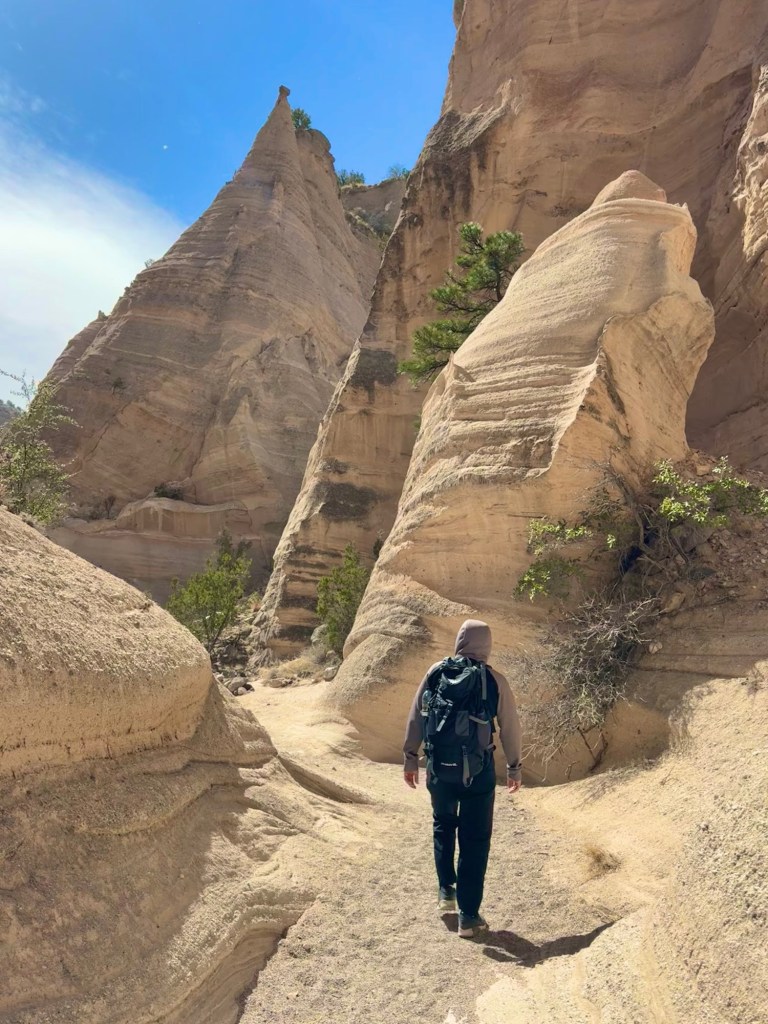
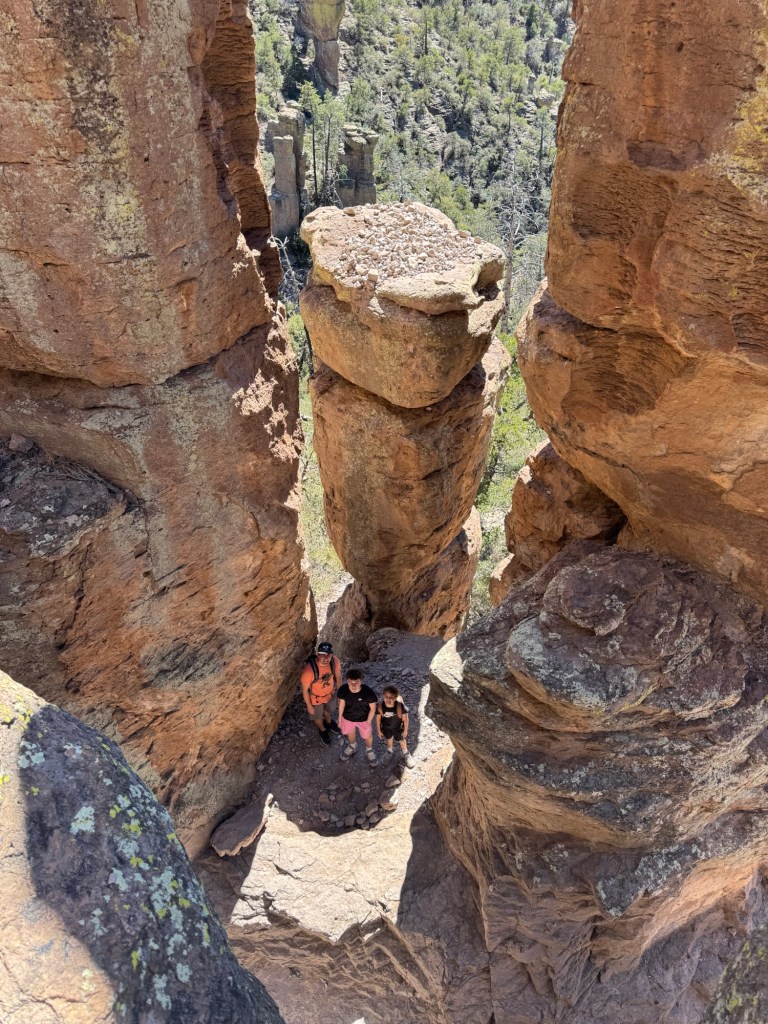
Alabaster Caverns State Park: One of Oklahoma’s Most Unique Hidden Gems
Drive Time from Dallas: Approximately 5-6 Hours
Recommended Trip Length: Weekend (2 Days)
Best Time to Visit: Spring and Fall, though the cave remains cool year-round
Best For: Unique family adventures, cave tours, weekend getaways, geology lovers, and travelers looking for something different
If you’ve already explored the Wichita Mountains and are looking for another Oklahoma road trip that feels completely different, Alabaster Caverns State Park deserves a spot on your bucket list.
For families, it’s the perfect mix of education and adventure. Kids love exploring underground spaces, and adults appreciate the opportunity to experience something truly different from the typical hiking-and-waterfall road trip.
Why Alabaster Caverns Is Worth the Drive
Let’s be honest—most people don’t think “cave adventure” when planning a road trip from Dallas. That’s exactly why Alabaster Caverns is such a fun surprise.
Unlike many cave systems that require long hikes or advanced tours, the main cavern can be explored on a guided tour that is accessible for most visitors. The cave stays cool year-round, making it an especially appealing destination during Oklahoma’s hot summer months.
Guided Cave Tours: Fees apply and may vary by age.
Tour schedules can change seasonally, so it’s always a good idea to check the park website or call ahead before visiting.
Best Things To Do
Take the Guided Cave Tour
This is the main reason to visit.
The guided tour takes visitors deep into the cavern system while sharing information about the cave’s geology, history, and wildlife.
You’ll walk through large chambers, narrow passageways, and areas filled with unique mineral formations.
The temperature inside remains around 55-60 degrees year-round, providing a welcome break from summer heat.
Road Trip Queen Tip: Bring a light jacket even during the middle of summer.
Explore the Nature Trails
Several trails around the park provide opportunities to explore the surrounding prairie landscape.
While most visitors focus on the cave, these trails offer a chance to stretch your legs and enjoy the area’s natural beauty.
Wildlife Viewing
The park is home to a variety of wildlife including:
Deer
Wild turkeys
Birds of prey
Small mammals
Bring binoculars if you enjoy birdwatching.
Stargazing
One of the most underrated reasons to visit this area is the dark sky.
With very little light pollution, the night skies can be spectacular.
If you’re staying overnight, spend some time outside after dark—you may be surprised by how many stars you can see.
Where To Stay
Budget-Friendly
Woodward, Oklahoma: Located about 30 minutes away and offers the largest selection of hotels.
Camping
The park offers campsites for travelers wanting a more affordable and immersive outdoor experience.
Unique Stay
Cabins and vacation rentals throughout northwestern Oklahoma provide a peaceful getaway surrounded by open prairie.
Where To Eat
Freedom, Oklahoma
Small local cafes and restaurants provide simple meals near the park.
Woodward
For more dining options, head into Woodward where you’ll find:
Local diners
Steakhouses
Family-friendly restaurants
Chain restaurants
Many visitors choose to stay in Woodward and drive to the park for the day.
Suggested Weekend Itinerary
Day 1
Drive from Dallas
Arrive at Alabaster Caverns
Take the guided cave tour
Explore the trails
Enjoy sunset and stargazing
Day 2
Breakfast nearby
Visit Gloss Mountain State Park
Scenic drive through northwestern Oklahoma
Begin drive home
Family Travel Tips
Wear closed-toe shoes.
Bring a light jacket.
Call ahead to confirm tour times.
Bring water and snacks.
Download maps before arriving.
Allow extra time for the drive on rural highways.
Estimated Budget
Family of Four (Weekend Trip)
Lodging: $100-$250 per night
Food: $50-$125 per day
Cave Tours: $20-$50 total depending on family size
Gas: $75-$150 roundtrip from Dallas
Estimated Total: $350-$900
This is one of the most affordable road trips on this list.
Don’t Miss This
The guided cavern tour is absolutely the highlight of the trip. The scale of the cave, the unique alabaster formations, and the cool underground temperatures make it an experience that feels completely different from anything else you’ll find within driving distance of Dallas.
Nearby Bonus Stops
Gloss Mountain State Park: The white gypsum mesas create one of the most unusual landscapes in Oklahoma and offer beautiful panoramic views.
Boiling Springs State Park: Another great option for extending your Oklahoma adventure.
Woodward: A convenient overnight stop with lodging, restaurants, and additional attractions.
Final Thoughts
Alabaster Caverns may be the least-known destination on this list, but that’s part of what makes it special.
If you’re looking for a road trip that’s different from the typical mountain getaway or beach vacation, Alabaster Caverns is worth adding to your travel list.
Whether you’re dreaming of hiking through Zion’s famous red rock canyons, chasing waterfalls in Tennessee, spotting bison in Oklahoma, relaxing on the beaches of Gulf Shores, or exploring Colorado’s breathtaking mountain towns, these destinations prove you don’t have to hop on a plane to experience an unforgettable summer adventure.
Most people don’t think of Oklahoma when they’re planning an epic weekend road trip from Dallas. And honestly? I used to be one of them.
But after spending a weekend exploring hidden corners of the state, I completely changed my mind. Within just a few hours of Dallas, we found rugged mountain views, free-roaming bison, a waterfall tucked into the forest, and one of the largest gypsum caves in the world.
It felt adventurous, affordable, easy to reach, and surprisingly uncrowded compared to many popular Texas destinations.
If you’ve been looking for a weekend getaway that feels different without needing flights or tons of planning, these Oklahoma state parks deserve a spot on your list.
And the best part? Each stop feels completely different from the next — which makes this one of the most unexpected road trips from Dallas we’ve done.
Oklahoma Weekend Road Trip Snapshot
Starting Point: Dallas, TX
Best For: Families, hikers, outdoor lovers, and weekend adventurers
If I had to pick one place in Oklahoma that instantly makes you feel like you’ve left the South entirely, it would be the Wichita Mountains. Massive granite mountains rise out of the prairie while bison, elk, and longhorn cattle roam freely through the refuge. It honestly feels more like somewhere out west than a destination just a few hours from Dallas.
We spent time driving the scenic roads, stopping at overlooks, and hiking around the refuge — and every turn felt like another “wait…this is Oklahoma?!” moment.
Don’t miss:
Seeing the free-roaming bison
Hiking the Narrows Trail or Elk Mountain area
Sunset views across the prairie
The surprisingly dramatic mountain scenery
Best Time to Visit: Spring and fall are ideal for cooler temperatures, greener landscapes, and active wildlife.
Good to Know: Bison frequently block the roads, so drive slowly and never approach wildlife for photos.
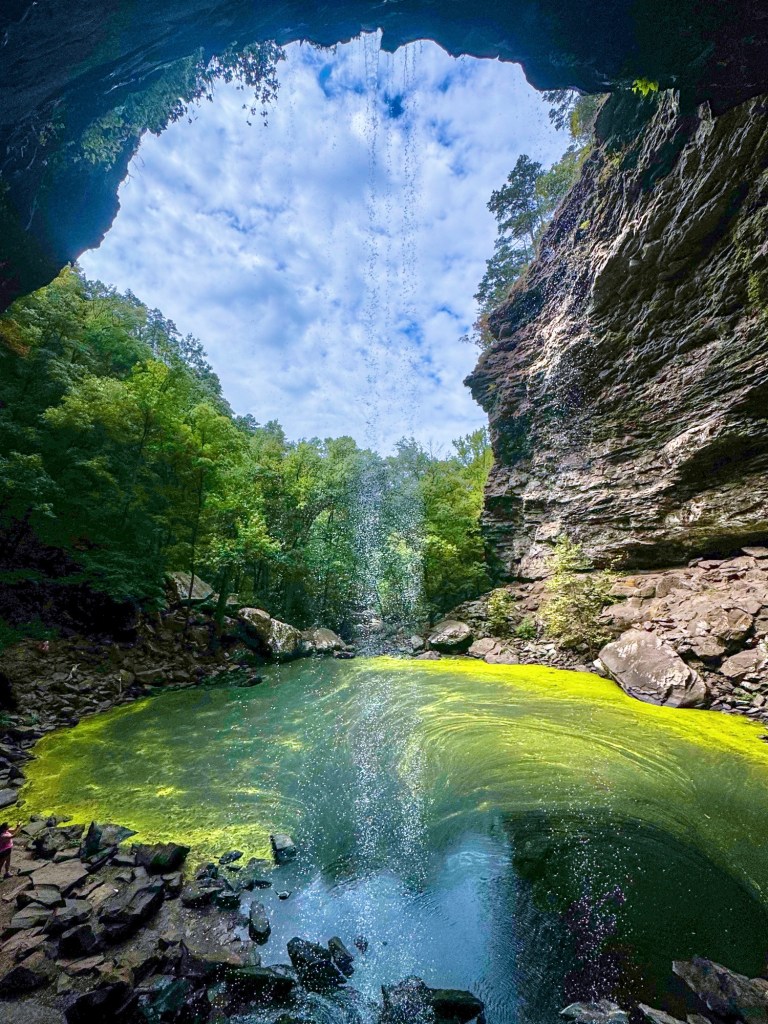
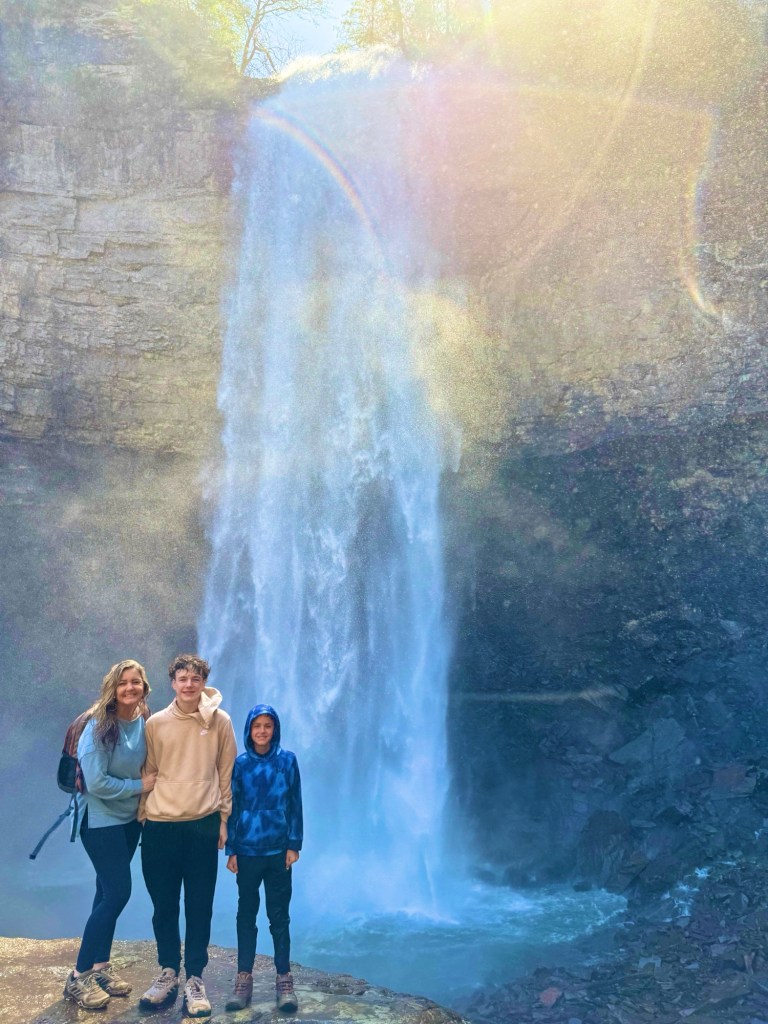
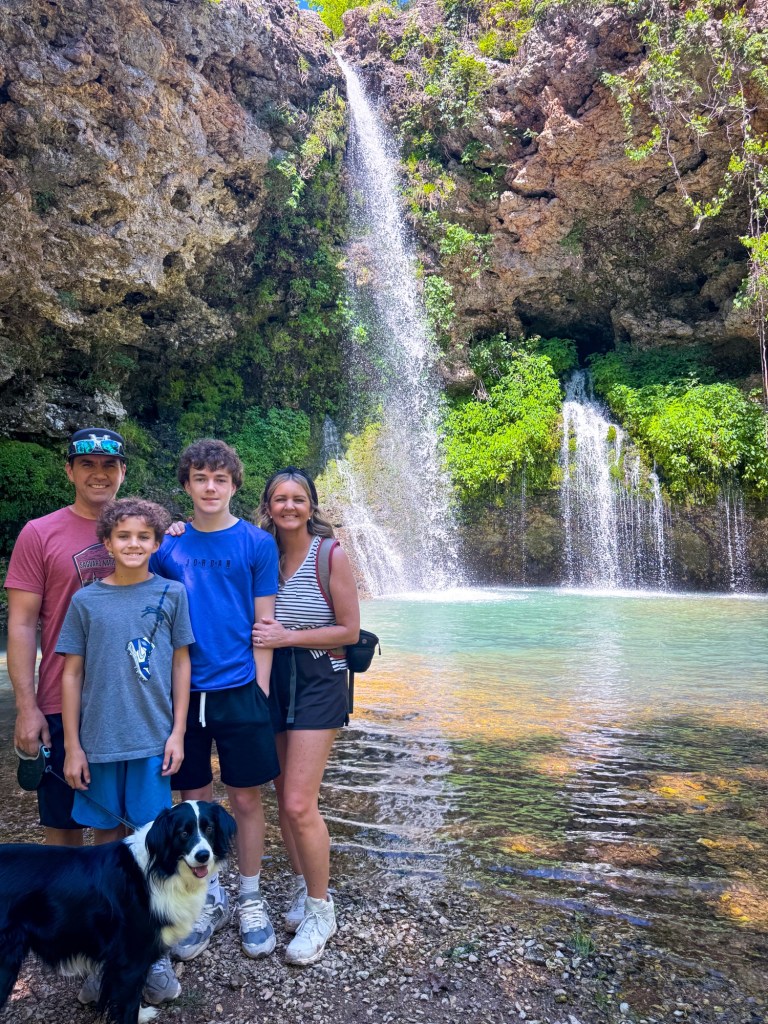
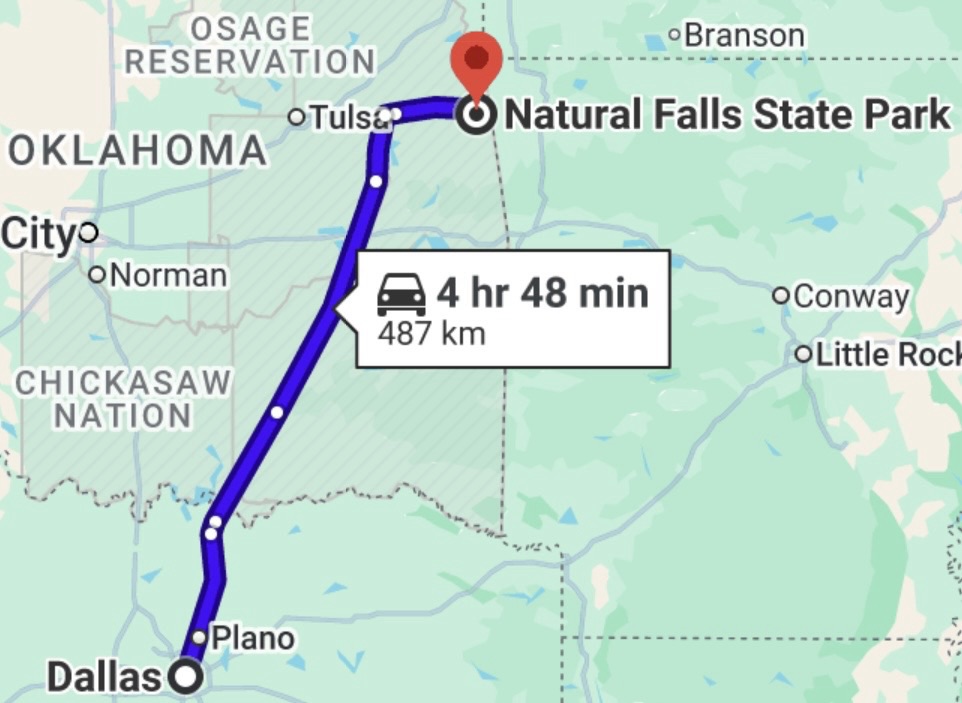
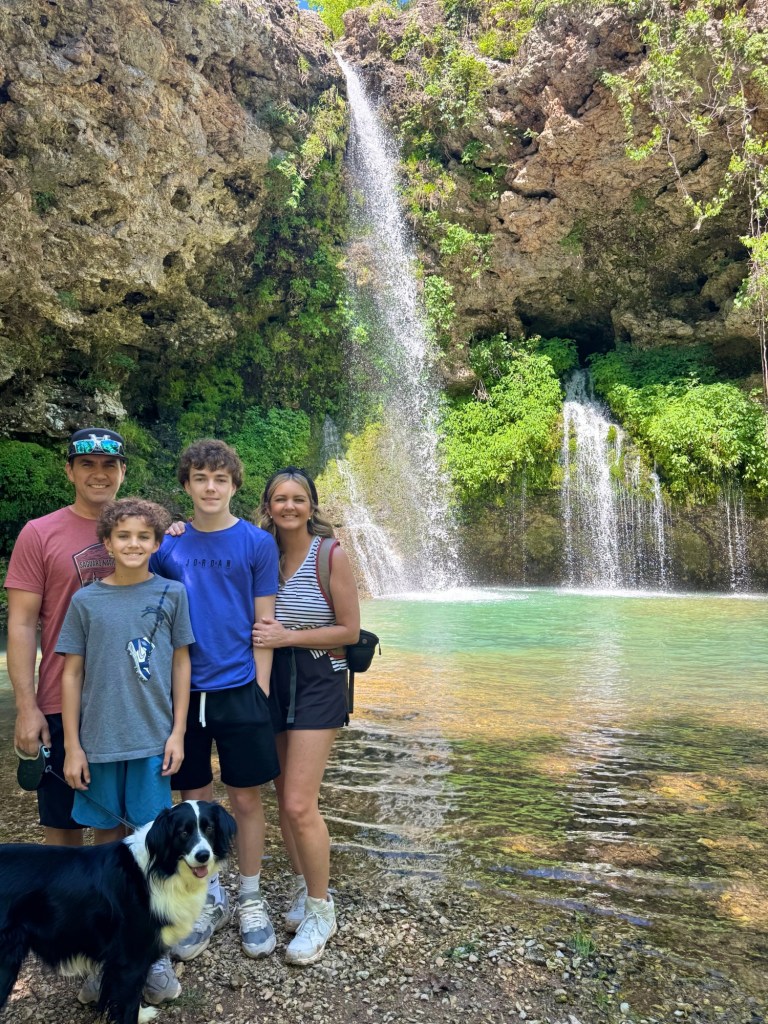
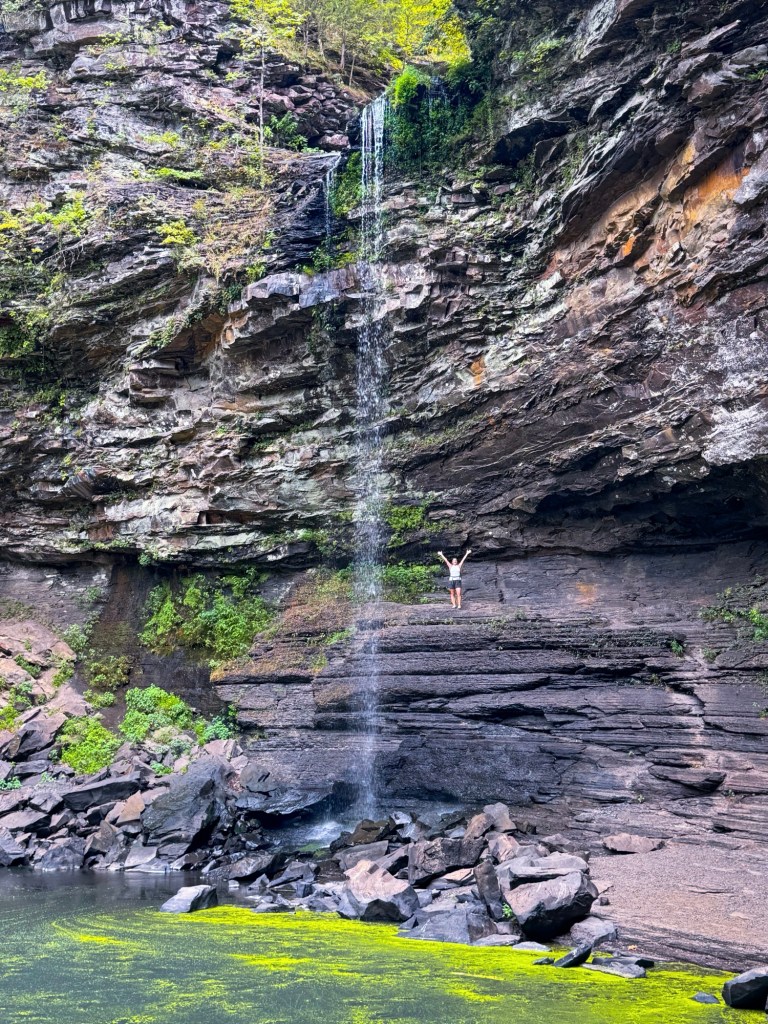
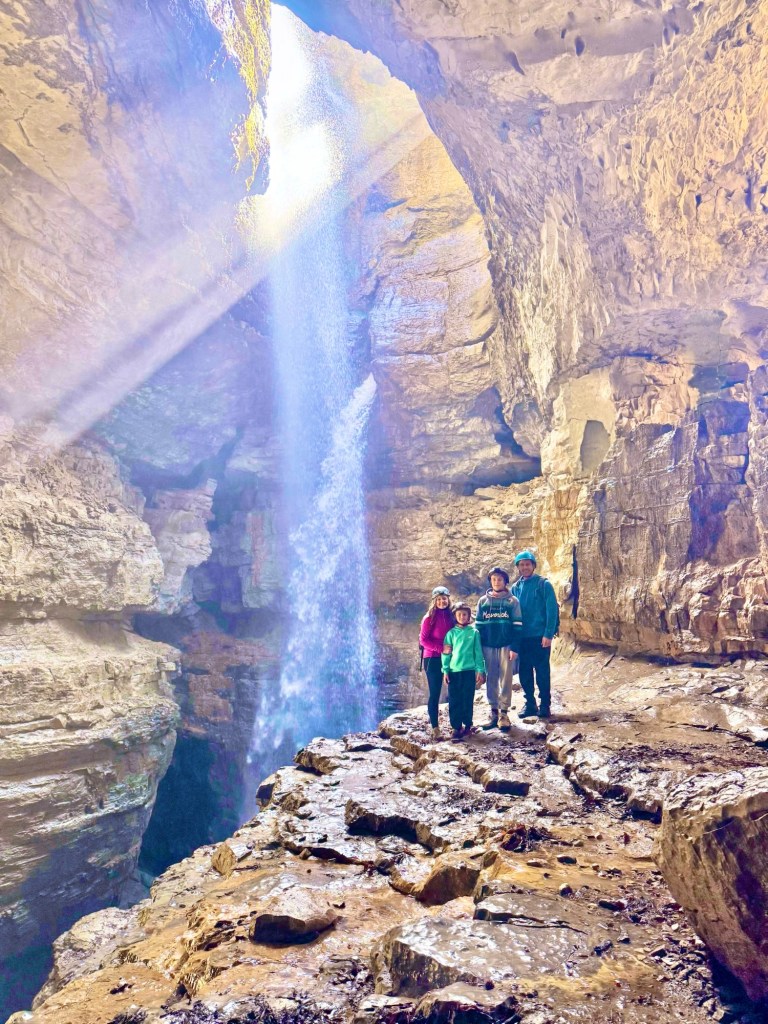
Natural Falls State Park feels like a hidden pocket of the Ozarks tucked into northeast Oklahoma. The main attraction is a stunning 77-foot waterfall surrounded by lush greenery, wooden staircases, and shaded trails that make the entire park feel cool and peaceful — especially in spring and early summer.
The waterfall overlook is beautiful, but the real magic happens when you hike down closer to the falls and hear the rushing water echo through the canyon.
Don’t miss:
The waterfall overlook trail
Walking down to the base viewing area
The Dripping Springs trail area
Visiting after recent rain for the strongest waterfall flow
Best Time to Visit: Spring and early summer are usually best for waterfall flow and lush scenery.
Good to Know: There are several stair sections throughout the park, so comfortable shoes are definitely worth it.
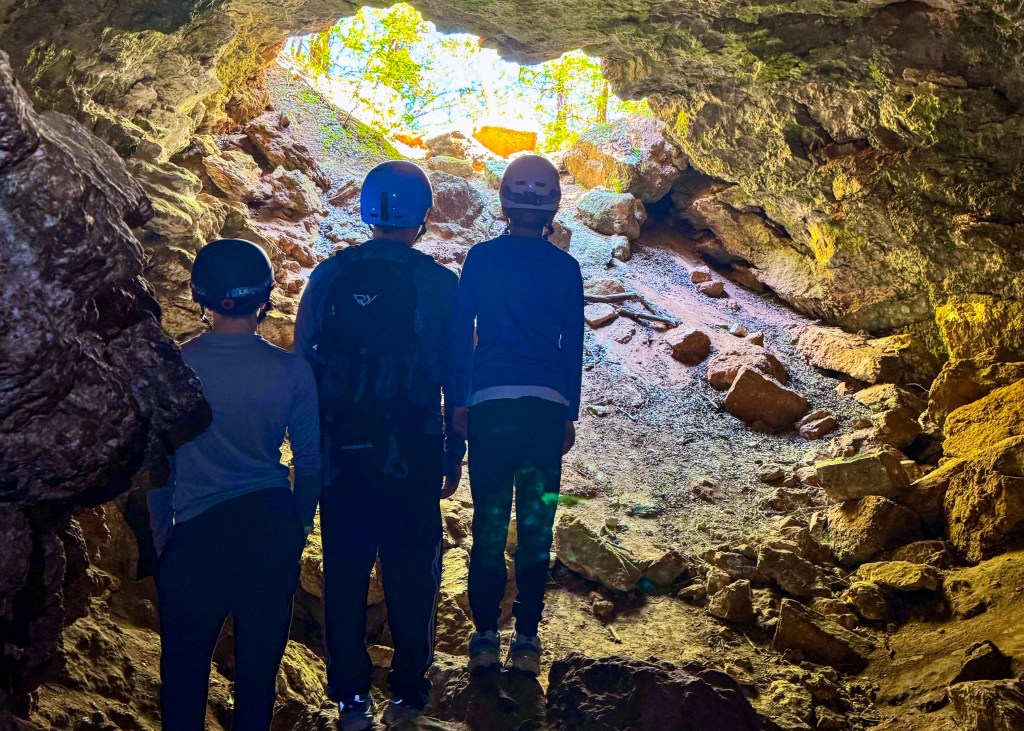
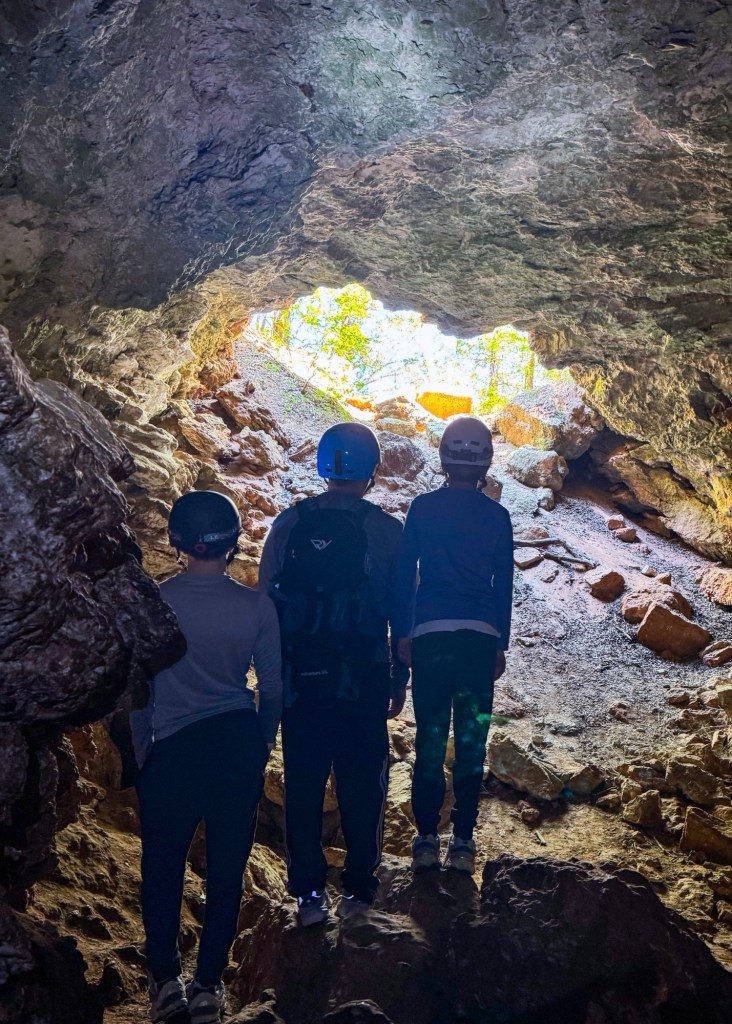
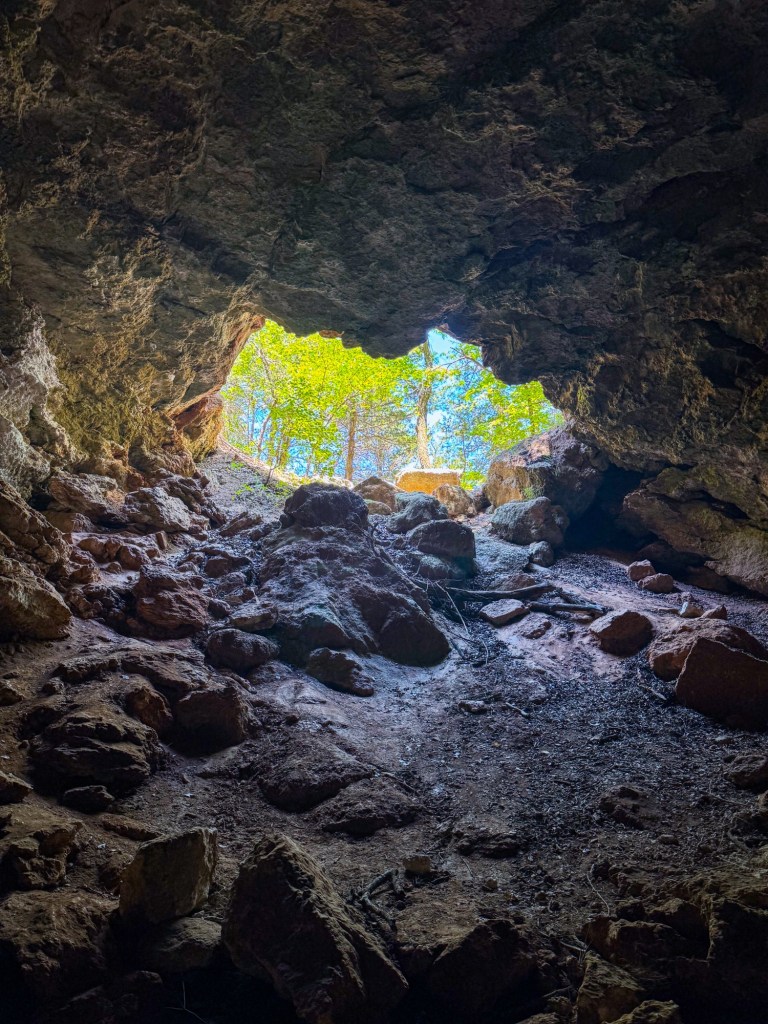
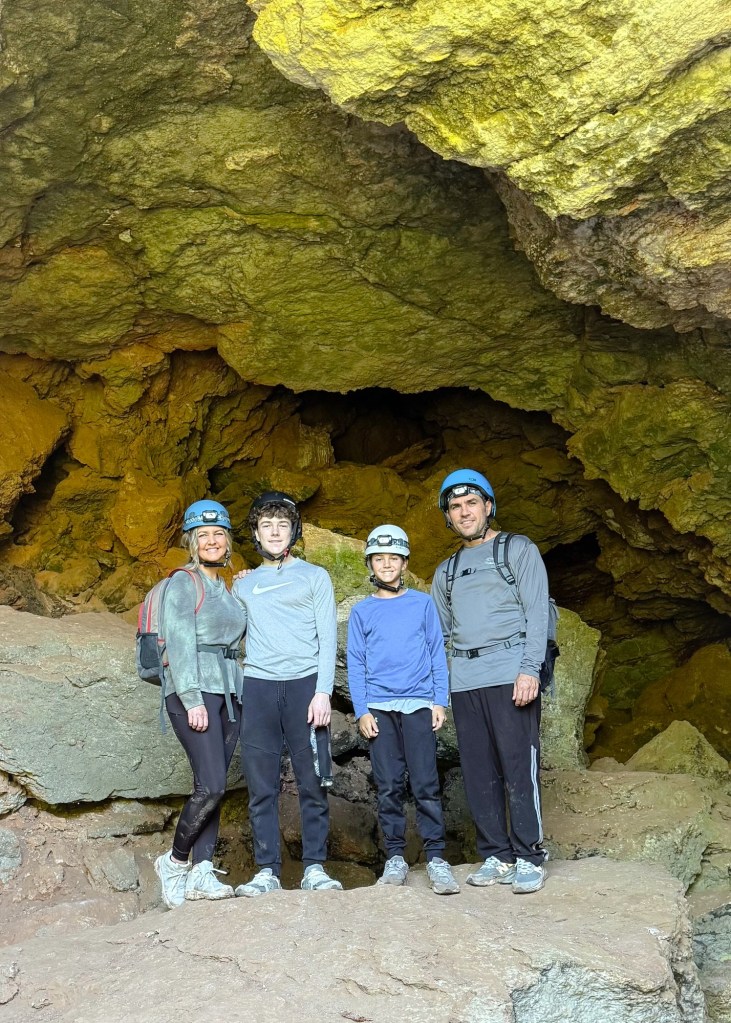
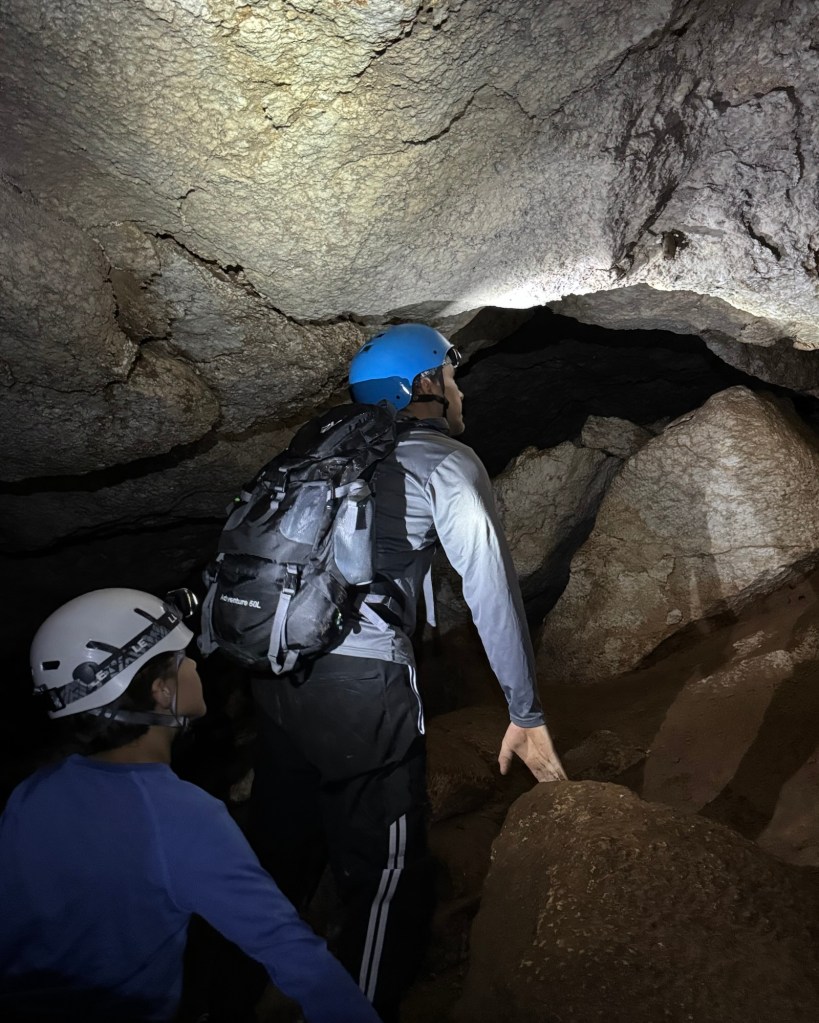
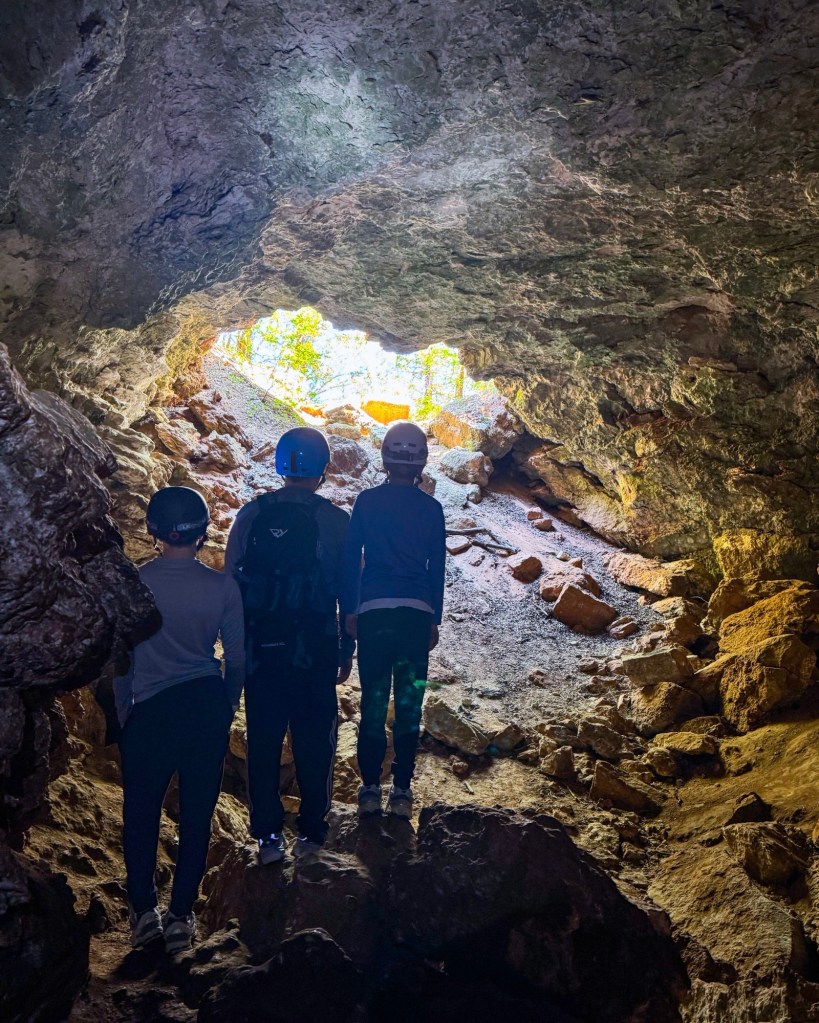
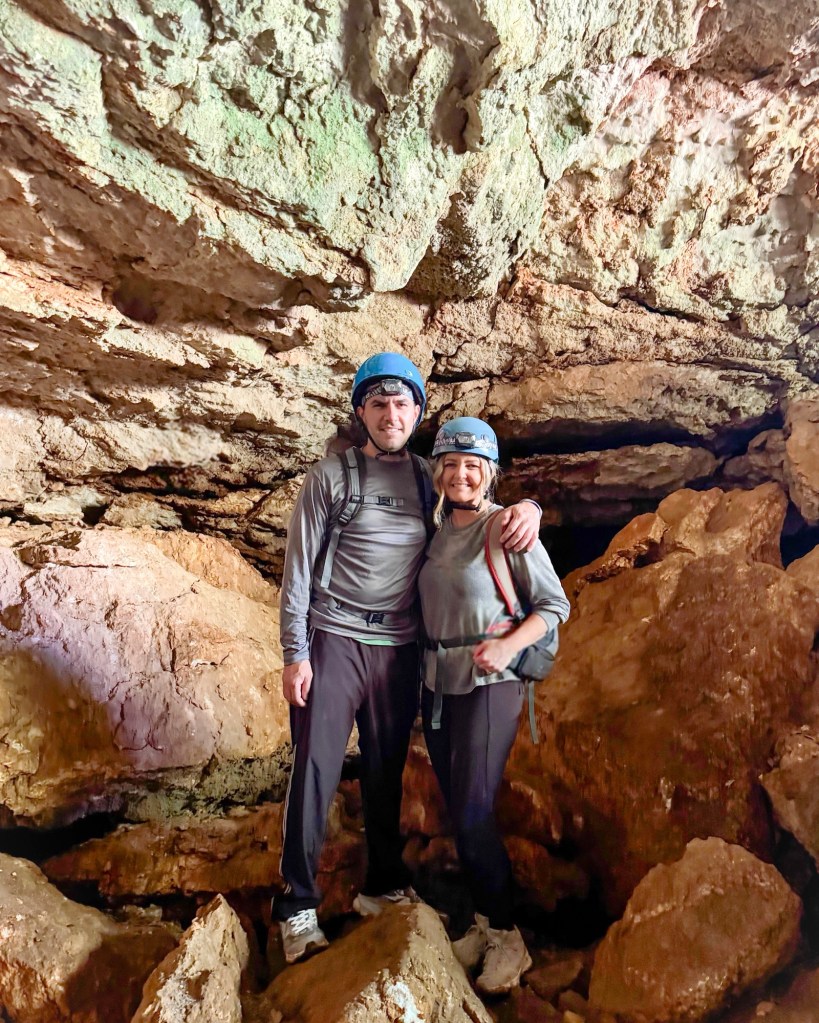
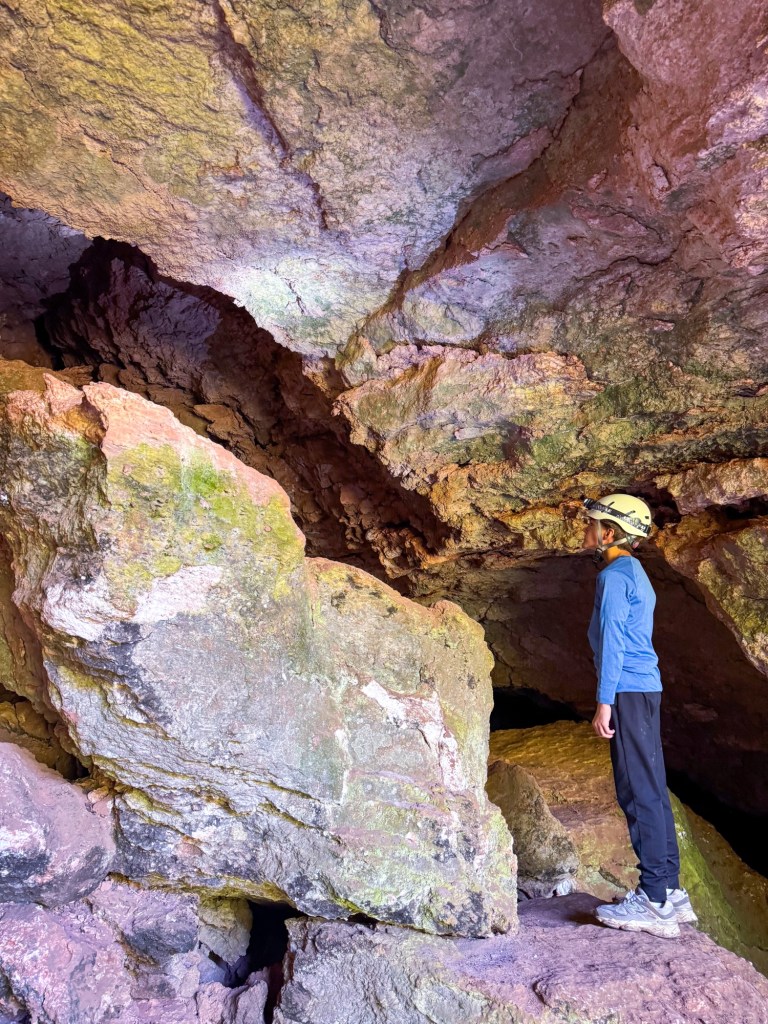
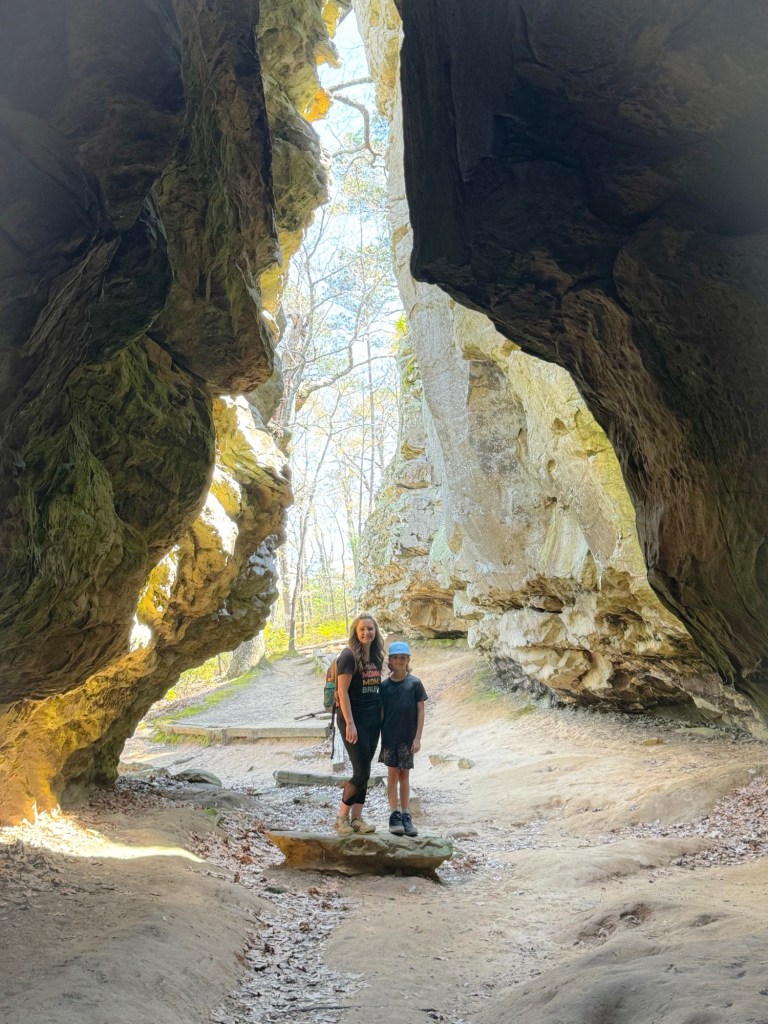
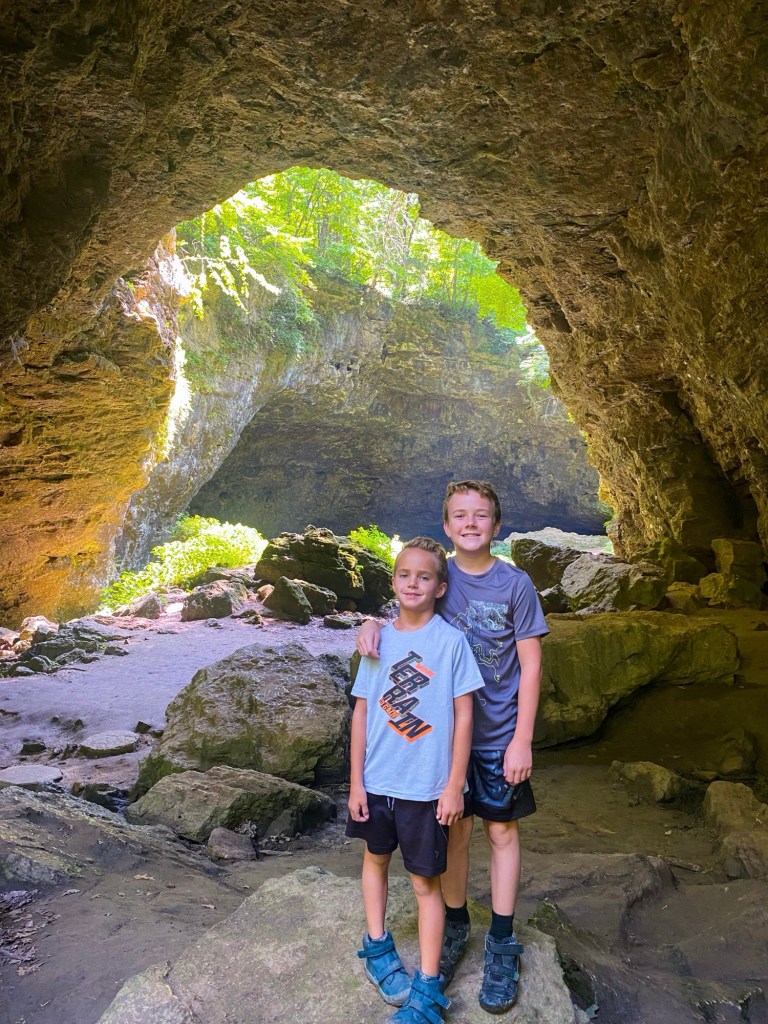
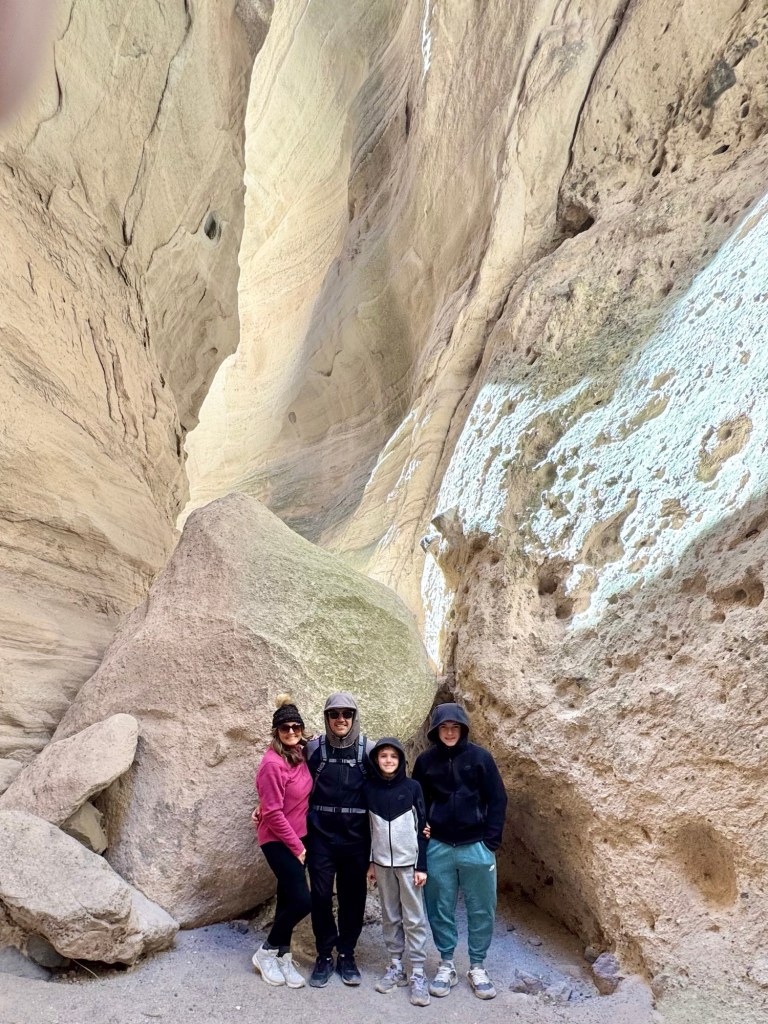
Out of all the Oklahoma parks we visited, Alabaster Caverns was probably the most unexpected adventure of the trip. This park is home to one of the world’s largest natural gypsum caves open to the public — and yes, you can actually go wild caving here.
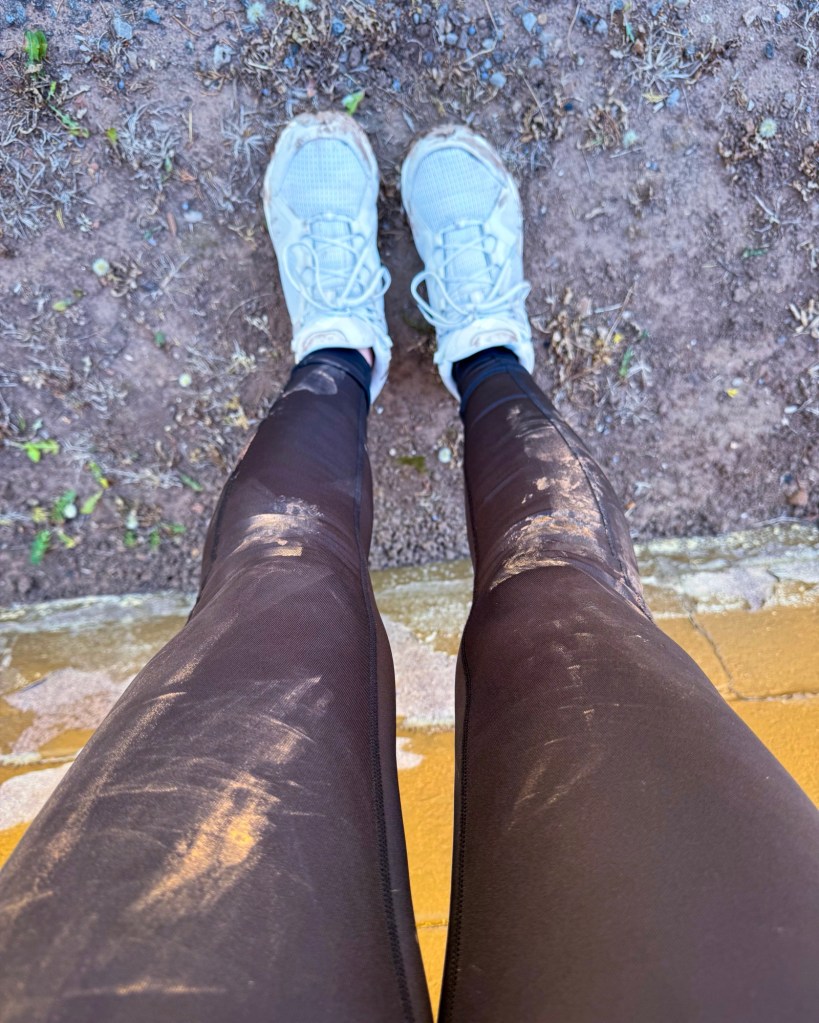
We explored several of the wild caves, crawling through tight spaces, climbing over rocks, and getting completely covered in dirt along the way. It felt adventurous, slightly chaotic, and incredibly fun in the best road trip kind of way.
Even if wild caving isn’t your thing, the guided cavern tour is still worth doing. The cave stays cool year-round and the pink, white, and black gypsum formations are unlike anything else we’ve seen nearby.
Don’t miss:
The guided cavern tour
Wild caving in the open caves
Seeing the pink gypsum formations
Staying nearby in Woodward for an easy weekend base
Best Time to Visit: This park works well year-round because the cave temperatures stay cool even during summer.
Good to Know: Wild caving availability changes seasonally due to bat hibernation closures, so check conditions before your trip.
What I’d Do Differently Next Time
Bring gloves, knee pads, and old clothes/shoes for wild caving
Visit Wichita Mountains in the spring to see the wildflowers
Stay an extra night to make the driving feel more relaxed
Add more time for scenic stops and overlooks along the way
Final Thoughts
What surprised me most about this Oklahoma road trip wasn’t just how beautiful these places were — it was how unexpected they felt. Mountains, waterfalls, caves, wildlife, scenic drives… all in one completely underrated state and just a weekend trip away from Dallas!
Oklahoma completely shattered my expectations on this trip — and honestly, that’s what made it unforgettable. If you’ve been searching for hidden gems near Dallas or unique Oklahoma state parks to explore, this is your sign to finally plan the trip.
Caves, crystal-covered mountains, and waterfalls — all in one weekend.
If you’re looking for a unique weekend road trip from Dallas that feels WAY bigger than just a quick getaway, this Oklahoma loop seriously surprised us. In just 3 days, we explored the largest gypsum cave in the world, climbed sparkling white mesas, and ended the trip at a hidden waterfall tucked inside the forest — all without taking a single day off work.
This route is perfect for families, couples, or anyone looking for hidden gems near Texas that aren’t overcrowded.
Our Exact Weekend Route
Friday Evening
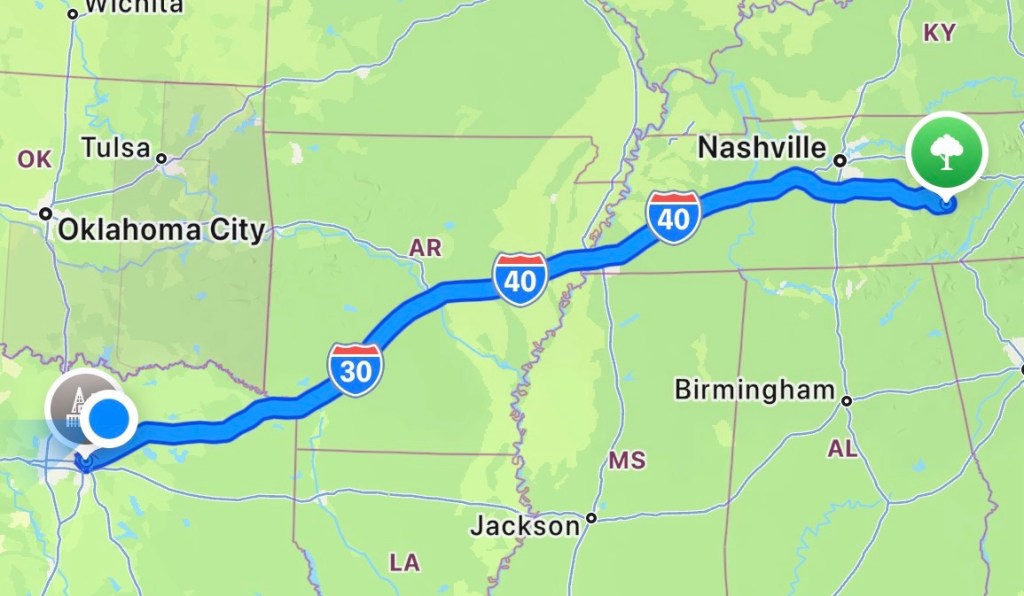
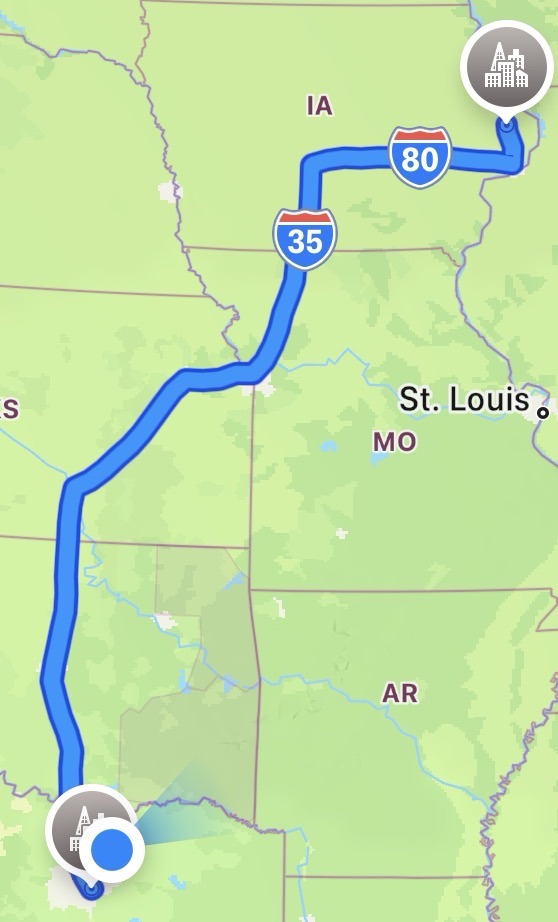
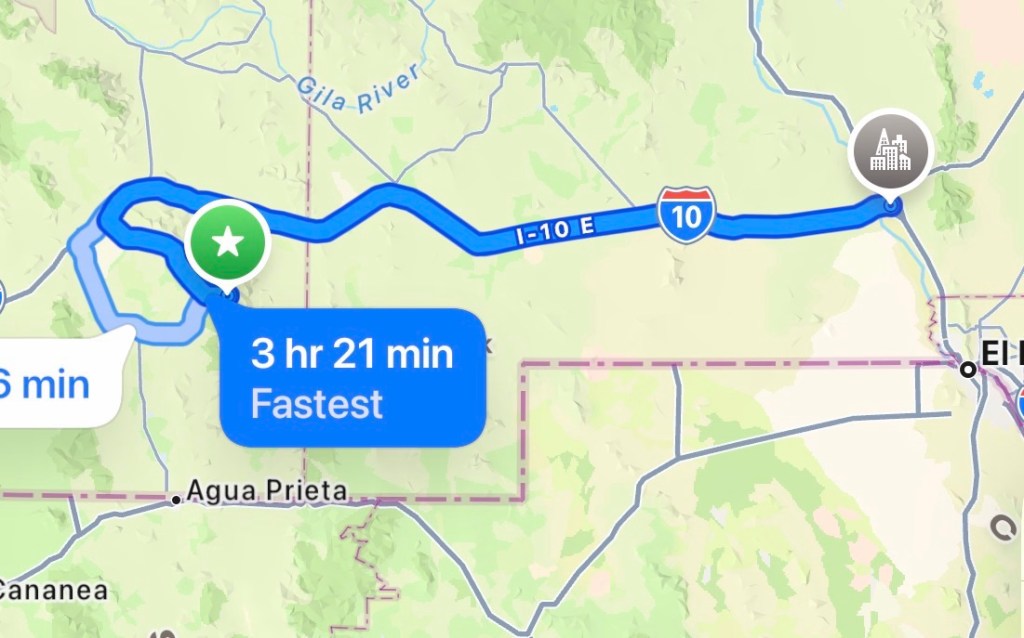
Dallas → Woodward, Oklahoma ⏰ Drive Time: About 5–5.5 hours
We left after work/school on Friday and drove straight to Woodward since it’s the best home base for visiting Alabaster Caverns State Park.
Where We Stayed
We stayed both Friday and Saturday night in Woodward to avoid packing up and changing hotels.
The main cave is the largest natural gypsum cave in the world open to the public, and the guided tour is worth doing even if you’re not usually a “cave person.”
But the REAL adventure? Wild caving.
We explored 3 of the open wild caves, and it was easily the highlight of the trip. Expect crawling, scrambling, helmets, gloves, mud, and a lot of laughs. It felt like a real adventure without needing advanced experience.
Things to Know Before You Go
Guided cavern tours are offered daily
Wild caving requires helmets/headlamps
Wear old clothes and shoes with grip
Summer temperatures are HOT above ground
Bring lots of water
Don’t Miss
Cathedral Mountain Trail
The picnic area views
Cave photography opportunities
Wild caving permits/info at the visitor center
After exploring, we drove back to Woodward for our second night.
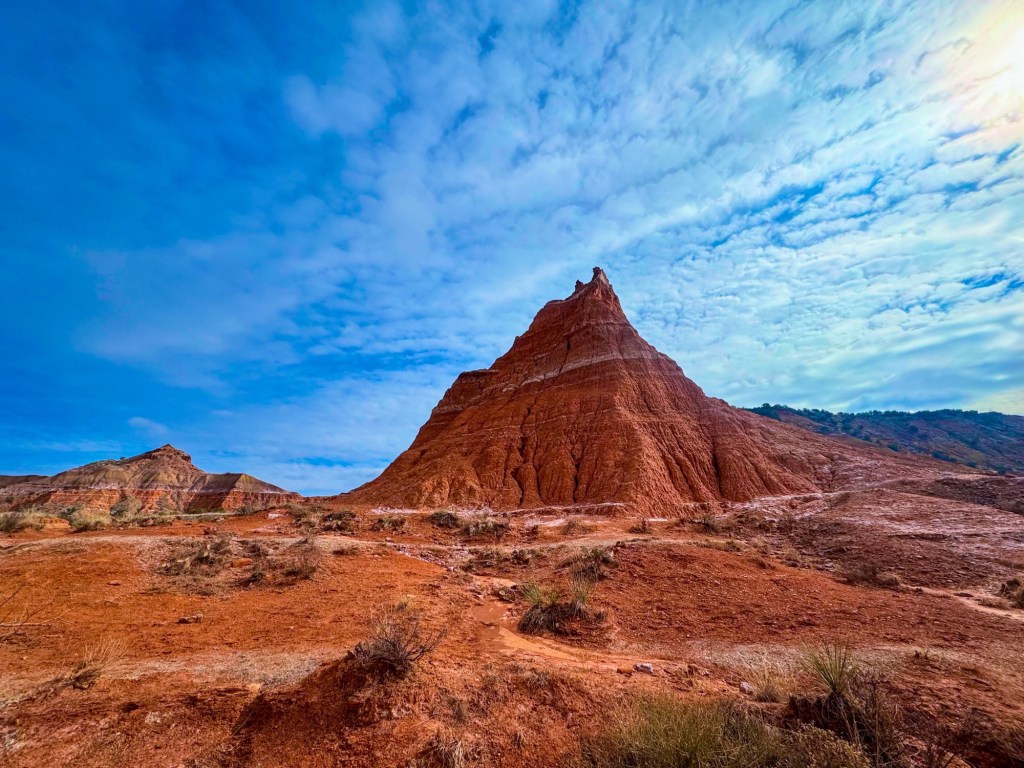
Sunday Stop #1: Gloss Mountain State Park
⏰ Woodward to Gloss Mountain: About 1.5 hours
If you’ve never seen photos of Gloss Mountain State Park, prepare to be shocked this place is in Oklahoma.
The mountains almost sparkle in the sunlight because of the selenite gypsum covering the mesas. It genuinely looks otherworldly.
The hike is short but steep, and the panoramic views are incredible.
Quick Tips
Go early before the heat ramps up
Bring water — there’s very little shade
The stairs at the beginning are the hardest part
Great stop for drone footage and photos
You don’t need a full day here. We spent a couple of hours exploring and taking photos before continuing east.
The waterfall is tucked into a lush green ravine and honestly feels nothing like the rest of Oklahoma. The short trail down to the falls is easy for most families and gives you that big payoff view pretty quickly.
This is also a great picnic stop before heading home.
Don’t Miss
The observation platform
Dripping Springs Trail
Lower viewing area near the waterfall
Suspension bridge area
Drive Home
⏰ Natural Falls State Park → Dallas Area: About 4 hours
We made it home by around 7 PM Sunday, which made this one of the BEST no-PTO weekend road trips we’ve done from Texas.
Is This Road Trip Worth It?
Absolutely.
This route packs in: ✔️ caves ✔️ waterfalls ✔️ mountain views ✔️ hidden gems ✔️ family-friendly adventure ✔️ unique Oklahoma state parks
…without needing a long vacation.
If you want a weekend trip that feels adventurous, different, and surprisingly affordable, this Oklahoma road trip loop is hard to beat.
If you’re looking for a unique outdoor adventure in Oklahoma that goes beyond the typical hiking trail, Alabaster Caverns State Park is one of those places that surprises you—in the best way.
We made the trip from Dallas and stayed nearby in Woodward, Oklahoma, and it ended up being one of those weekends that felt easy to plan but way more memorable than expected.
If you’re considering a visit, here’s exactly what it’s like—and what I’d tell a friend before they go.
Why Alabaster Caverns Is Worth Visiting
This isn’t just another cave stop.
Alabaster Caverns is home to the largest natural gypsum cave open to the public in the world, which already makes it pretty unique. But what really sets it apart is the experience—you can explore both a massive guided cave and several wild caves on your own.
Inside the main cavern, you’ll see:
White, pink, and rare black gypsum formations
Huge open chambers that don’t feel cramped
A well-maintained path that makes it accessible for most visitors
It’s impressive without feeling overwhelming, which makes it a great option for both first-time visitors and more adventurous travelers.
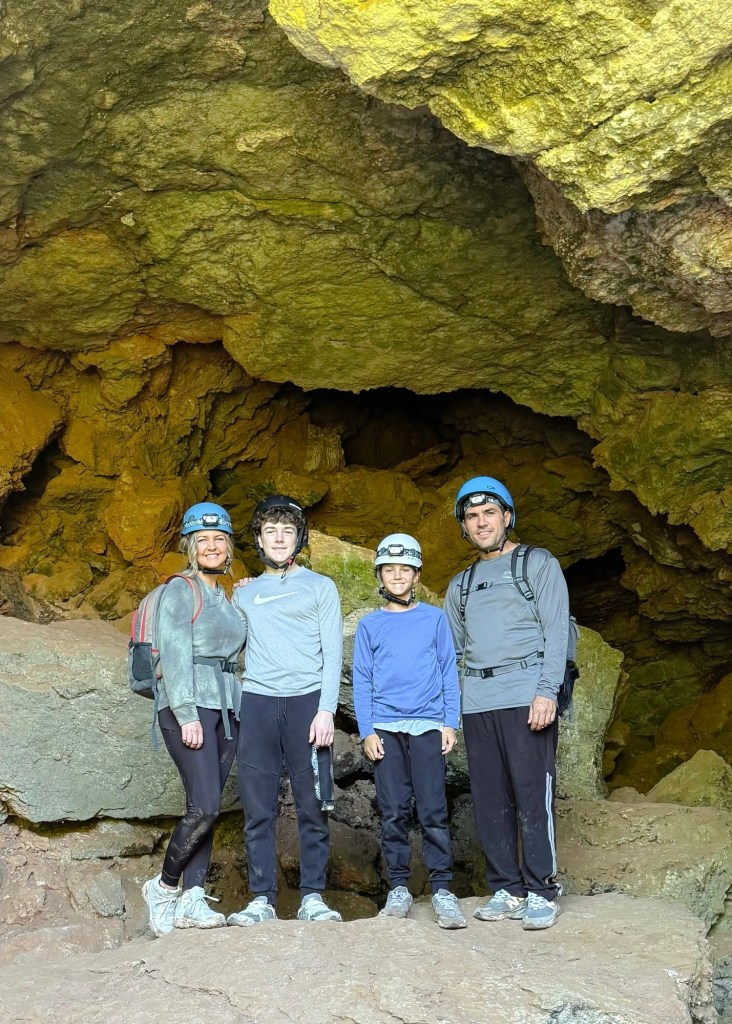
The Wild Caving Experience (What It’s Really Like)
If you’re up for a little adventure, this is the part that makes the trip.
We explored 3 of the 4 open wild caves, and it was easily the highlight of our visit.
Wild caving here is exactly what it sounds like—no guided path, no lighting, and no set route. You’re navigating it yourself.
Expect:
Crawling through narrow openings
Climbing over rocks
Ducking into low spaces
Getting dirty along the way
It’s not difficult in a technical sense, but it does feel like an adventure—which is what makes it so fun.
Each cave had a completely different feel, and it quickly turned into one of those experiences where you’re figuring it out as you go and laughing the whole time.
We didn’t explore the Ice Cave, because it required a pretty long crawl to enter the cave and we didn’t bring knee-pads with us. We plan to go back with the right gear (knee-pads/gloves) to explore this cave!
What to Bring for Wild Caving
If you plan to explore the wild caves, a little preparation goes a long way:
Headlamp (essential—your phone won’t be enough) – 3 light sources are required per person (we also brought flashlights)
Helmets required – bicycle helmets will work
Gloves for grip and to protect your hands from rocks
Knee-pads to protect your knees when crawling is required
Closed-toe shoes with traction
Clothes you don’t mind getting dirty – long sleeve shirts and pants are required
Water
There are no amenities inside the caves, so plan accordingly.
Don’t Skip the Guided Cave Tour
Even if wild caving is your main goal, the guided tour through the main cavern is absolutely worth doing.
A park ranger leads you through the cave, sharing history and pointing out formations you’d likely miss on your own. It also gives you a much better sense of the scale—this cave is bigger than most people expect.
It’s an easy, family-friendly walk and a great balance to the more rugged wild caves.
Where to Stay Nearby
Most visitors stay in Woodward, Oklahoma, about 30 minutes from the park.
It’s the most convenient base because you’ll find:
Multiple hotel options – we stayed at The Hampton Inn.
Reliable dining choices
Easy access to the park early in the day
While it’s not a destination town, it makes the logistics of the trip simple—which is exactly what you want for a quick getaway.
Tips for Visiting Alabaster Caverns State Park
A few things to know before you go:
Check cave access and seasonal closures in advance – wild caving opens May 1st (but closes fall – winter for bat hibernation)
Grab your tickets for the guided tour at the Visitor Center – tours leave every hour on the hour.
Call the Park Office (580-254-6085) for wild caving requirements (clothing, light sources, etc.)
Get your wild caving permit ($9 pp) at the Visitor Center when you arrive
Arrive early for the best tour availability
Bring snacks or lunch—options nearby are limited
Plan for limited cell service in the area
Expect to get muddy if you’re exploring wild caves
You will see bats in the caves
Final Thoughts
Alabaster Caverns State Park is one of those places that feels a little unexpected—in a good way.
It’s easy enough for a weekend trip, but different enough to feel like a real adventure. Between the massive gypsum cave and the hands-on wild caving experience, it offers something you won’t find at most state parks.
If you’re looking for a trip that’s a little outside the usual, this one is absolutely worth adding to your list.
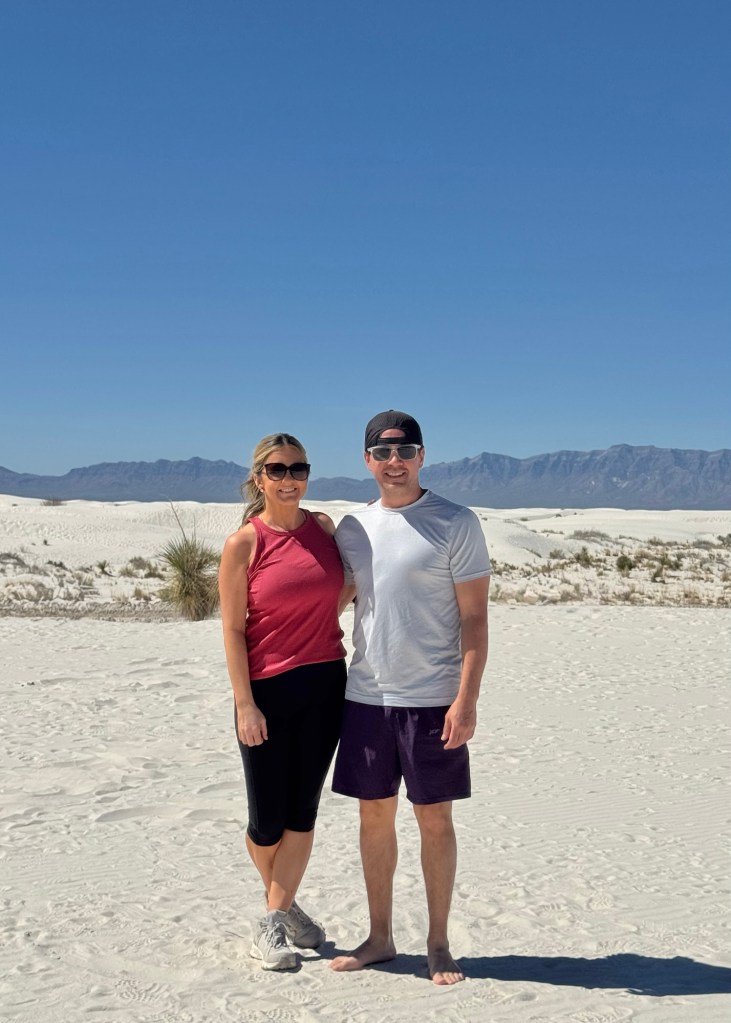
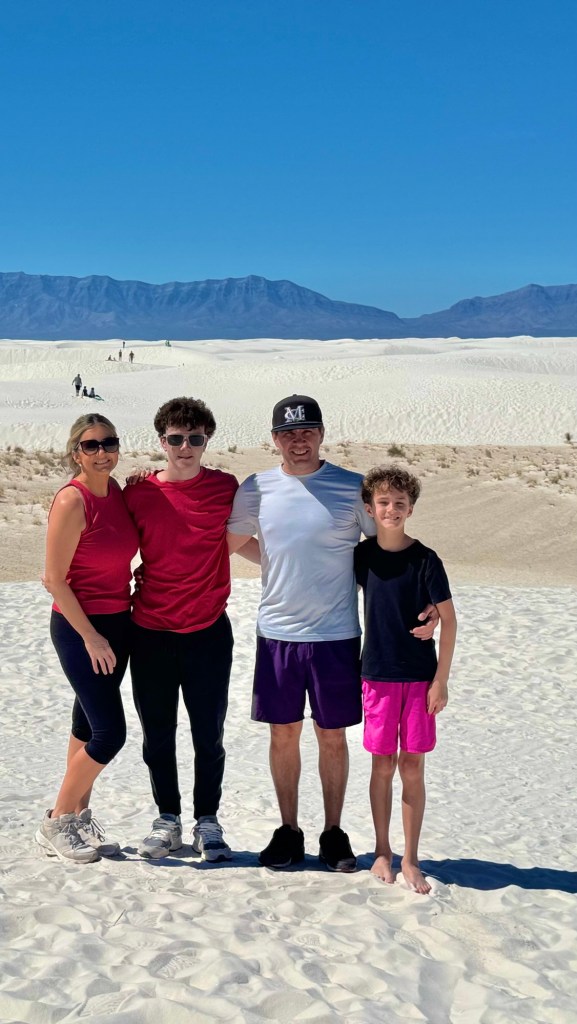
If you’re looking for the perfect 14 day road trip from Texas, this Southwest loop is one of the most unforgettable routes you can take.
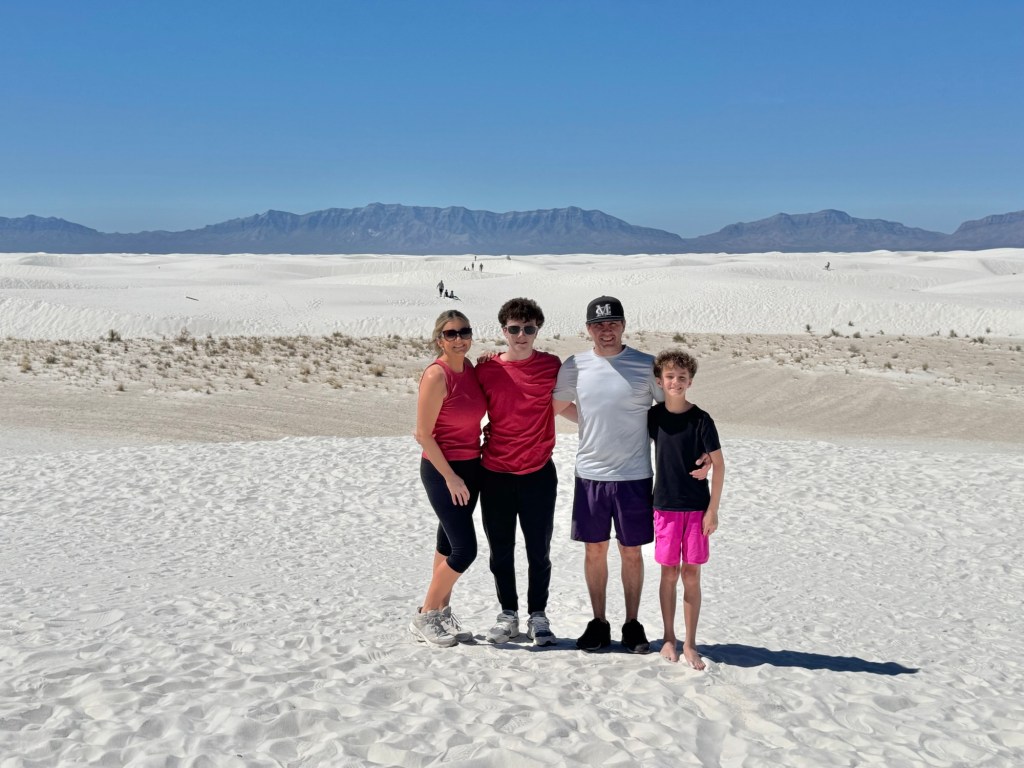
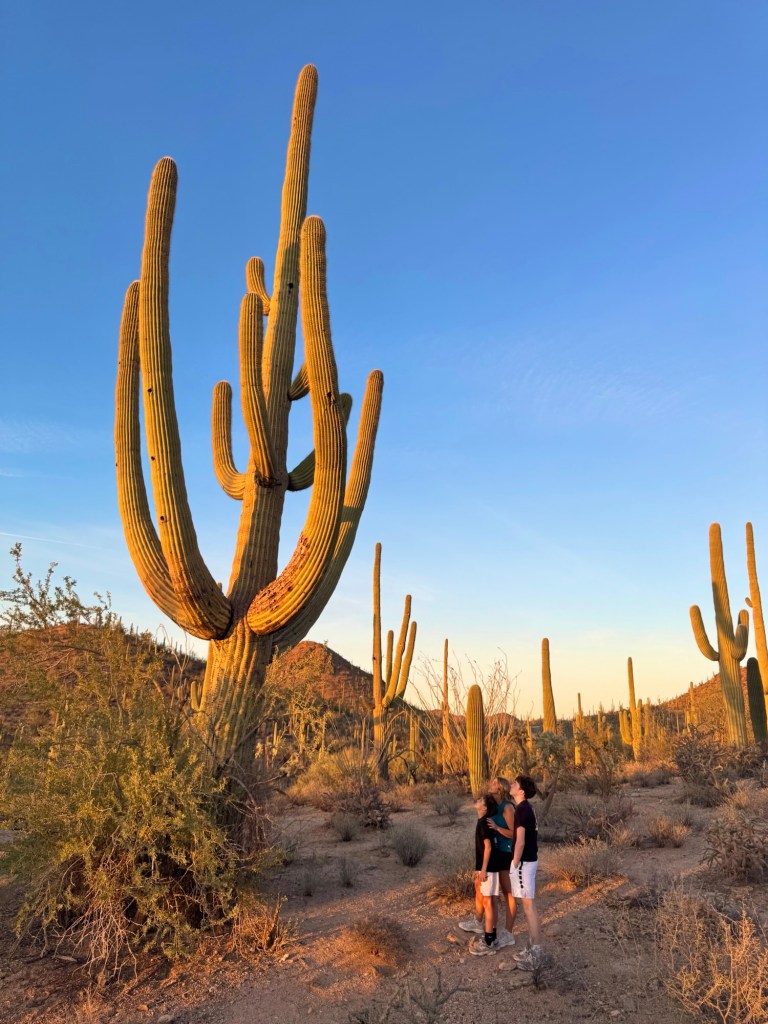
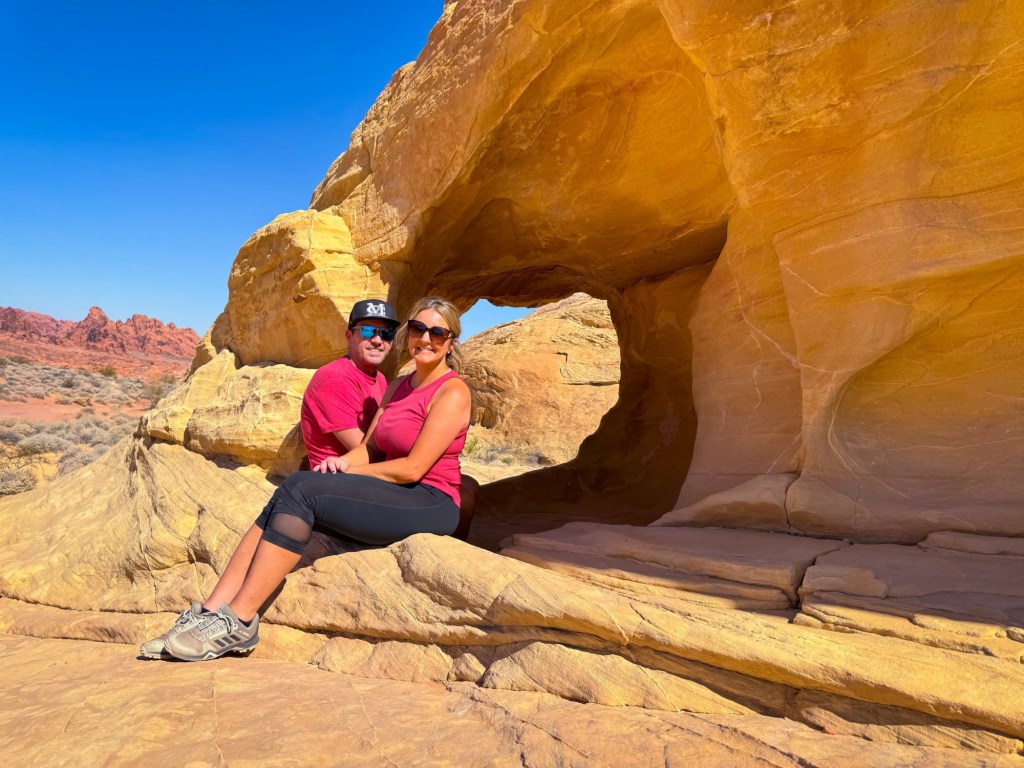
Starting and ending in Dallas, this 14 day road trip from Texas takes you through some of the most incredible landscapes in the country—from underground caves to white sand dunes to iconic national parks like Zion and the Grand Canyon.
Even better? This route is a complete loop, meaning no backtracking—just one amazing stop after another.
Overview of This 14 Day Road Trip from Texas
Start/End: Dallas, TX
Length: 14 Days
Distance: ~2,900 miles
Route Highlights: Carlsbad Caverns → White Sands → Saguaro → Valley of Fire → Zion → Grand Canyon → Albuquerque → Palo Duro Canyon
This 14 day road trip from Texas is ideal for families, first-time long-distance road trippers, or anyone wanting to experience the Southwest in one epic journey.
Quick Trip Details
Starting Point: Dallas, Texas
Total Distance: ~2,900 miles
Trip Length: 14 days
Best Time to Go: Spring or Fall
States Covered: Texas, New Mexico, Arizona, Utah, Nevada
Kick off your 14 day road trip from Texas with an early start toward Carlsbad. This is a longer drive day, but it sets up one of the most unique experiences of the entire trip.
A slower day to wrap up your 14 day road trip from Texas with one of the most underrated parks in the state.
Don’t Miss
Lighthouse Trail
The Big Cave
Sunset views
Day 14: Amarillo → Dallas
Drive Time: ~5–6 hours
Wrap up your 14 day road trip from Texas and head home.
Final Thoughts on This 14 Day Road Trip from Texas
This is one of those trips where every stop feels completely different—and somehow the views just keep getting better.
If you’ve been searching for the ultimate 14 day road trip from Texas, this route checks every box: national parks, unique landscapes, family-friendly stops, and a seamless loop you can actually follow.
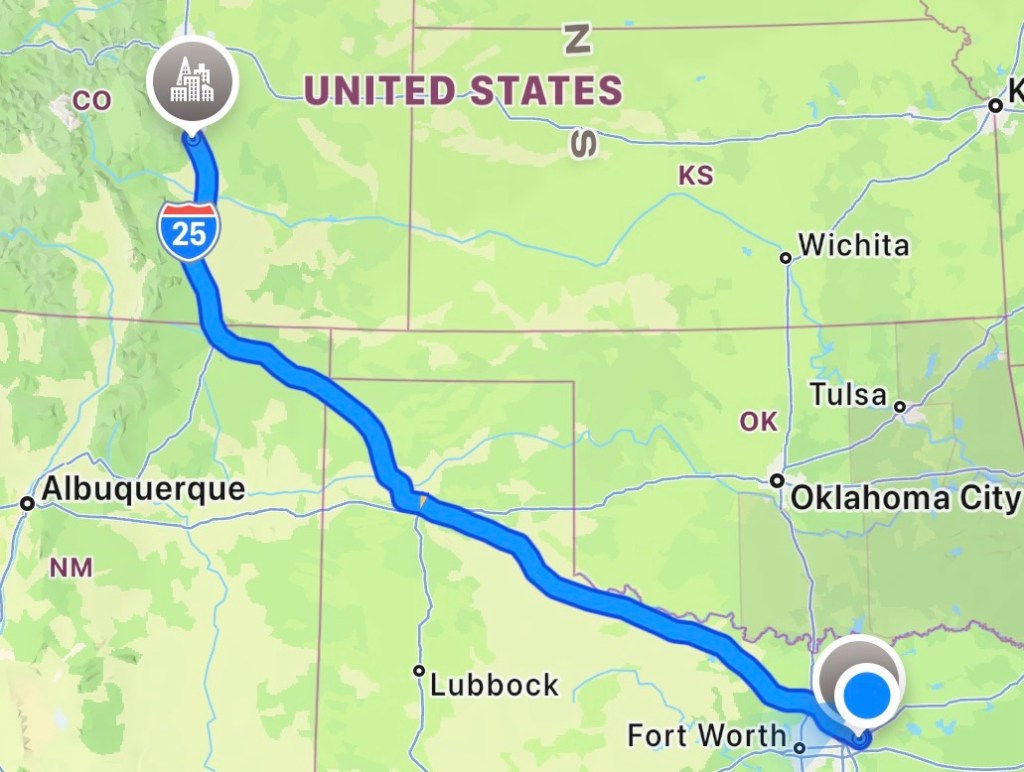
If you’re dreaming of alpine lakes, easy hikes with BIG payoff, and mountain views around every turn, Rocky Mountain National Park delivers. From waterfall stops to turquoise lakes and scenic drives above the clouds, this is the kind of trip that feels unforgettable without being overwhelming to plan.
Dallas → Rocky Mountain National Park
If you’re coming from Texas, getting here is part of the adventure—and honestly, it’s a GOOD one.
Distance: ~800–850 miles
Time: ~ 13 hours (without stops)
Best split: 2 days (highly recommend, especially with kids)
Bear Lake Corridor pass (includes everything—this is what you want)
Park access only (does NOT include Bear Lake area)
Book on Recreation.gov
Releases months in advance (best option)
Limited night-before drops at 5 PM
No reservation? You can still enter before 5 AM or after 6 PM
Best time to visit
June–September: Best hiking conditions + Trail Ridge Road is fully open
Late September: Elk rut (wild, loud, and honestly unforgettable)
October–May: Snowy + quieter, but expect limited access and trail closures
Getting around
Bear Lake parking fills FAST (think before 7 AM in peak season)
Use the park shuttle if you’re arriving later—it’ll save you time + stress
Drive Trail Ridge Road
Highest paved road in a national park
Takes you above treeline (and the views are unreal)
Best hikes (short + BIG payoff)
These are the kind of hikes that make you feel like you did something big… without actually needing to go far
Alberta Falls – 1.6 mi, easy waterfall payoff
Nymph Lake – 1.0 mi, lily pads + calm vibes
Dream Lake – 2.2 mi, iconic mountain reflections
Emerald Lake – 3.6 mi, BEST overall hike
Lake Haiyaha – 4.0 mi, turquoise water + a little boulder scrambling
These can all be linked into one epic hike, which is exactly what we did
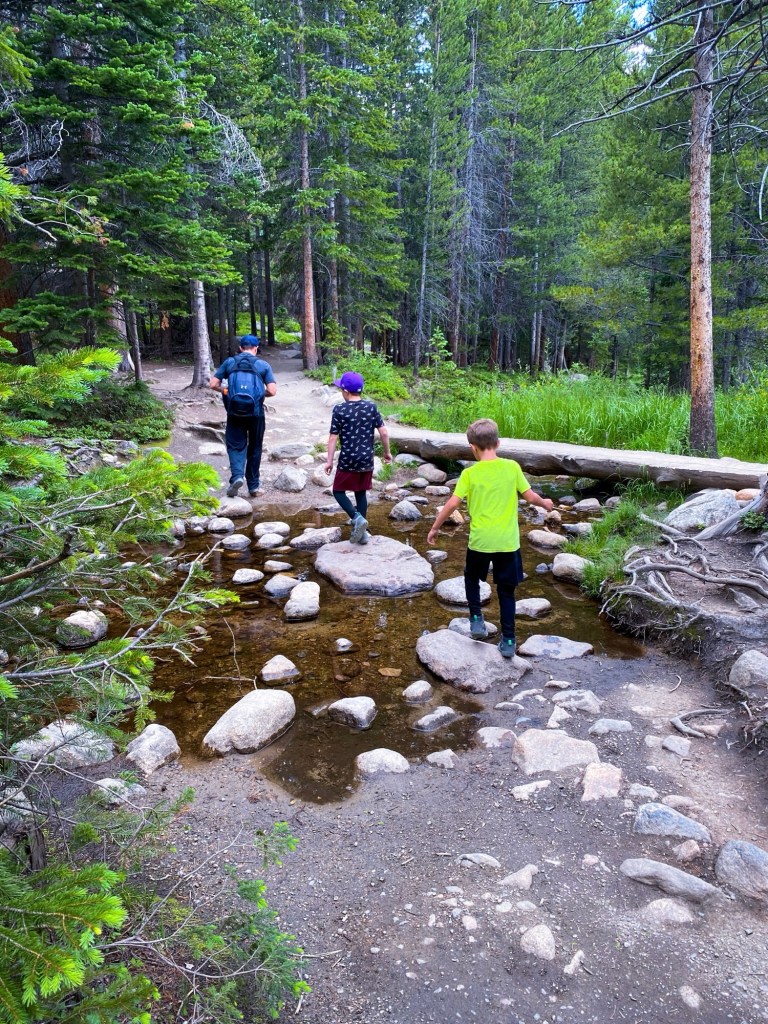
Kid-friendly? YES
Well-maintained, easy-to-follow trails
Short distances with constant views (no boring stretches)
Wildlife sightings keep kids engaged the whole time
Wildlife to watch for
Elk (especially in Moraine Park)
Mule deer
Marmots + pikas
Moose (more common on the west side near Grand Lake)
⚠️ Always keep your distance—these are wild animals, not photo props
Where to stay
Estes Park → best for first-timers + easiest park access
Grand Lake → quieter, more laid-back vibe
Inside the park: Moraine Park Campground (book early—it fills fast)
What to pack
Layers (weather changes FAST in the mountains)
Water + snacks (altitude hits harder than you expect)
Good hiking shoes
Sunscreen + hat (sun is intense at elevation)
Microspikes if visiting in shoulder season
Know before you go
Altitude = ~8,000–12,000 ft → take it slow your first day
Afternoon storms are common in summer (start early!)
Limited cell service → download maps ahead of time
No pets on trails (only allowed in paved areas)
Pro tips (this is what people forget)
Start EARLY—it’s the difference between chaos and magic
Sunrise at Dream Lake = absolutely unreal
Add Alberta Falls on your way in or out
Bring a tripod—reflections are THAT good
Combine hikes for max value: Nymph → Dream → Emerald → Haiyaha
Quick itinerary idea
Day 1: Arrive + explore Estes Park
Day 2: Bear Lake hikes (hit all the lakes)
Day 3: Drive Trail Ridge Road + explore the west side
Bottom line
Rocky Mountain National Park delivers huge mountain views without extreme hiking—which is exactly why it’s one of the best national parks for families and first-time visitors.
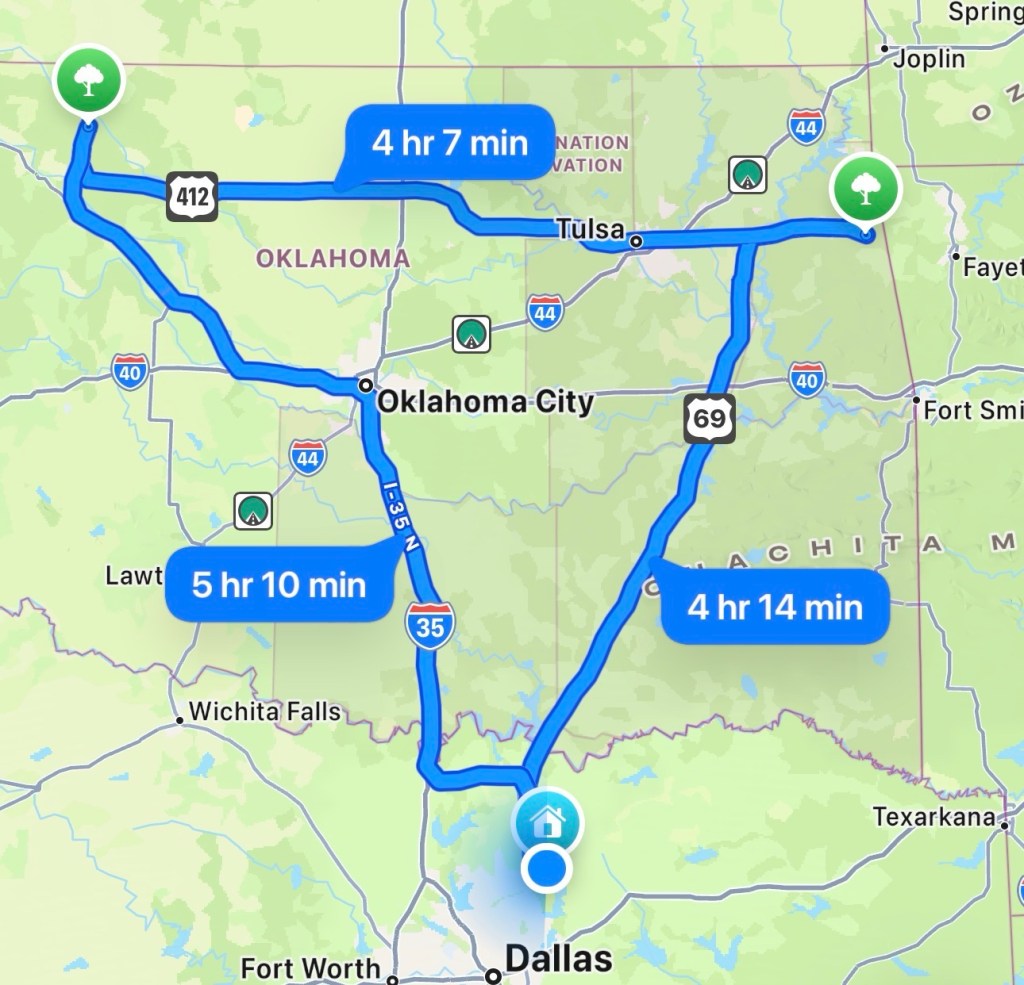
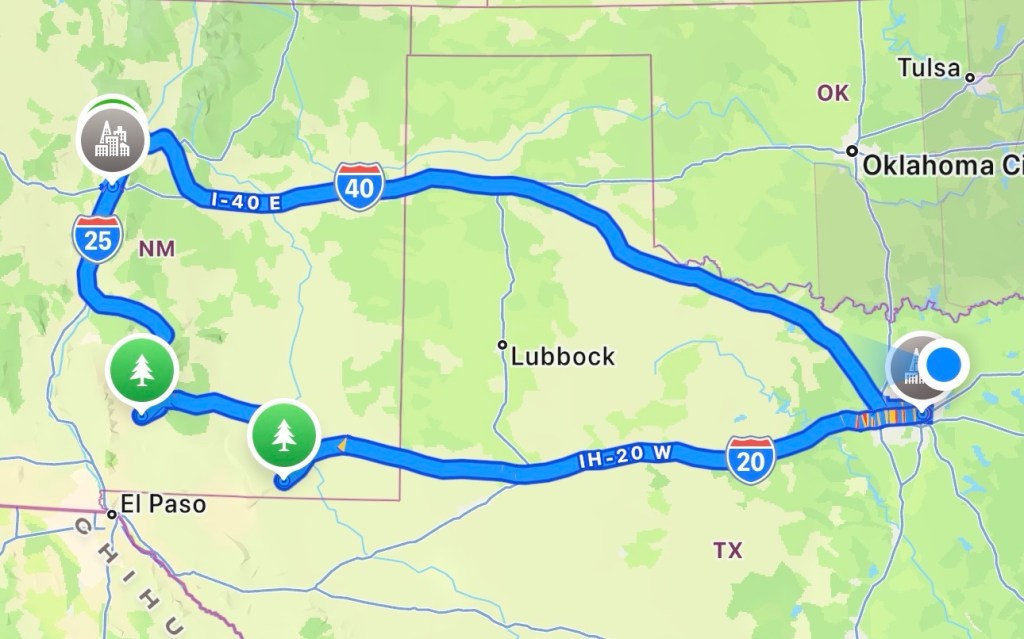
If you’re looking for an easy, high-impact road trip from Dallas, this 5-day loop through Arkansas, Oklahoma, and the Texas Panhandle is one of the best you can do. All with manageable drive times and kid-friendly stops.
Start your road trip with one of the most underrated parks in the South.
Don’t Miss:
Stout’s Point Overlook (sunset views)
Mather Lodge check-in
Easy exploring around Bear Cave
Where to Stay:
Mather Lodge (best views + convenience)
Cabins inside the park
Pro Tip: Keep this day light—save your energy for hiking tomorrow.
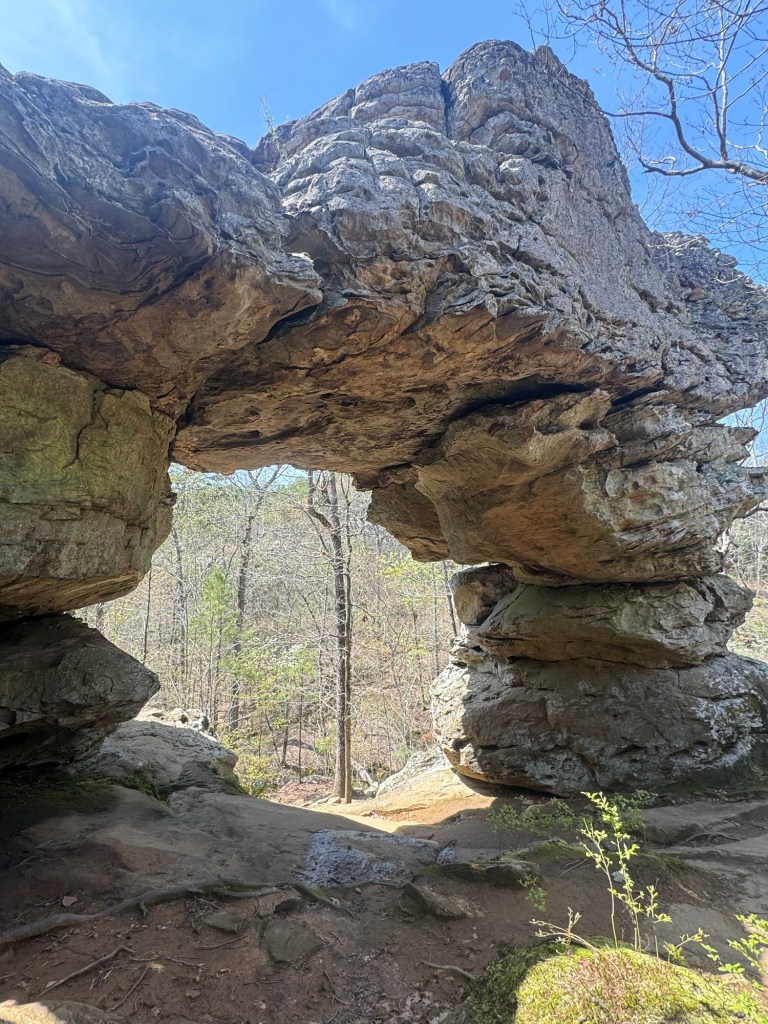
Day 2: Petit Jean State Park (Full Day)
Main Highlight: Cedar Falls Trail
This is the most iconic hike in the park—and worth every step.
Don’t Miss:
Cedar Falls (95-ft waterfall)
Rock House Cave (short + unique stop)
Scenic overlooks throughout the park
Tips:
Start early to beat crowds
Wear good shoes—the climb back up is no joke
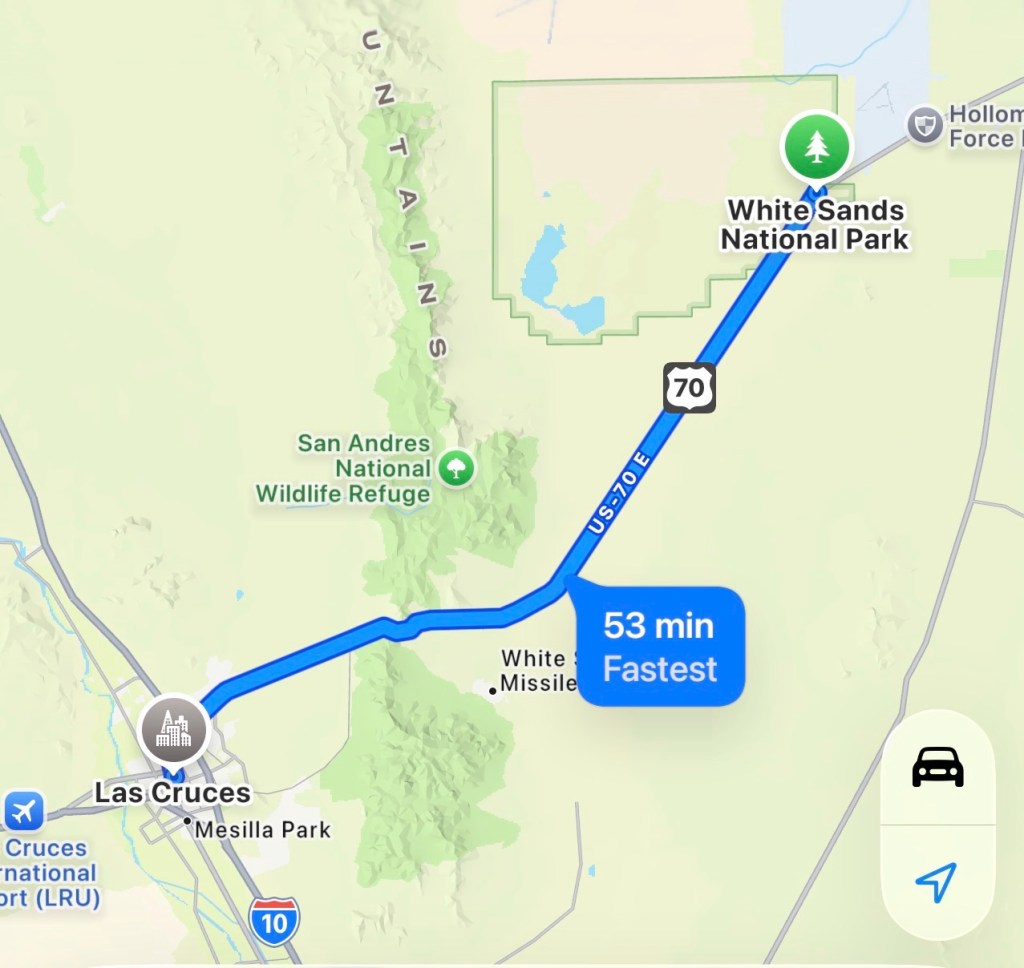
Day 3: Petit Jean → Wichita Mountains Wildlife Refuge
Drive Time: ~5.5 hours
This day mixes travel with one of the most unique landscapes in Oklahoma.
Stop in: Medicine Park (lunch + quick explore)
Don’t Miss:
Bison + longhorn sightings
Scenic refuge drive
Short walk on the Narrows Trail (1.5 miles roundtrip)
Mount Scott at sunset
Where to Stay:
Medicine Park (charming + close)
Lawton (more options)
Day 4: Wichita Mountains → Palo Duro Canyon
Drive Time: ~5–5.5 hours
Welcome to the second largest canyon in the U.S..
Don’t Miss:
Driving down into the canyon (incredible views)
Rim overlooks
Sunset over the canyon
Where to Stay:
Palo Duro cabins/glamping
Hotels in Canyon or Amarillo
Pro Tip: Take it easy today—tomorrow is your big hike.
Day 5: Palo Duro Canyon → Dallas
Drive Time: ~6 hours
End your trip with one of the best hikes in Texas.
Main Highlight: Lighthouse Trail (iconic rock formation)
Tips:
Start early (heat + no shade)
Bring lots of water
Turn around early if needed—views are still amazing
Optional Stop: Cadillac Ranch (Amarillo) on the drive back to Dallas
What to Pack
Comfortable hiking shoes
Reusable water bottles
Sunscreen + hats
Snacks + easy picnic meals
Lightweight backpack
Why This Trip is Perfect for Families
No extreme drive days
Mix of easy + moderate activities
Plenty of “wow” moments without overpacking the schedule
Tips for Planning This Road Trip
Book lodging early (especially at Petit Jean + Palo Duro)
Start hikes early to avoid heat
Keep afternoons flexible for rest
This road trip is proof that you don’t have to travel far to have an incredible adventure. From waterfalls to wildlife to canyon views—this loop is one of the best road trips from Dallas!
If you think Texas is just flat highways… this road trip will prove you wrong.
This ultimate Texas road trip loop from Dallas takes you from sand dunes → mountains → canyons → bison-filled landscapes—all without backtracking or needing a flight.
It’s one of the most unique and doable multi-stop road trips in Texas—and I’ve mapped out the exact route, stops, and tips to make it EASY.
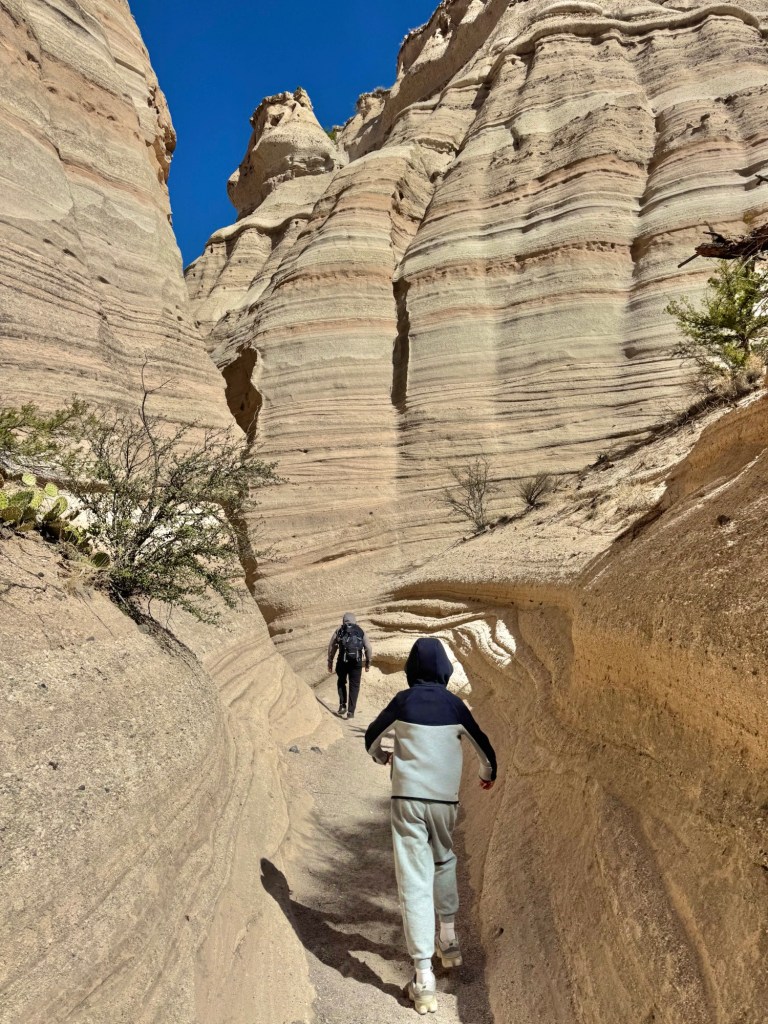
Dallas → Monahans Sandhills State Park → Guadalupe Mountains National Park (+ Carlsbad Caverns National Park BONUS) → Palo Duro Canyon State Park → Caprock Canyons State Park → Dallas
OVERVIEW
Length: 4–5 days
Drive Time: ~14–15 hours total
Best Time to Go: October–April (avoid peak summer heat)
Trip Style: Loop (no backtracking)
Best For: Families, first-time road trippers, bucket-list Texas adventures
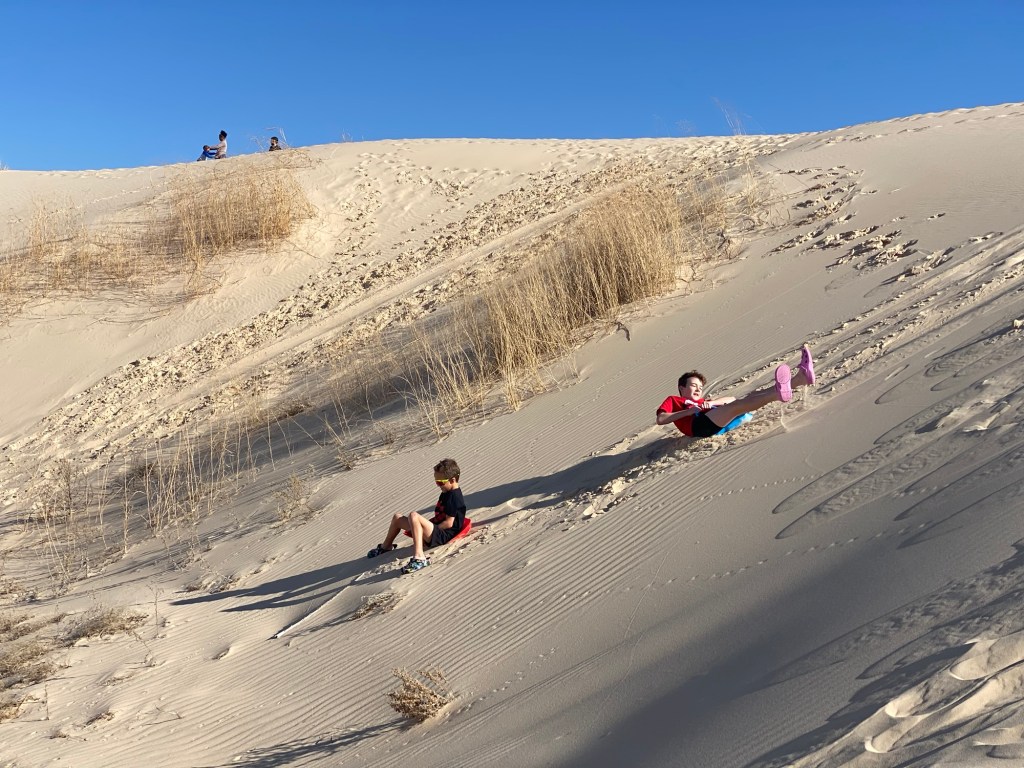
DAY 1: DALLAS → MONAHANS SANDHILLS
Kick off your trip heading west toward one of the most unexpected landscapes in Texas.
Drive time: ~5 hours
Route: Dallas → I-20 W → Midland/Odessa → Monahans
Stop: Monahans Sandhills State Park
Time here: 1.5–3 hours
Don’t Miss:
Sandboarding or sledding down the dunes
Climbing to the highest points for sweeping views
Letting kids run wild (no trails = total freedom)
Exploring during golden hour for the best experience
Pro Tips:
Go late afternoon for cooler temps
Bring water + sunglasses (windy + sandy!)
Stay:
Midland/Odessa (most options)
OR continue 2 hrs to Carlsbad, NM (sets up Day 2 perfectly)
These are the weekend trips I’d recommend first if you want big scenery, memorable hikes, wildlife, and that “how is this only a few hours from Dallas?” feeling. I picked a mix of Texas, Oklahoma, and Arkansas destinations that are all realistic for a 2–3 day getaway, with park basics, where to stay, top highlights, a hidden gem, and an easy weekend plan for each one. Park fees, hours, and lodging details can change, so I’d still book/check the official park pages before you go.
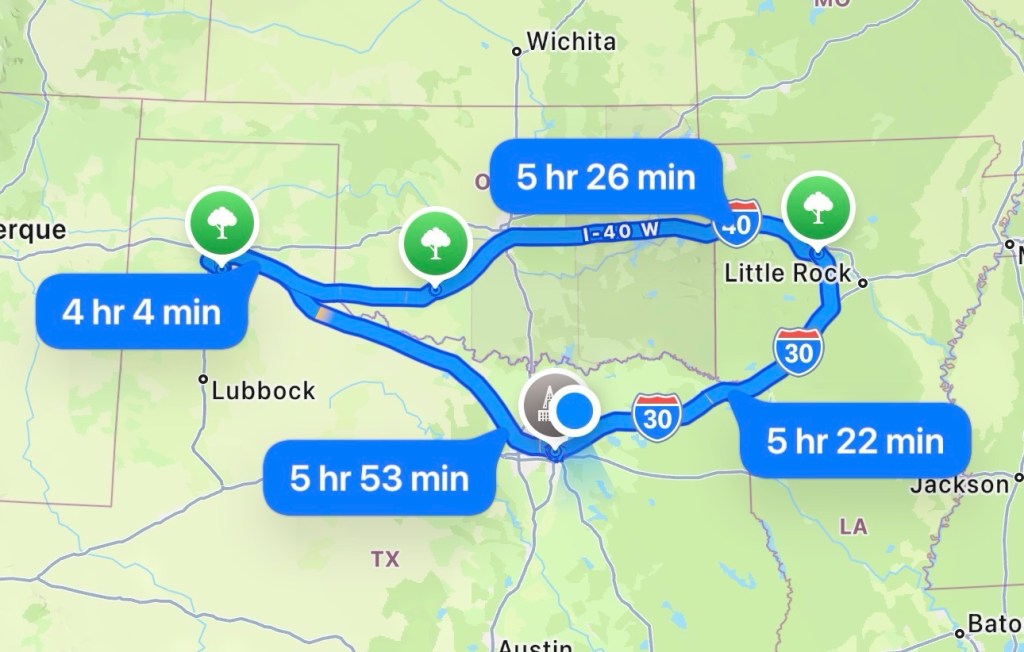
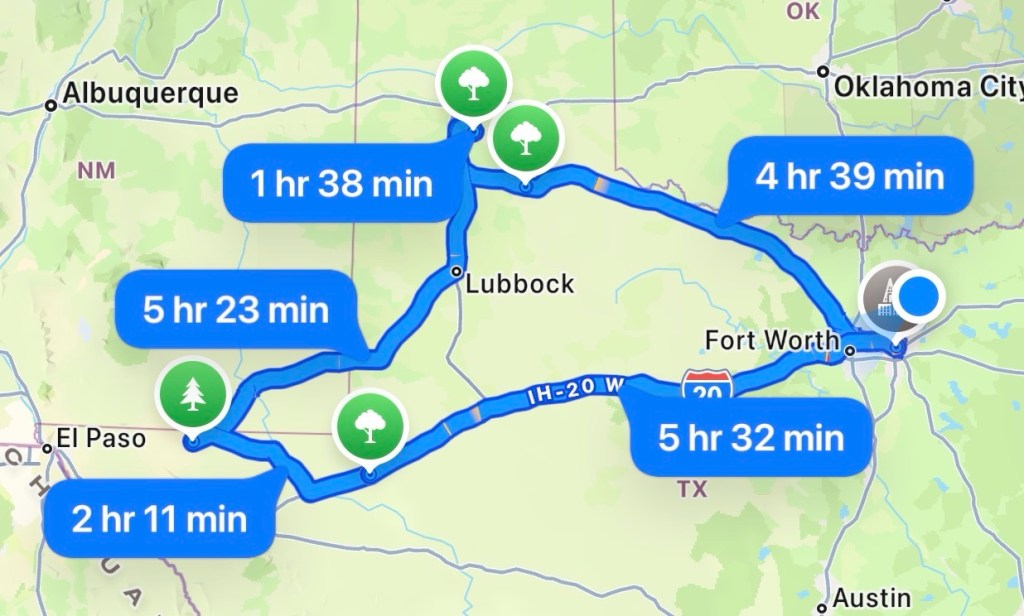
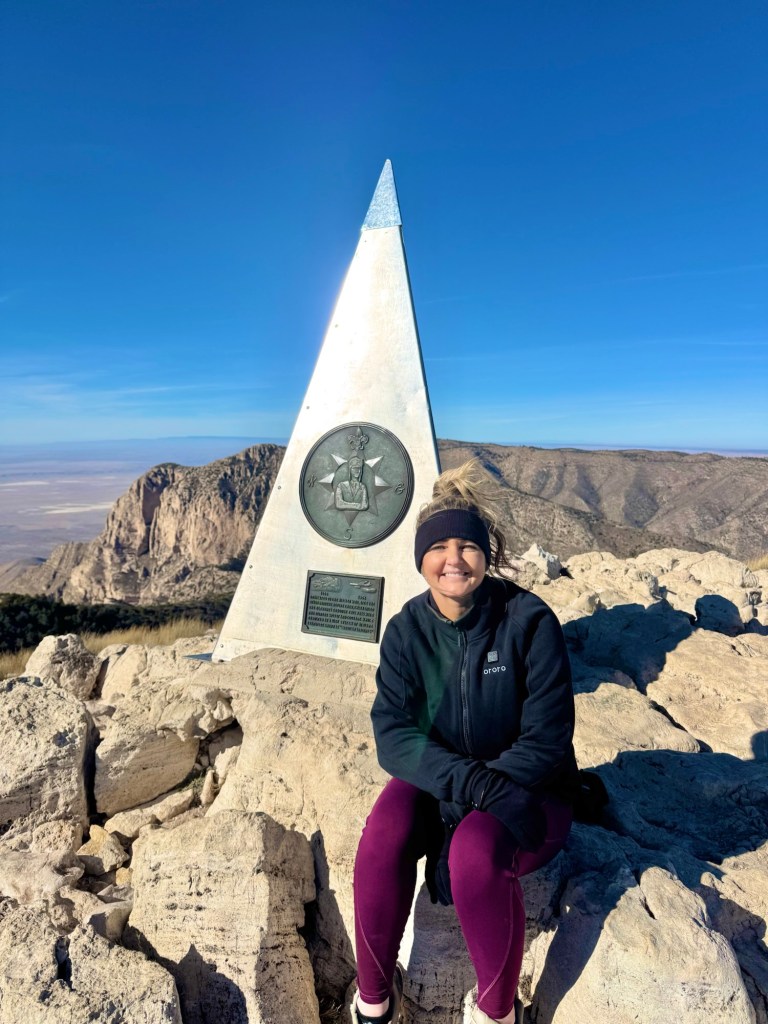
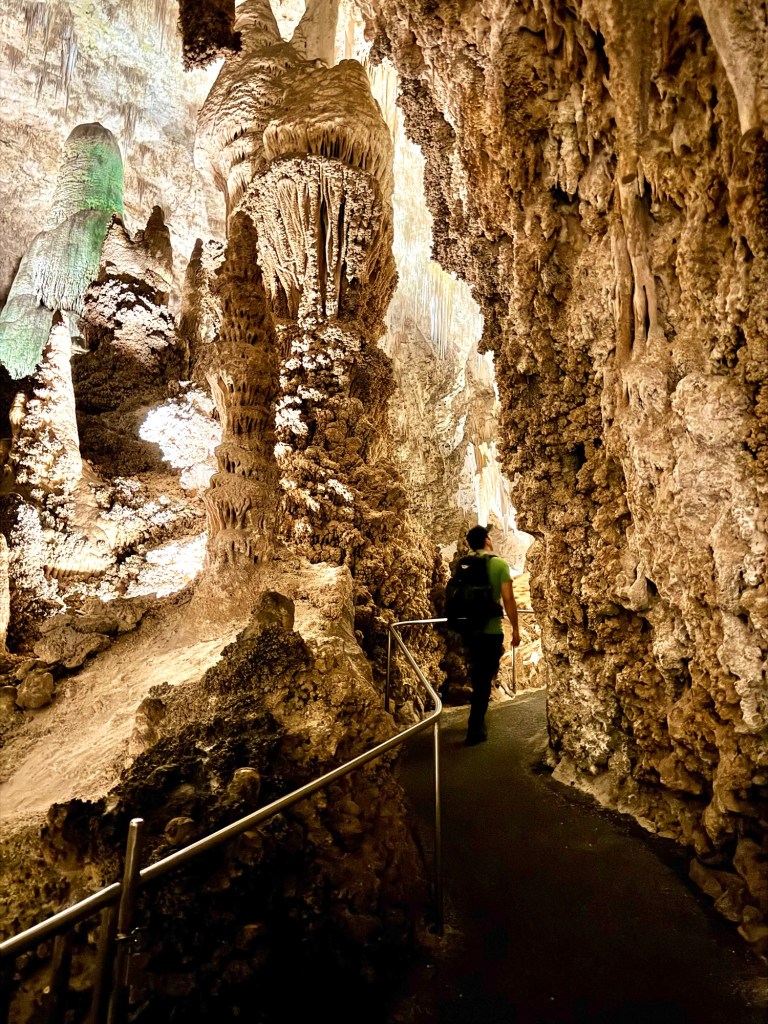
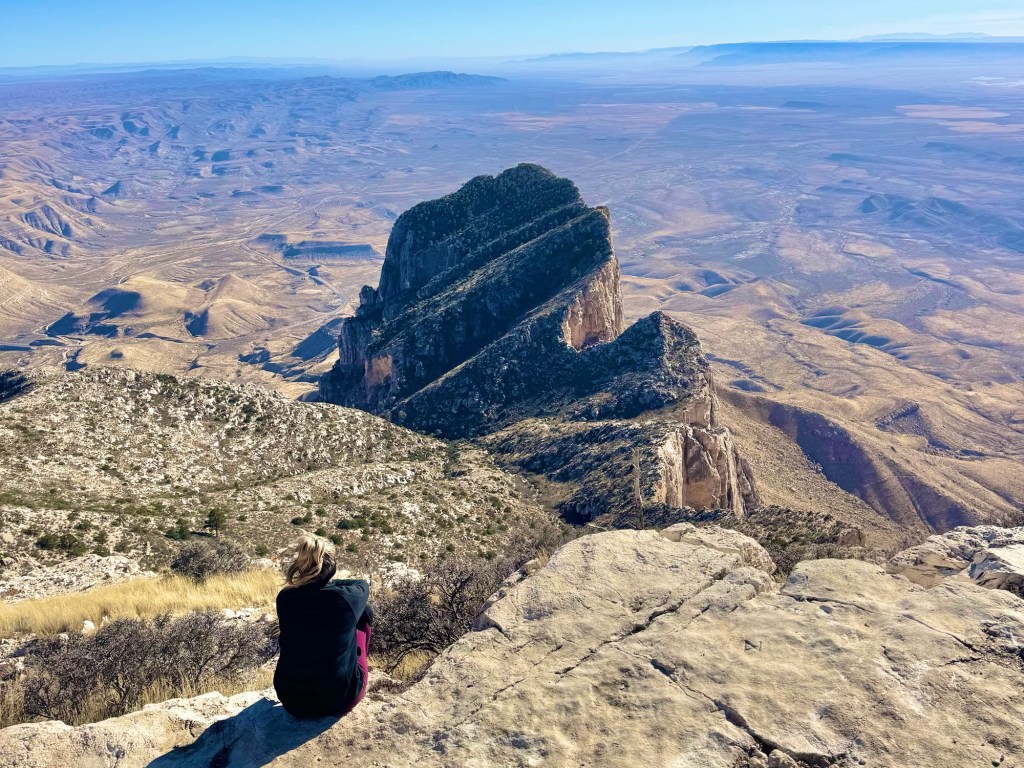
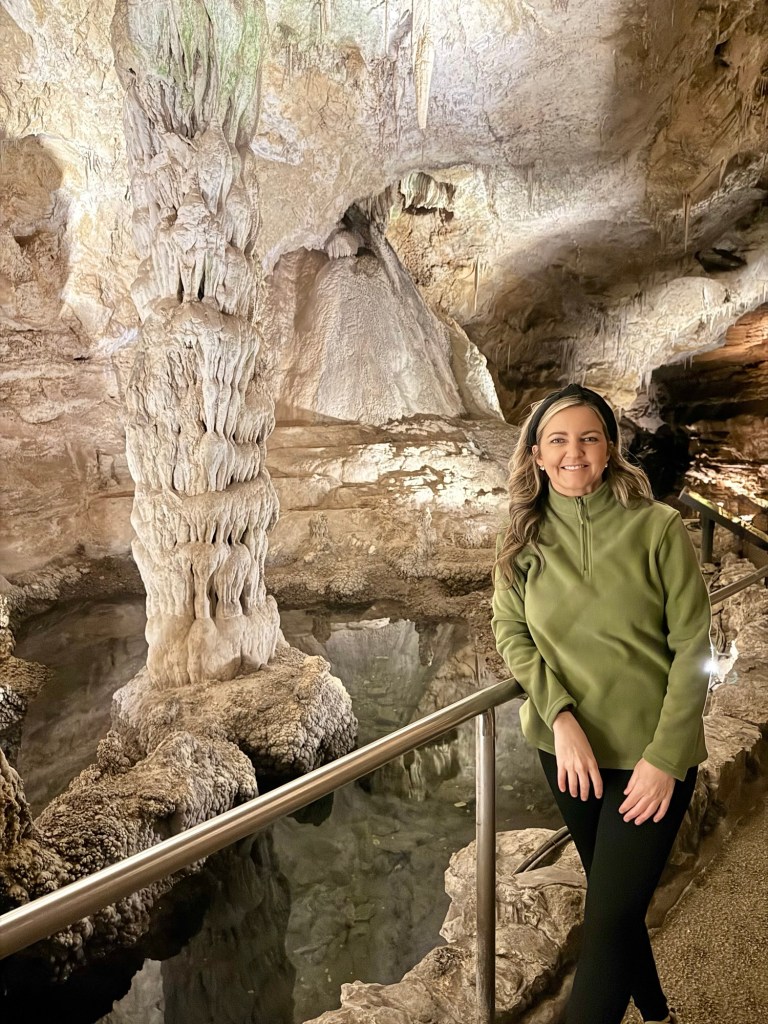
1.) Guadalupe Mountains National Park + Carlsbad Caverns National Park — Carlsbad, NM
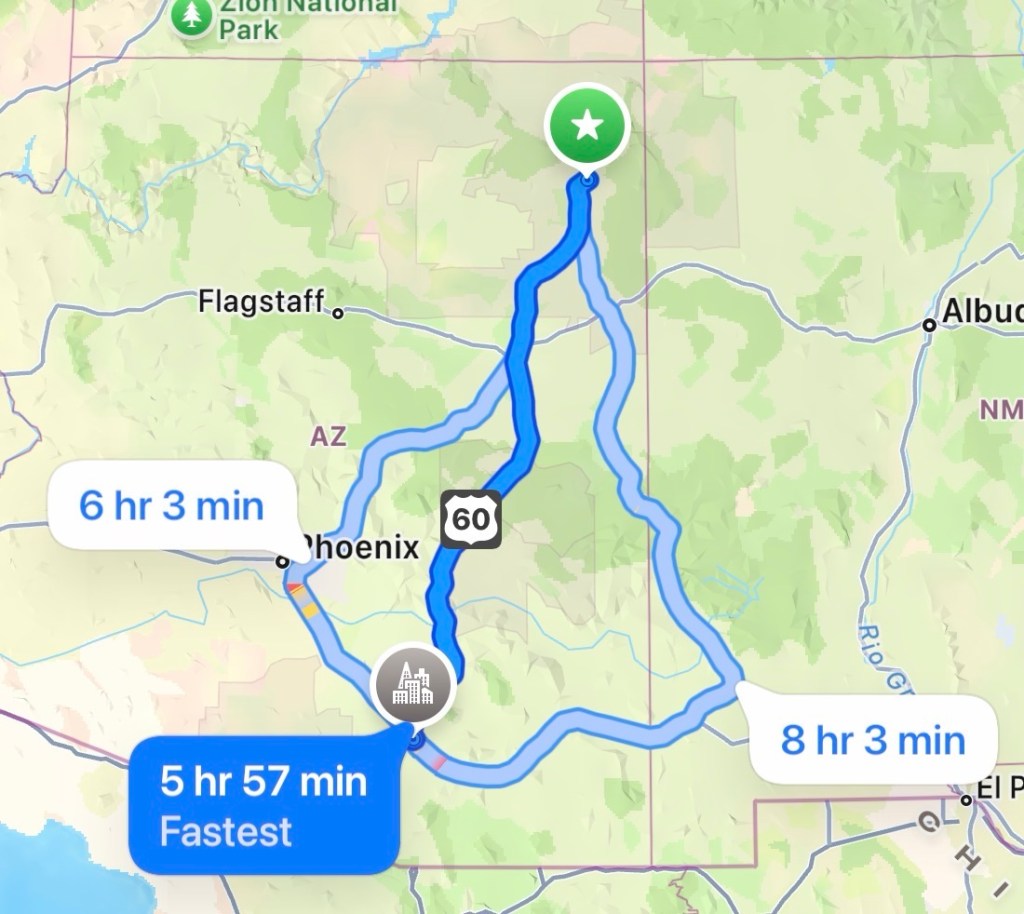
Drive from Dallas: about 7–7.5 hours Best for: a bucket-list combo trip (mountains + caves in one weekend)
This is one of the BEST ways to experience Guadalupe Mountains — pair it with Carlsbad Caverns and base yourself in Carlsbad, New Mexico for an unforgettable weekend.
Best route from Dallas: Head west toward Carlsbad, NM (easy, straightforward drive). On your full day, you’ll drive about 45 minutes to Guadalupe Mountains (Pine Springs area).
Where to stay:
Carlsbad, NM (best option — more hotels, restaurants, and easier logistics)
Options range from budget hotels to family-friendly stays
Much more convenient than staying in Van Horn
Top highlights:
Guadalupe Peak (highest point in Texas)
Devil’s Hall (fun rock scrambling)
El Capitan views on the drive in
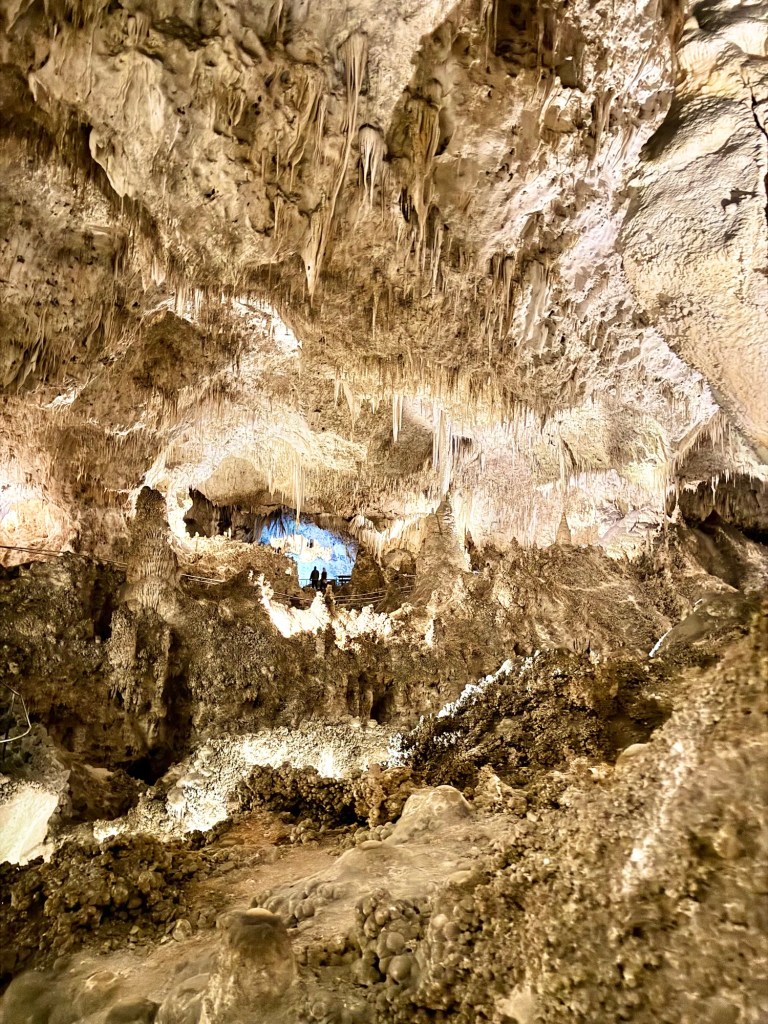
Carlsbad Caverns (massive underground cave system — unreal experience)
Guadalupe MountainsWeekend Itinerary:
Day 1: Drive Dallas → Carlsbad Check in, dinner in town, rest up
Day 2: Morning hike in Guadalupe Mountains (Devil’s Hall or Guadalupe Peak) Afternoon rest Evening: Carlsbad Caverns bat flight program (seasonal but AMAZING)
Day 3: Morning: Explore Carlsbad Caverns (Natural Entrance + Big Room) Lunch in Carlsbad Drive back to Dallas
2.) Wichita Mountains Wildlife Refuge — Medicine Park / Lawton, OK
Drive from Dallas: about 3 hours Best for: a quick, high-reward weekend with wildlife, views, and minimal planning
This is one of the easiest weekend trips from Dallas that still feels like a true escape — think mountains, open prairie, and bison roaming freely.
Best route from Dallas: Head north toward Lawton, OK. Super straightforward drive and perfect for leaving after work on a Friday.
Where to stay:
Medicine Park (best option — charming cabins + walkable town)
Hotels in Lawton (more budget-friendly + chain options)
Top highlights:
Mount Scott drive (panoramic views with almost no effort)
Bison + longhorn sightings throughout the refuge
Elk Mountain hike (short, scenic summit)
Lake Lawtonka (great for relaxing views)
Wichita MountainsWeekend Itinerary:
Day 1: Drive Dallas → Medicine Park Explore town, dinner, sunset drive up Mount Scott
Day 2: Morning wildlife spotting (bison!) Hike Elk Mountain Relax at Lake Lawtonka or explore more scenic pull-offs
Day 3: Slow morning in Medicine Park Coffee + quick walk Drive back to Dallas
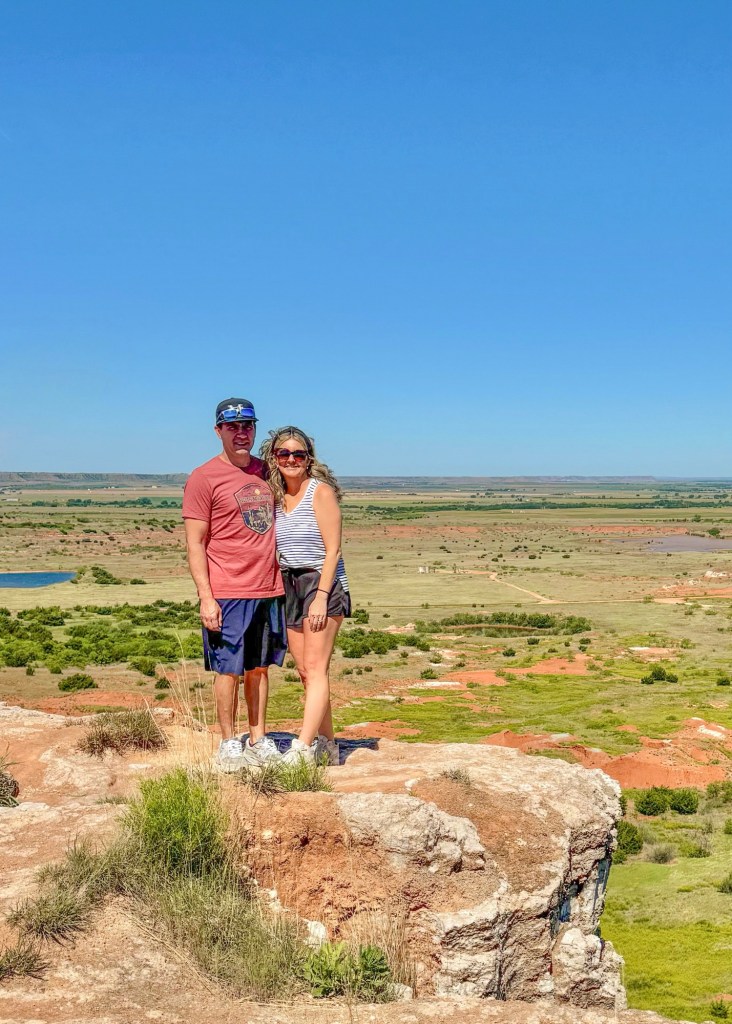
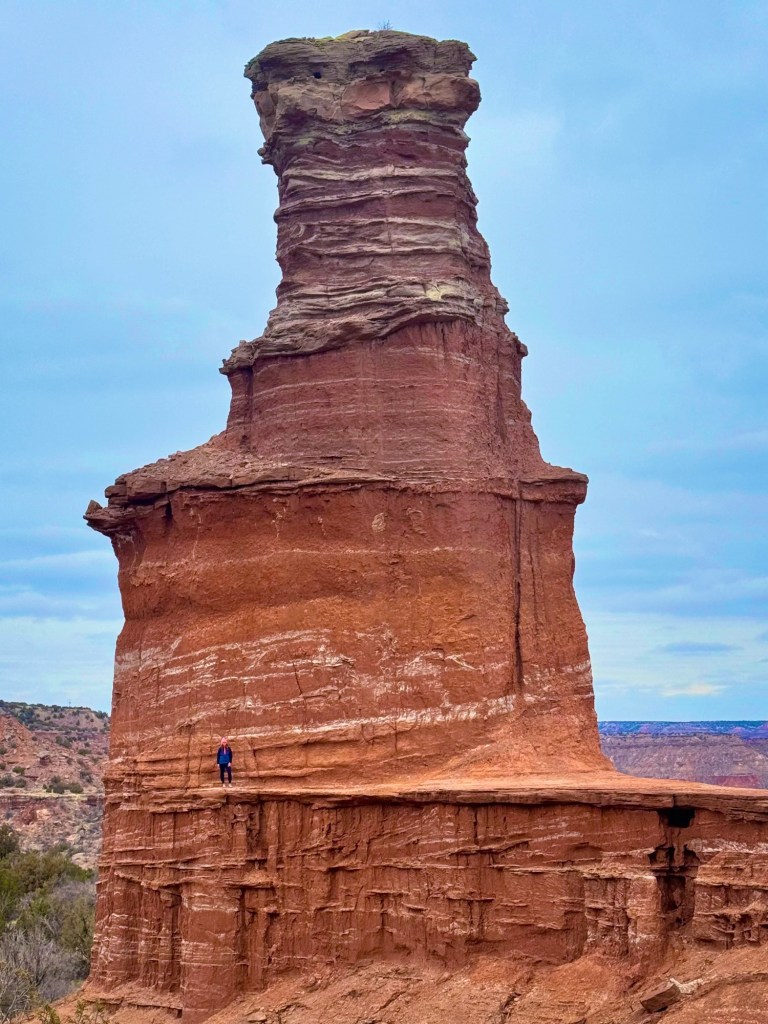
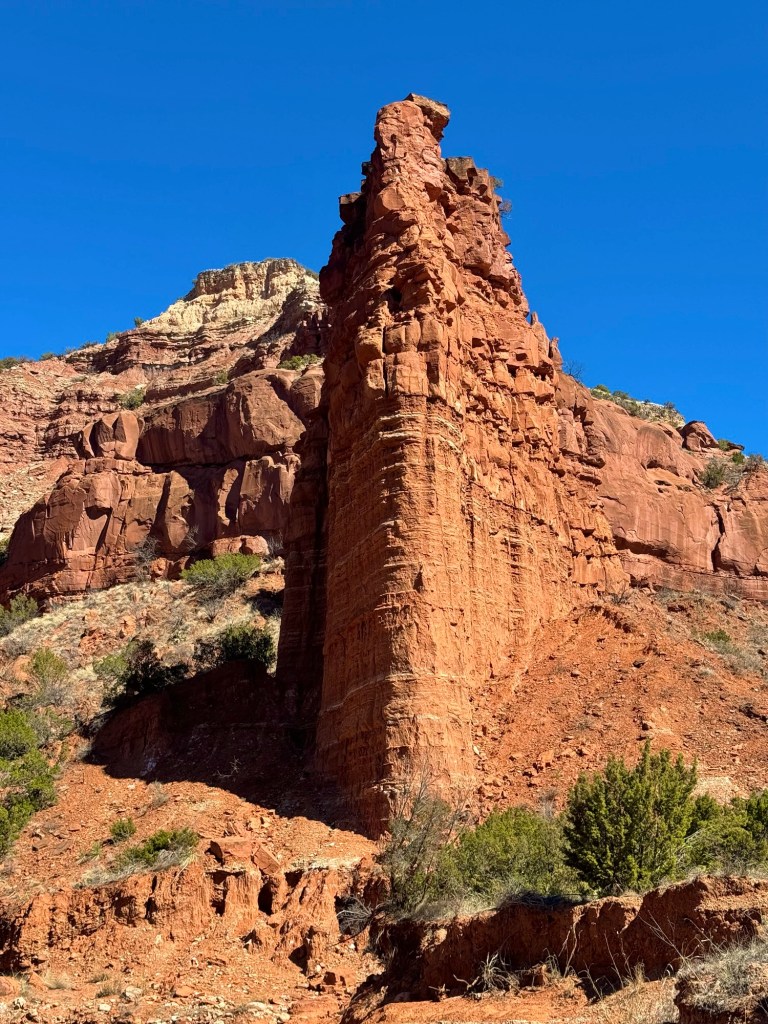
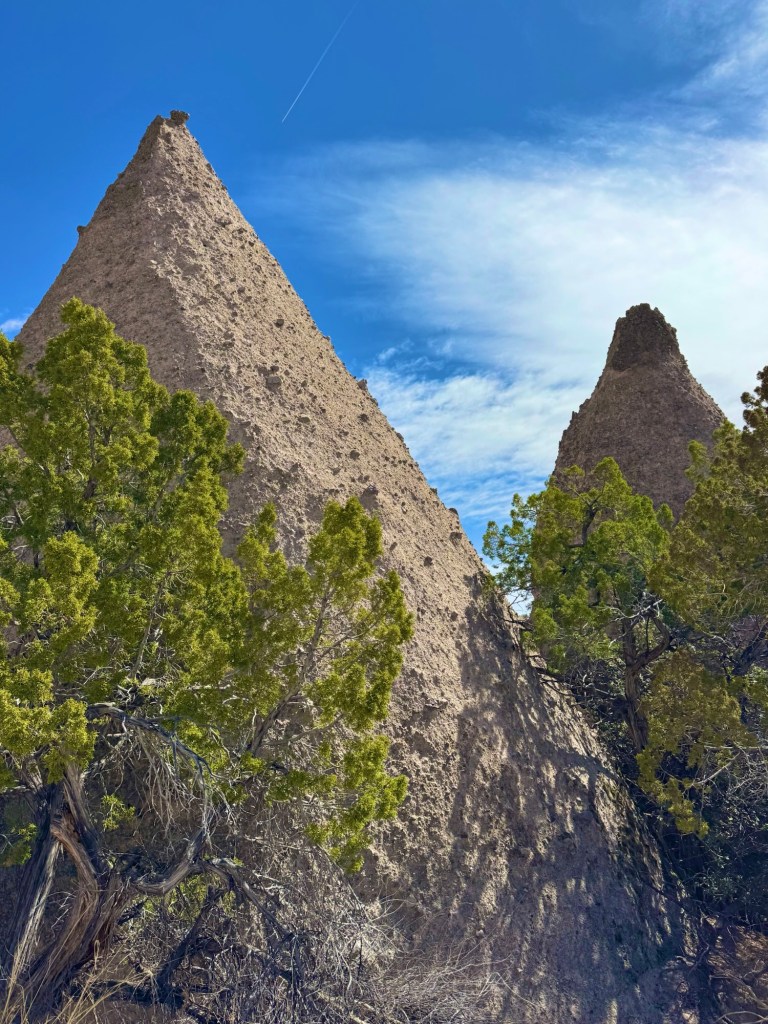
3.) Palo Duro Canyon State Park — Amarillo, TX
Drive from Dallas: about 6 hours Best for: iconic Texas scenery + one of the most photogenic hikes in the state
Palo Duro is the kind of place that makes you stop and say… this is Texas?! It’s massive, colorful, and surprisingly easy to explore.
Best route from Dallas: Head northwest toward Amarillo. Easy highway driving the entire way.
Day 1: Drive Dallas → Morrilton Check in, sunset at an overlook
Day 2: Morning hike to Cedar Falls Explore Bear Cave or Seven Hollows Relax at lodge or viewpoints
Day 3: Stop at Rock House Cave Drive back to Dallas
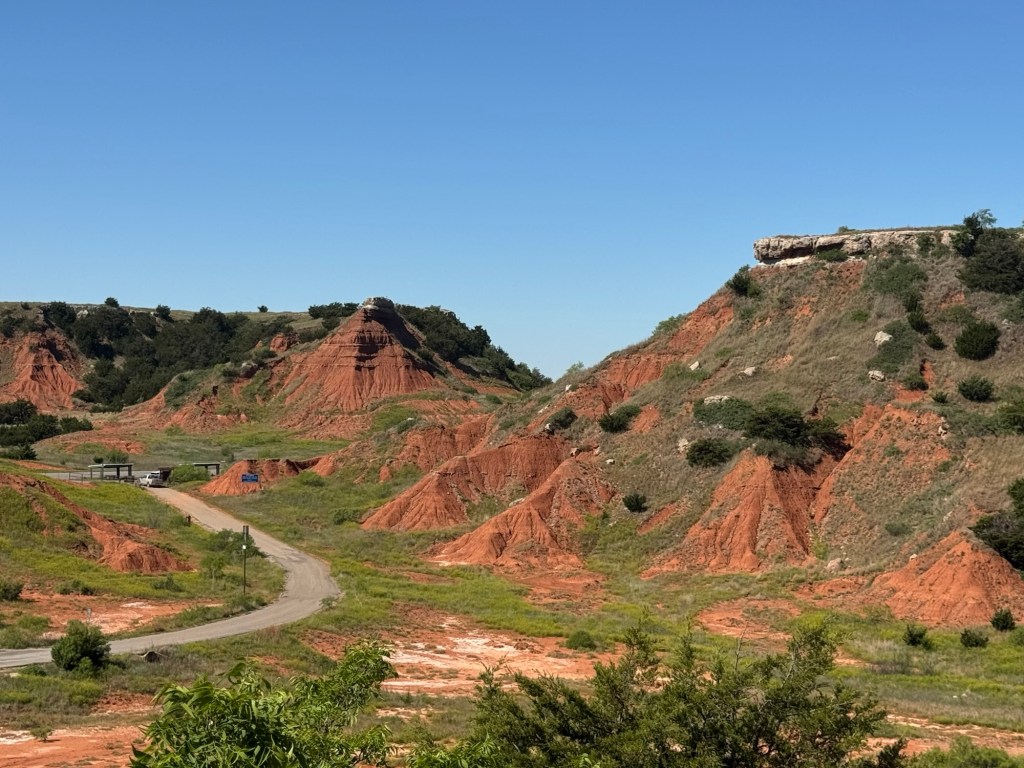
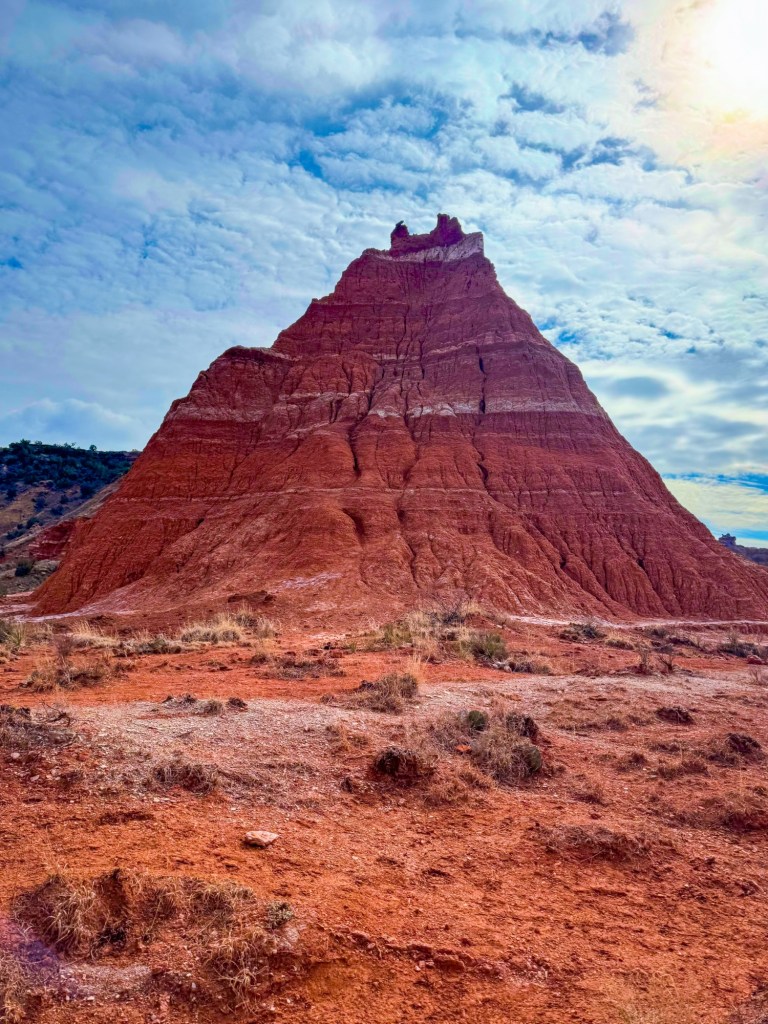
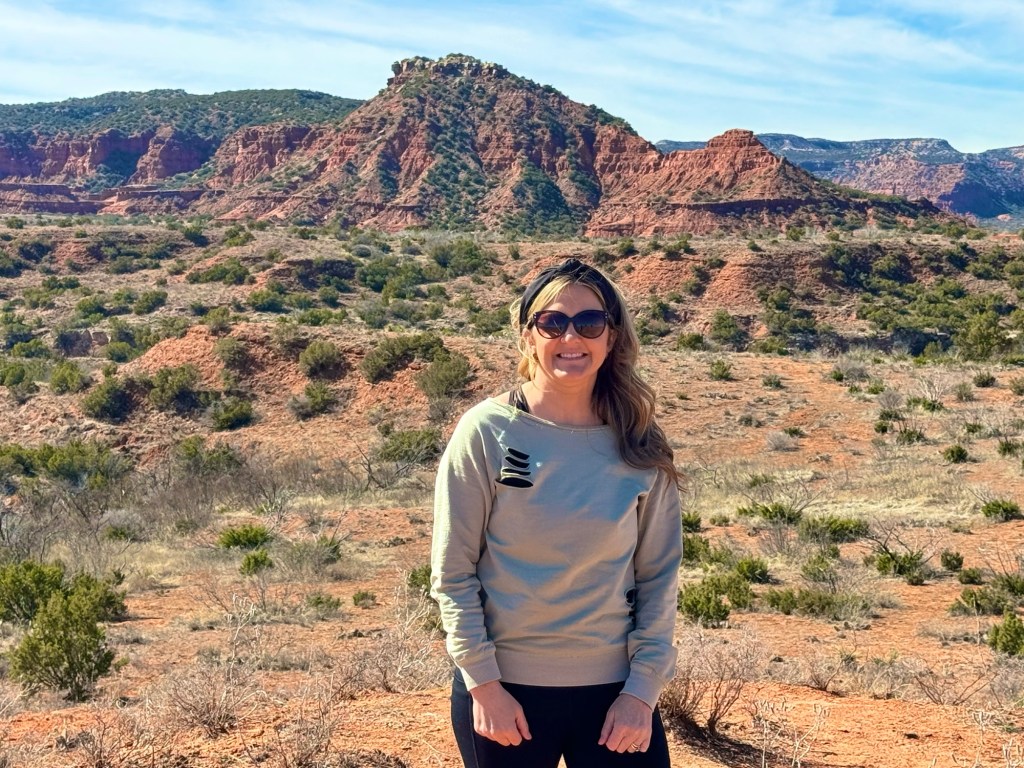
5.) Caprock Canyons State Park — Quitaque, TX
Drive from Dallas: about 4–5 hours Best for: red rock canyon views without the crowds
Caprock feels like Palo Duro’s quieter, wilder sister — same dramatic scenery, but way fewer people.
Best route from Dallas: Head northwest toward Quitaque, TX — similar direction as Amarillo, just less traffic and fewer stops.
Where to stay:
Campgrounds inside the park (best experience)
Limited stays in Quitaque
Nearby small towns like Turkey, TX
Top highlights:
Texas State Bison Herd (often very close to the road)
Clarity Tunnel (walk-through bat tunnel)
Upper Canyon Trail (best views in the park)
Lake Theo (great for relaxing or picnics)
Caprock CanyonWeekend Itinerary:
Day 1: Drive Dallas → Quitaque Check in or set up camp Sunset at canyon rim
Day 2: Morning hike (Upper Canyon Trail) Explore Clarity Tunnel Wildlife spotting (bison) Relax at Lake Theo
Day 3: Slow morning Quick scenic stop Drive back to Dallas
Final Thoughts
These are the kind of weekend trips that remind you how much there is to explore just a few hours from Dallas. Whether you want mountains, waterfalls, wildlife, or wide-open canyon views — you don’t need a flight to make it happen.
I’ve mapped out routes, stops, and family-friendly plans for all 5 to make planning simple — so all you have to do is pick a weekend and go.
Carlsbad Caverns • White Sands • Albuquerque • Tent Rocks
If you’re looking for a road trip from Texas that feels completely different from anything you’re used to—this New Mexico loop delivers.
In just a few days, you’ll experience massive underground caverns, bright white sand dunes, mountain-top sunsets, and one of the most unique hikes in the Southwest.
This guide covers everything you need to plan the trip: route, stops, hotels, tips, and exactly what to expect at each destination.
This route is very family-friendly with a mix of easy + moderate activities
Best time to go: spring and fall (cooler temps, better hiking conditions)
Final Thoughts
This New Mexico road trip is one of the most diverse routes you can take from Texas. In just a few days, you’ll go from underground caves to white desert dunes to mountain sunsets and slot canyon hikes.
It’s one of those trips that feels much bigger than the distance—and one you’ll want to do again.
Tent Rocks is one of those places that feels completely unexpected — like you’ve stumbled onto another planet right in the middle of New Mexico. If you’re planning a Southwest road trip, this is a stop that’s absolutely worth the extra planning. Save this guide for later!
What Are Tent Rocks?
Kasha-Katuwe Tent Rocks National Monument is one of the most unique landscapes in New Mexico, known for its cone-shaped rock formations (called hoodoos) created by volcanic eruptions millions of years ago.
It honestly feels like walking through another planet — especially once you hit the slot canyon.
You’ll check-in at the Visitor Center and then follow a pilot truck to the actual site
Hours & Access
Typically open Thursday–Monday
Closed Tuesday & Wednesday
Day-use only (no sunset access)
Tent Rocks opens at 8:00 am and the last pilot truck leaves the Visitor Center at 1:00 pm
⚠️ Hours can change — always double check before going
Best Hike to Do
Slot Canyon Trail (DO THIS ONE)
~3 miles round trip
Moderate
Includes:
Slot canyon section (super narrow + fun)
Short ladder climb
Panoramic overlook at the top
Is It Kid-Friendly?
Yes, but:
The slot canyon gets tight
The ladder may be tricky for little ones
Great for adventurous kids
Best Time to Go
Morning = best lighting + fewer crowds
Avoid midday heat (very exposed)
No shade for most of the hike
What to Bring
Water (no services inside)
Good hiking shoes
Sun protection
Sun glasses – it was extremely windy and sandy on our visit
Snacks if doing the full hike
Photo Tips
The slot canyon = best reel footage
Shoot upward angles to capture the scale
Overlook at the top = wide landscape shots
Things to Know Before You Go
No pets allowed
No drones
Limited facilities
Can close due to weather
Is It Worth It?
100% yes — one of the most unique hikes in New Mexico.
This ended up being one of our favorite stops on the entire trip — and honestly, I didn’t expect it to be. It’s fun, unique, and just adventurous enough to feel like a hidden gem. If you’re building out a Southwest road trip, definitely add this one to your list.
If you’re looking for a real-life, doable Southwest road trip from Texas, this is the exact route we just did for spring break—and it might be one of my favorite routes yet.
Think: desert sunsets, slot canyons, giant cacti, and lots of memories made!
Overview of the Route
Start: Dallas, TX
States: Texas → New Mexico → Arizona → back to Texas
Total Time: 6 days
Stops: Albuquerque, Tent Rocks, Canyon de Chelly, Saguaro, Chiricahua, White Sands
Day 1: Drive to Albuquerque + Sunset Views
After a long travel day from Texas, we made it to Albuquerque, NM just in time for sunset—and WOW, this is such an underrated stop.
What to do:
Head up to Sandia Crest (or nearby overlooks) for sunset
Take Dramamine if you get carsick – that road up to the peak is no joke!
Watch the mountains turn pink + gold
Why it’s worth it – This is the perfect way to kick off the trip without overpacking your first day.
Where to stay – Anywhere in Albuquerque for easy access to the next day’s drive. We stayed at Home2Suites by Hilton and had a lovely stay in a spacious room!
One of the most underrated places in the Southwest—and honestly, it surprised us.
What to do:
Hike the White House Trail (only trail you can do without a guide)
Stop at scenic overlooks along the rim
Why it’s special – You’re looking at ancient cliff dwellings AND massive canyon views—without the crowds of bigger parks.
Time needed: Half day
We drove straight to Tucson, AZ after visiting this site. We stayed two nights at Townplace Suites by Marriott in Tucson, and really enjoyed the spacious room and the breakfast was delicious! The pool was great, too!