Waterfall hikes are some of the most rewarding trails in the United States—short walks with big payoffs, dramatic canyons, and photo ops that stop people in their tracks. Whether you’re planning a national park vacation or road-tripping through small mountain towns, these waterfall hikes deserve a spot on your bucket list.
Below, you’ll find a guide to some of the most breathtaking waterfall trails in the country, including reader favorites like Fall Creek Falls, Stephan’s Gap, Flume Gorge, and more.
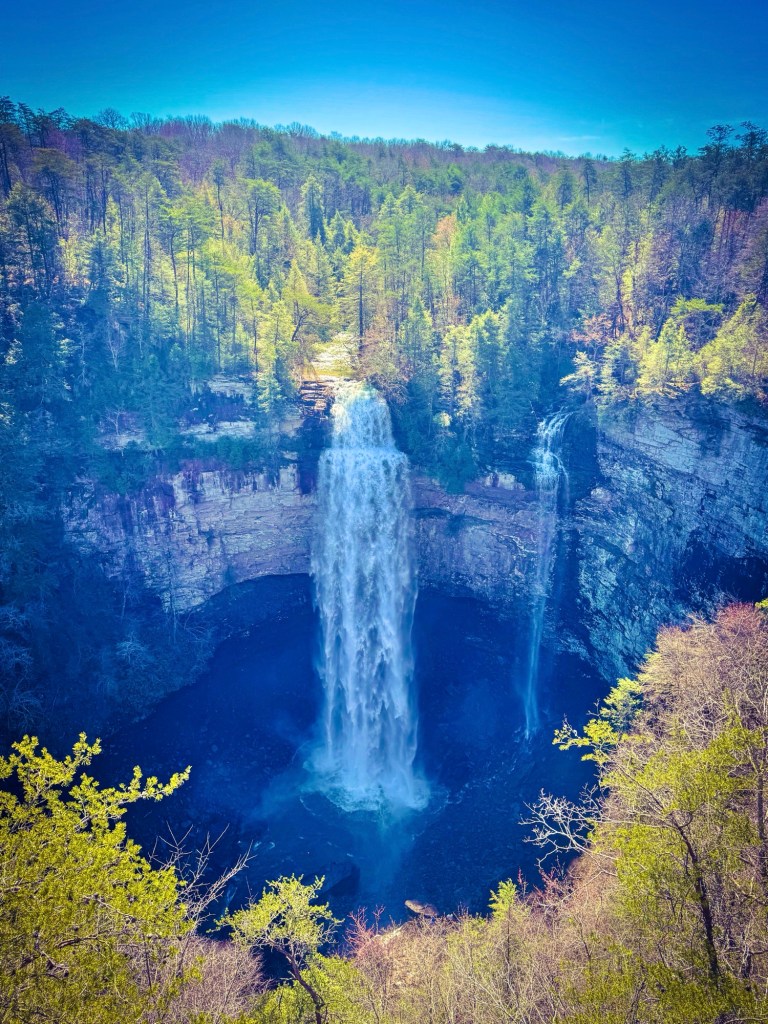
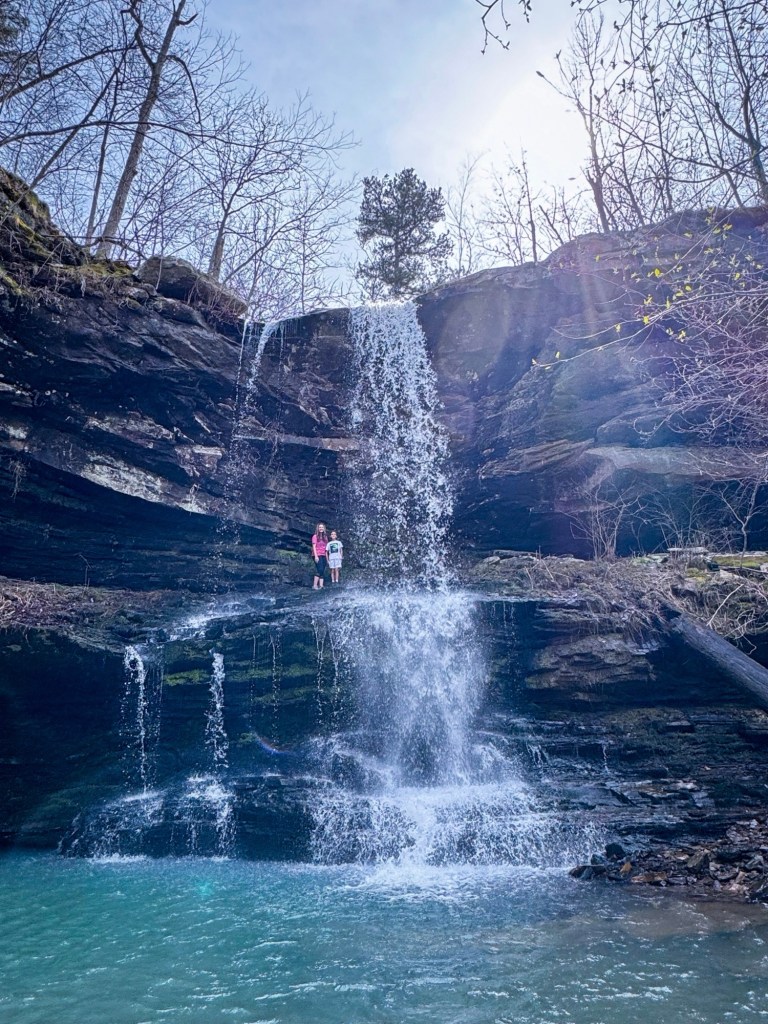
1. Fall Creek Falls – Tennessee
Difficulty: Moderate | Length: 0.8 miles round trip
One of the tallest waterfalls in the eastern U.S., Fall Creek Falls State Park offers breathtaking views and multiple trails. The hike to the base and back up is about 0.8 miles and accessible for most hikers. For a more panoramic experience, try the overlook trails.
Why it’s worth it: Incredible viewpoints, kid-friendly overlooks, and one of the most photographed waterfalls in Tennessee.
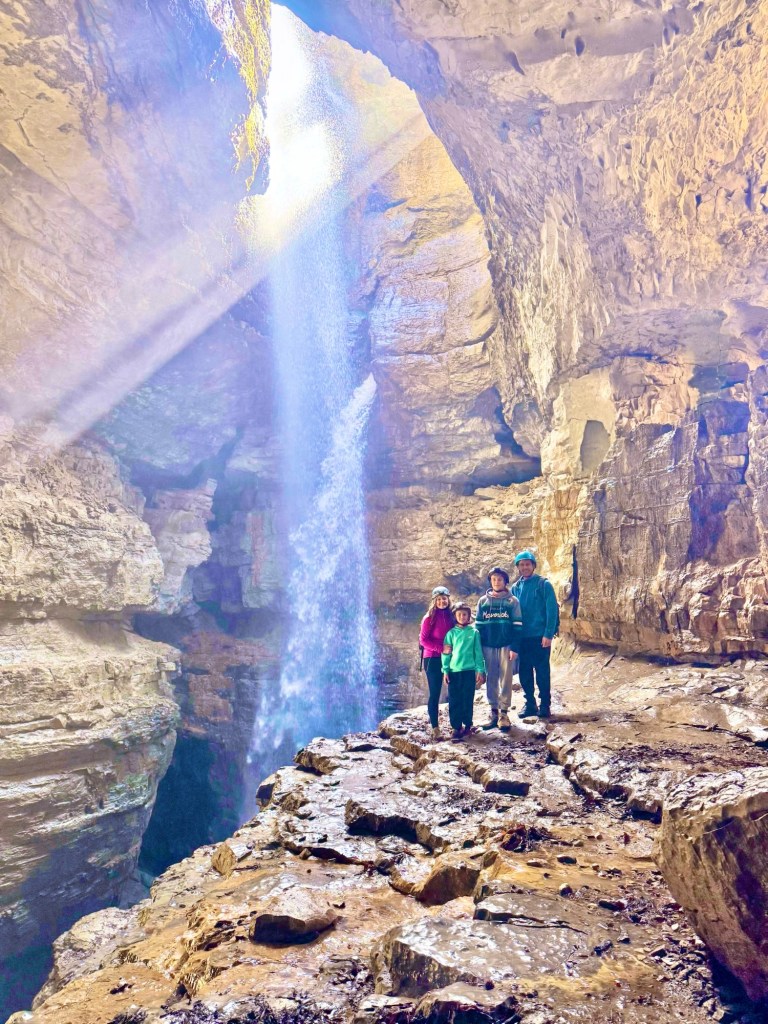
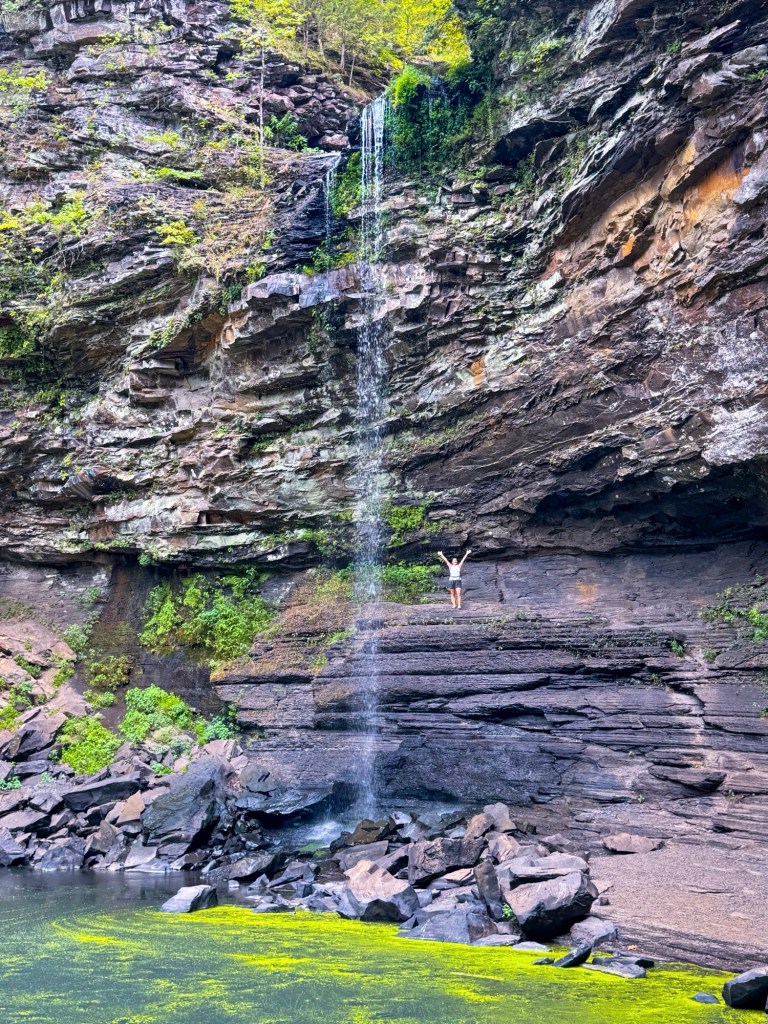
2. Stephan’s Gap – Alabama(Callahan Cave Preserve)
Difficulty: Moderate | Length: 1.4 miles
This dramatic, cave-like waterfall pours through a vertical gap in the rock and creates a moody, cinematic scene. It’s a favorite among landscape photographers and adventurers.
Why it’s worth it: Unique setting—not your typical waterfall; perfect for photographers.
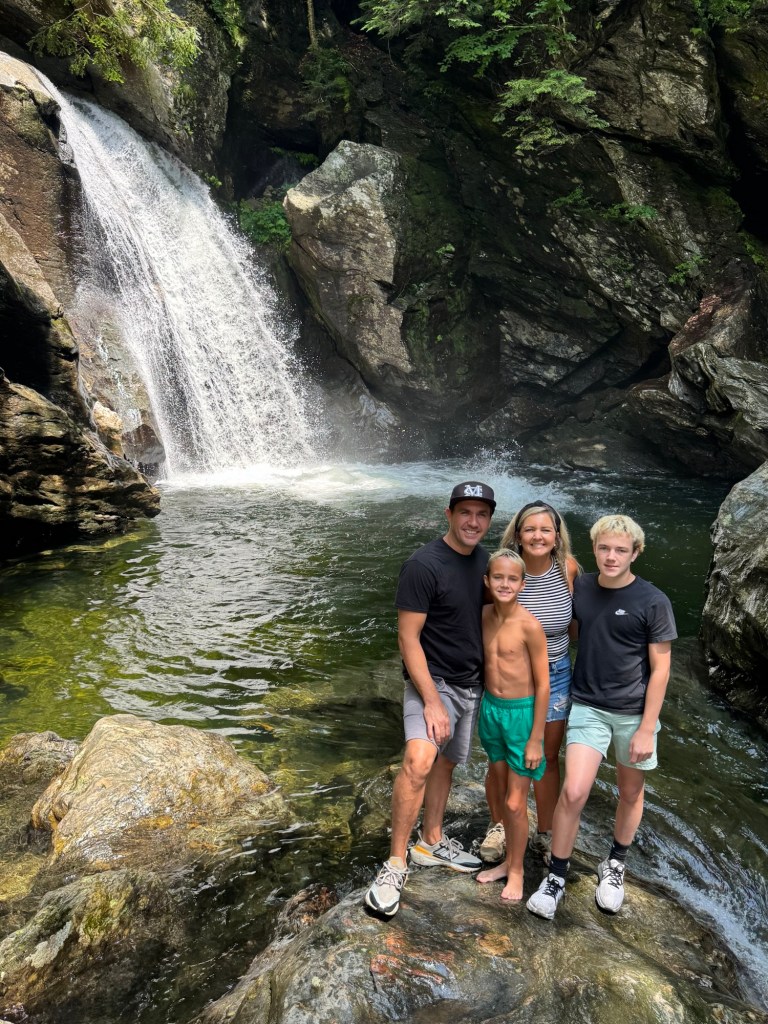
Hidden in the Green Mountains, Bingham Falls is a short but steep hike with a rewarding plunge pool at the bottom. Best visited in the summer, this waterfall is perfect for a quick refreshing stop during a Vermont road trip.
Why it’s worth it: Quick, accessible, and stunning in every season.
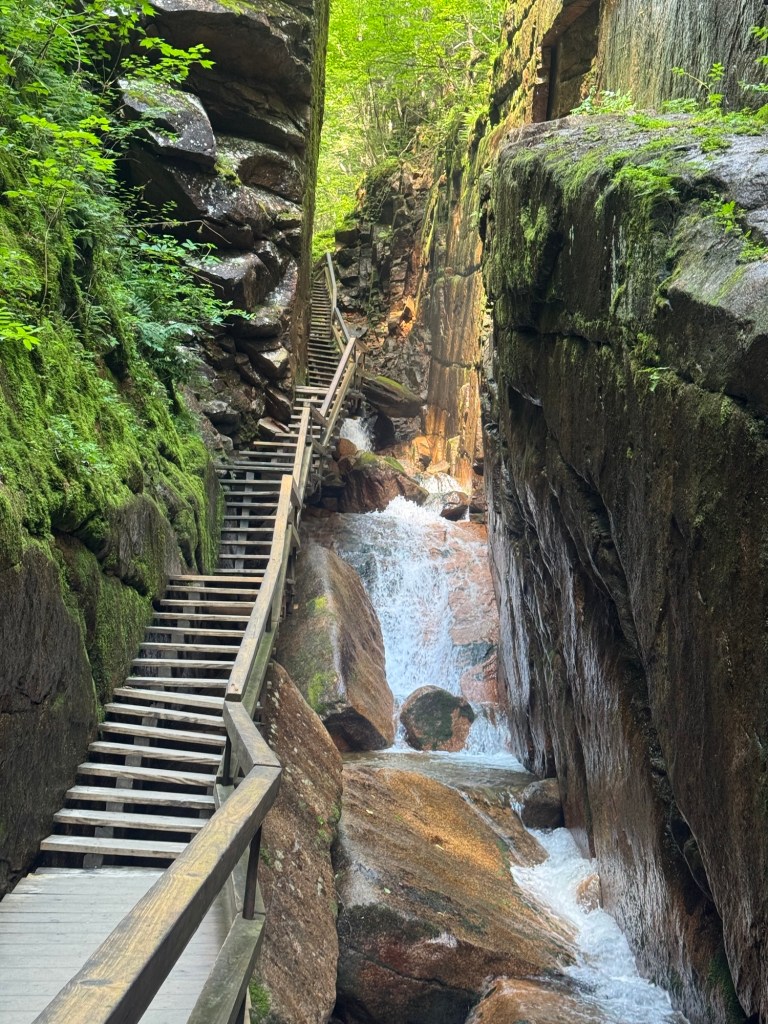
4. Flume Gorge – New Hampshire
Difficulty: Easy | Length: 2 miles
A natural wonder in Franconia Notch State Park, Flume Gorge is a family-friendly trail featuring waterfalls, covered bridges, and granite walls. The 2-mile loop is easy to moderate, making it perfect for kids and photographers alike. Although it’s famous for its boardwalks, steep granite walls, and covered bridges, the Flume also features stunning cascades as the Flume Brook flows through the canyon.
Why it’s worth it: Scenic and safe for kids, with tons of photo spots.
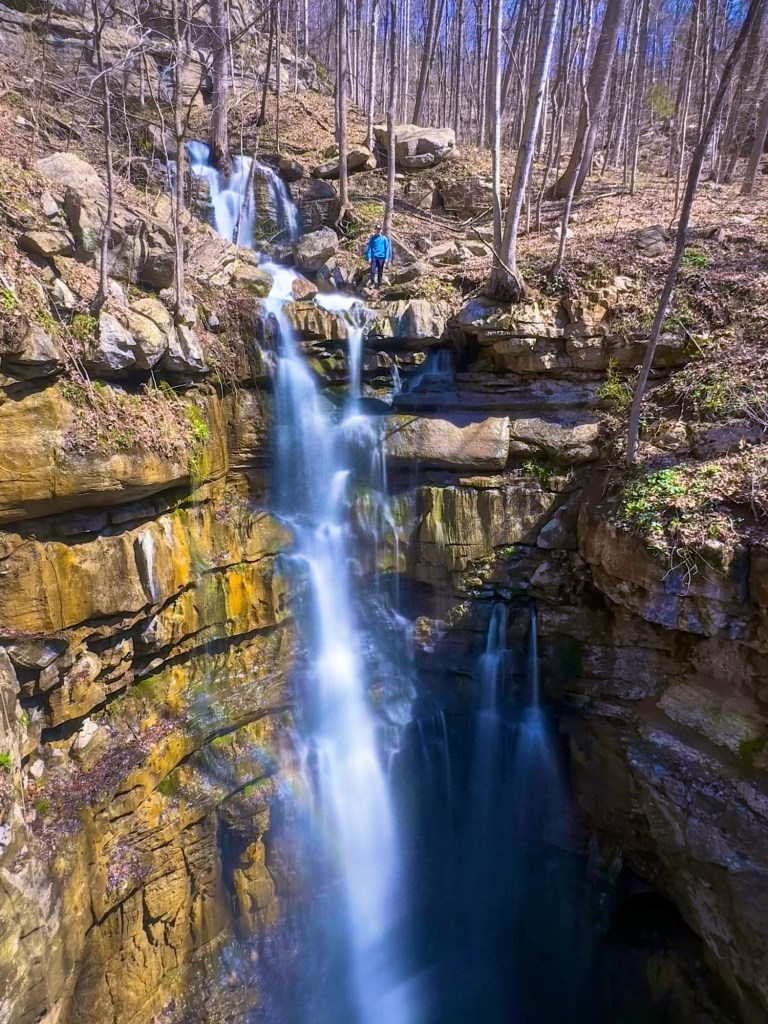
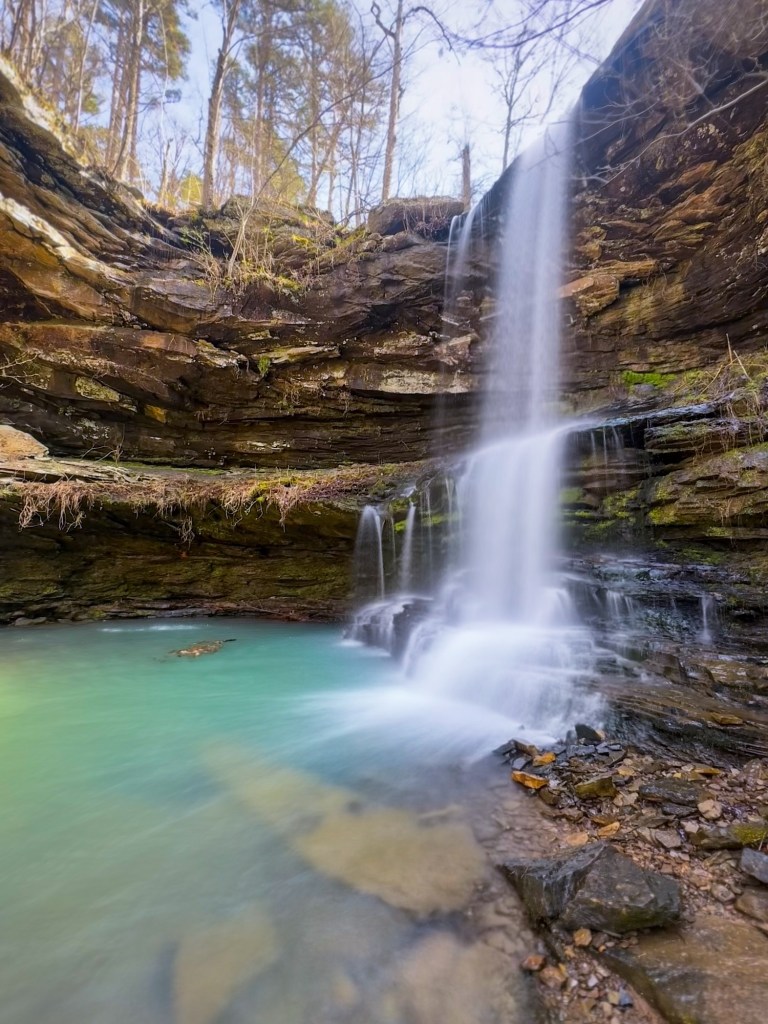
5. Fern Falls – Arkansas (Ozark- St. Francis National Forest)
Difficulty: Easy | Length: 1.5 miles
This lesser-known Arkansas gem features a delicate veil of water falling into a mossy grotto. It’s peaceful, quiet, and ideal for families looking for a gentle adventure. Nestled in the Ozarks, Fern Falls is a quieter waterfall destination with scenic hiking trails. The hike is moderate and shaded, making it a great escape on a hot day. Pair it with nearby Hawksbill Crag hike for a full-day adventure.
Why it’s worth it: Great for beginners and one of the most peaceful waterfalls in the region.
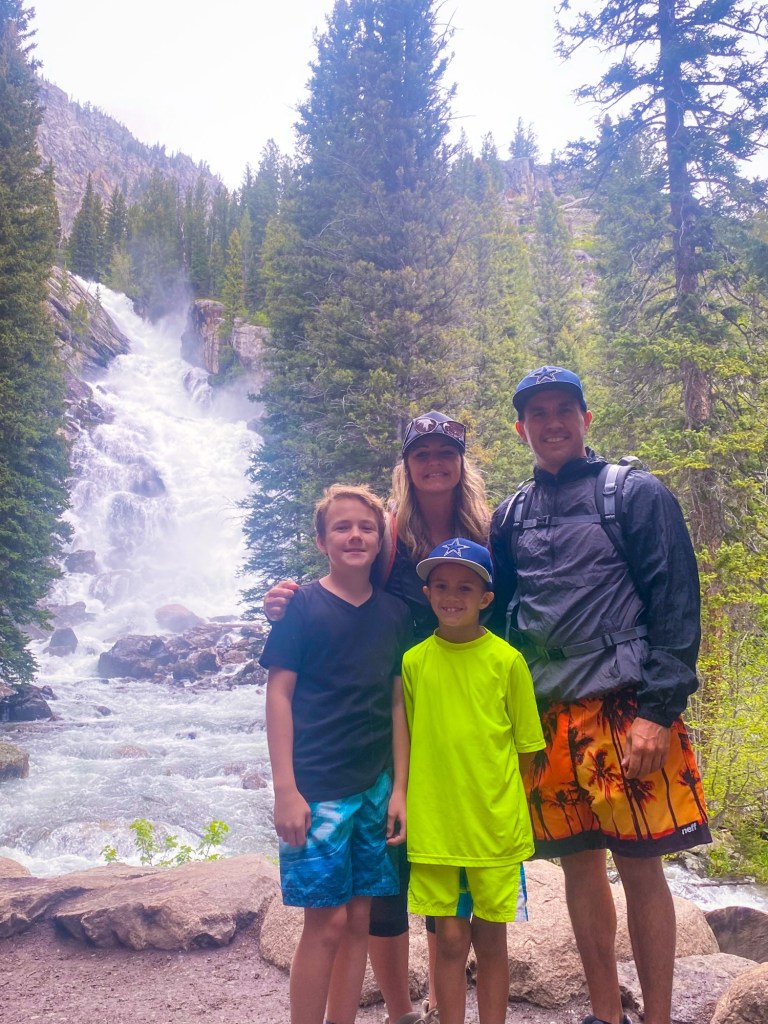
6. Hidden Falls – Grand Teton National Park (Wyoming)
Hidden Falls is one of Grand Teton’s most family-friendly waterfall hikes, delivering big views with minimal effort. The trail begins at Jenny Lake—either by boat shuttle or on foot—and gently winds through pines until you hear the roar of the falls. At 100+ feet, Hidden Falls impresses with its powerful cascade framed by rugged granite and lush greenery, making it a perfect stop before continuing on to Inspiration Point.
Why it’s worth it: Stunning mountain views, peaceful lakeside scenery, and a serene waterfall that feels like a hidden gem.
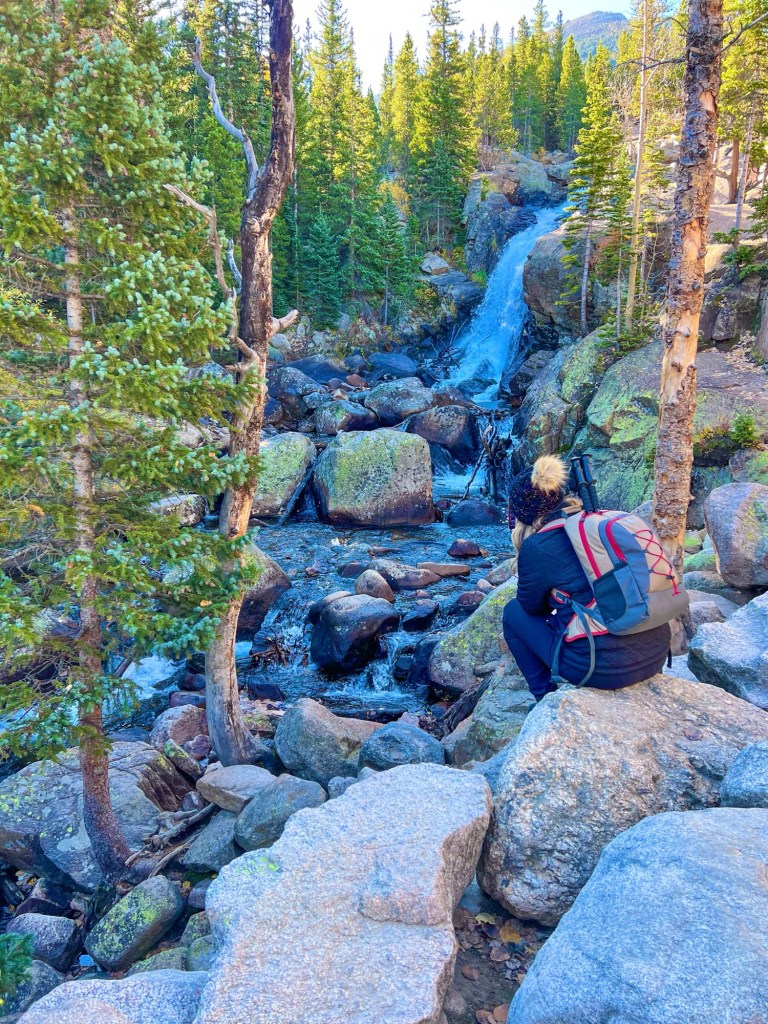
7. Alberta Falls – Rocky Mountain National Park (Colorado)
A quick, scenic hike in Rocky Mountain National Park leads you to Alberta Falls, a beautiful cascade framed by lush forest and rugged mountain peaks. Perfect for a family stroll or a quick nature escape.
Why it’s worth it: Easy access, photogenic scenery, and a refreshing waterfall set in the heart of the Rockies.
8. Cascade Falls – Ouray, Colorado
Just a short walk from downtown Ouray, Cascade Falls offers a dramatic plunge into a narrow canyon, surrounded by towering cliffs and alpine scenery. Perfect for a quick stop or a family-friendly adventure.
Why it’s worth it: Easy access, stunning cliffside views, and a waterfall that captures the charm of Ouray’s rugged beauty.
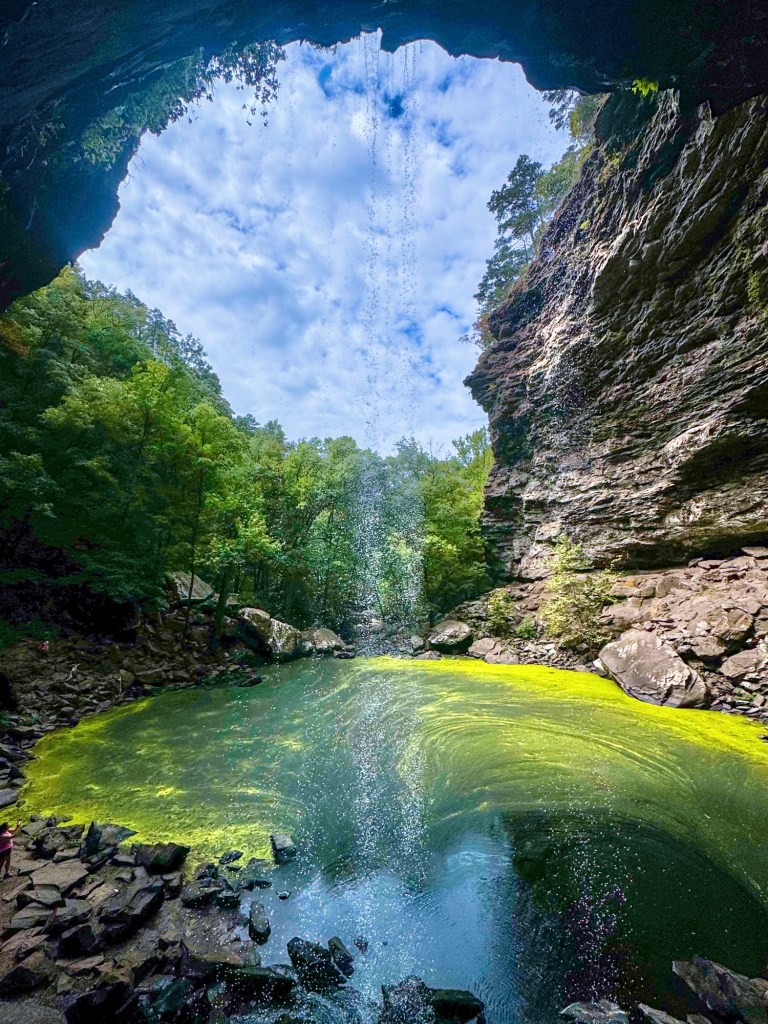
9. Cedar Falls – Petit Jean State Park (Arkansas)
A moderate hike through lush forest leads to Cedar Falls, one of Arkansas’ most impressive waterfalls, cascading over sandstone cliffs into a serene pool below. Great for families and nature lovers alike.
Why it’s worth it: Scenic forest trails, a powerful waterfall, and one of the most iconic spots in Petit Jean State Park.
Tips for Chasing Waterfalls Across the US:
Check trail conditions before you go—some waterfalls are seasonal.
Bring layers and water-resistant shoes; trails can be slippery.
Pack or wear a swimsuit in case you want to take a dip!
Early morning visits help avoid crowds and capture the best light for photos.
Consider packing a picnic—many parks have beautiful spots to rest and enjoy the scenery.
Must Have Hiking & Photography Gear
This post contains affiliate links. I may earn a small commission, at no extra charge to you, if you purchase items using any of the links provided. Thank you!
No matter which waterfall you choose, each offers its own unique beauty, adventure, and perfect photo opportunity. From serene forest cascades to dramatic mountain plunges, these hikes are well worth the journey. For more travel tips, waterfall inspiration, and behind-the-scenes adventure, follow me on Instagram @road.trip.queen and join the journey!
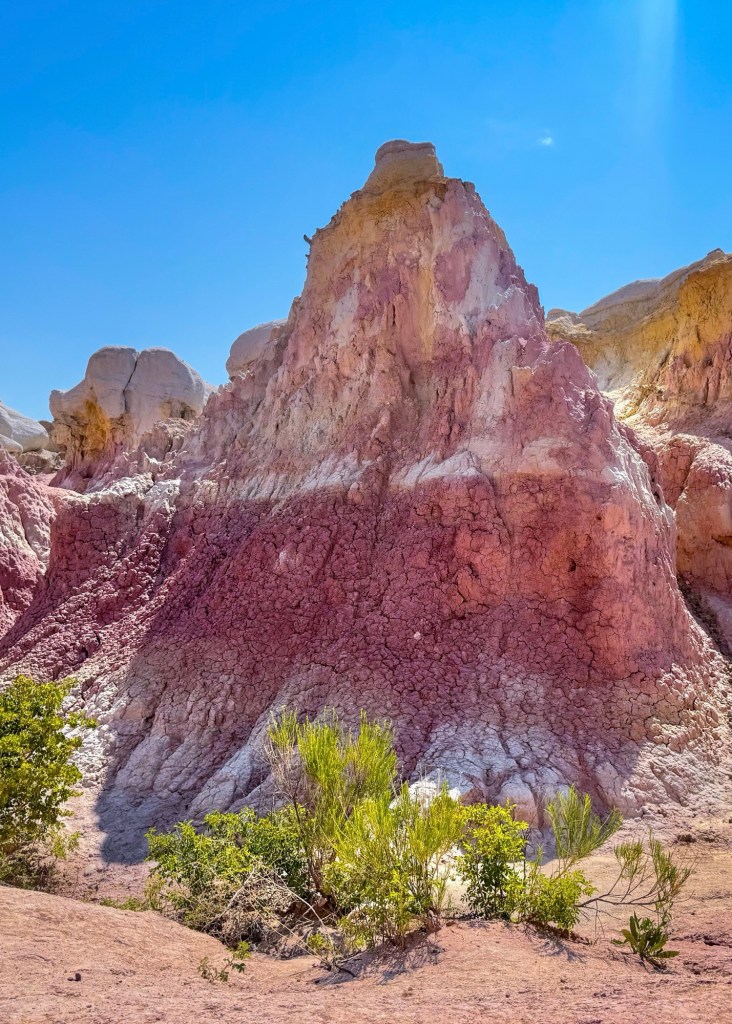
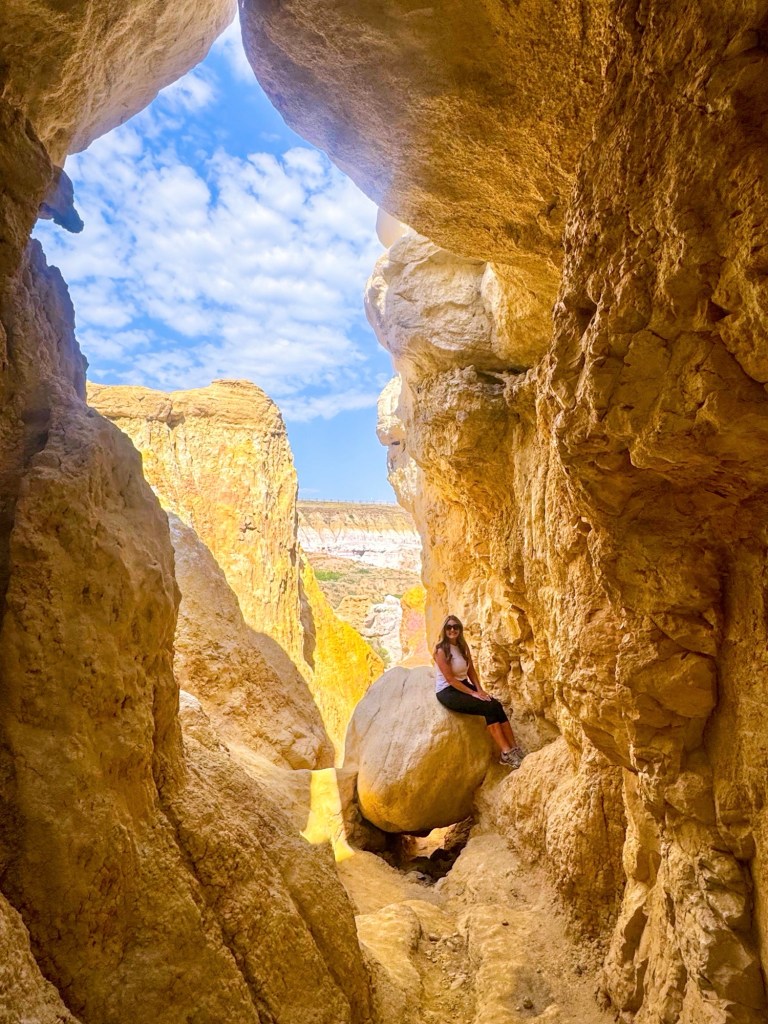
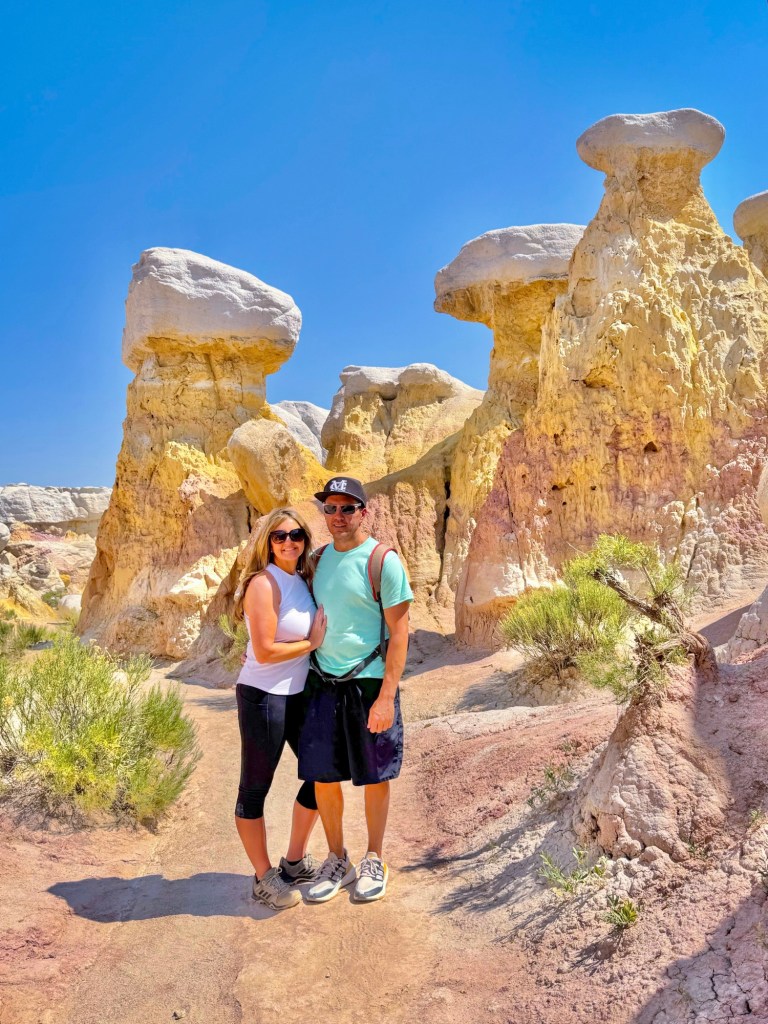
Nestled in the rolling prairies of eastern Colorado lies a hidden gem that seamlessly blends natural beauty, rich history, and geological wonder—the Paint Mines Interpretive Park. This 750-acre park is renowned for its vibrant, multicolored clay formations, sculpted over millennia by the forces of nature.
Trail Overview
Distance: Approximately 3.4 miles (loop)
Elevation Gain: Around 334 feet
Difficulty: Easy to moderate
Estimated Time: 1.5 to 2 hours
Trail Type: Loop with several interpretive stops
Best Time to Visit: Early morning or late afternoon for optimal lighting and cooler temperatures
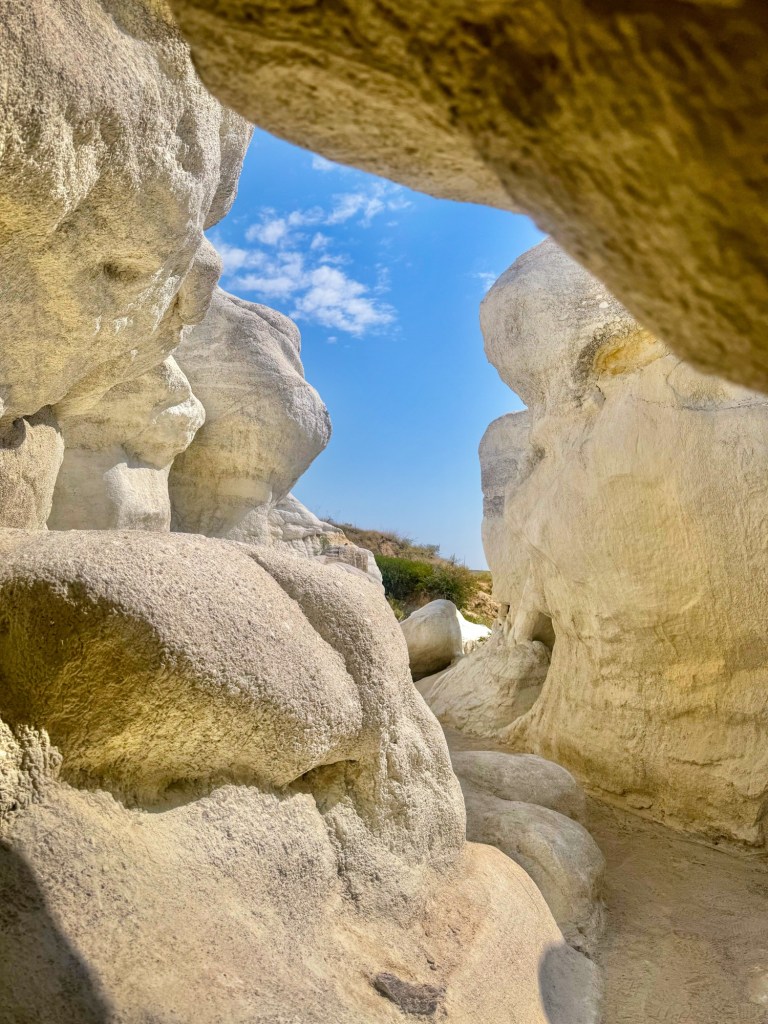
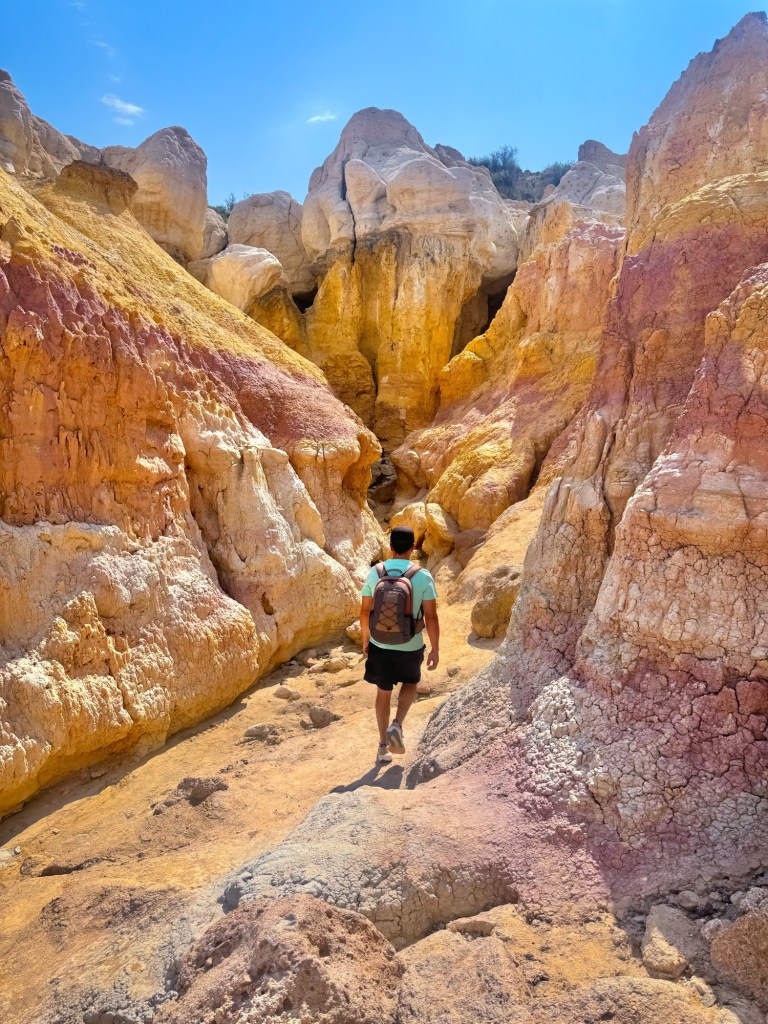
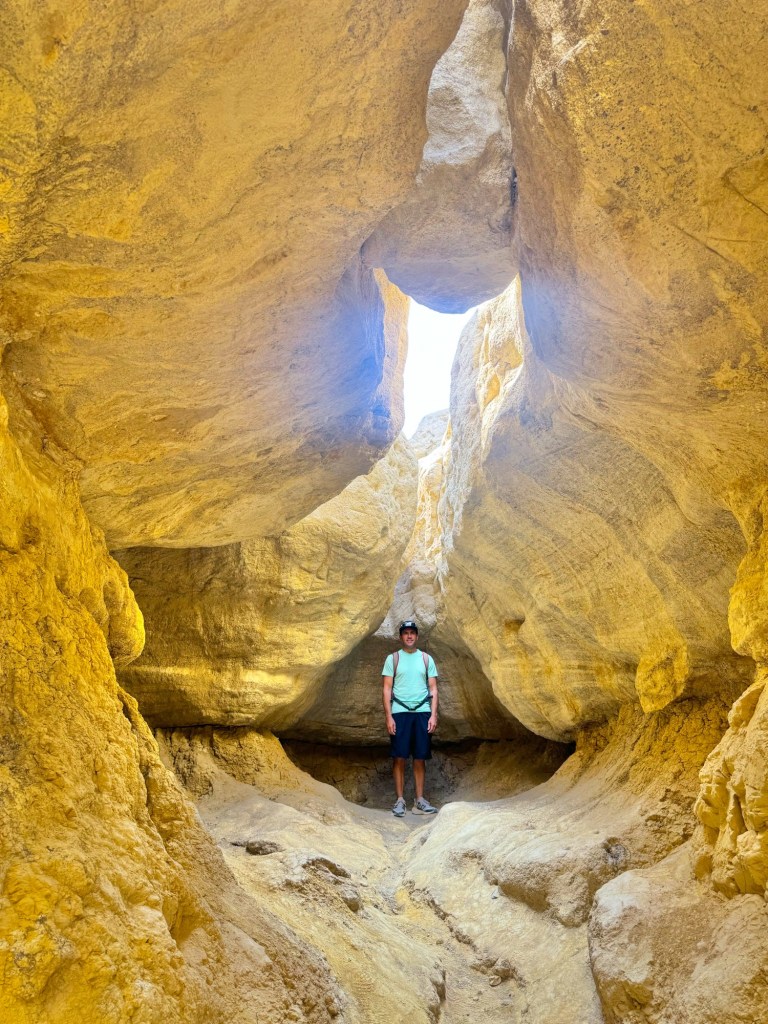
The main loop trail meanders through diverse terrains, including open prairies, colorful badlands, and unique geological formations. Along the way, hikers encounter five interpretive sites focusing on ecology, prehistory, history, geology, and an overlook offering panoramic views of the park.
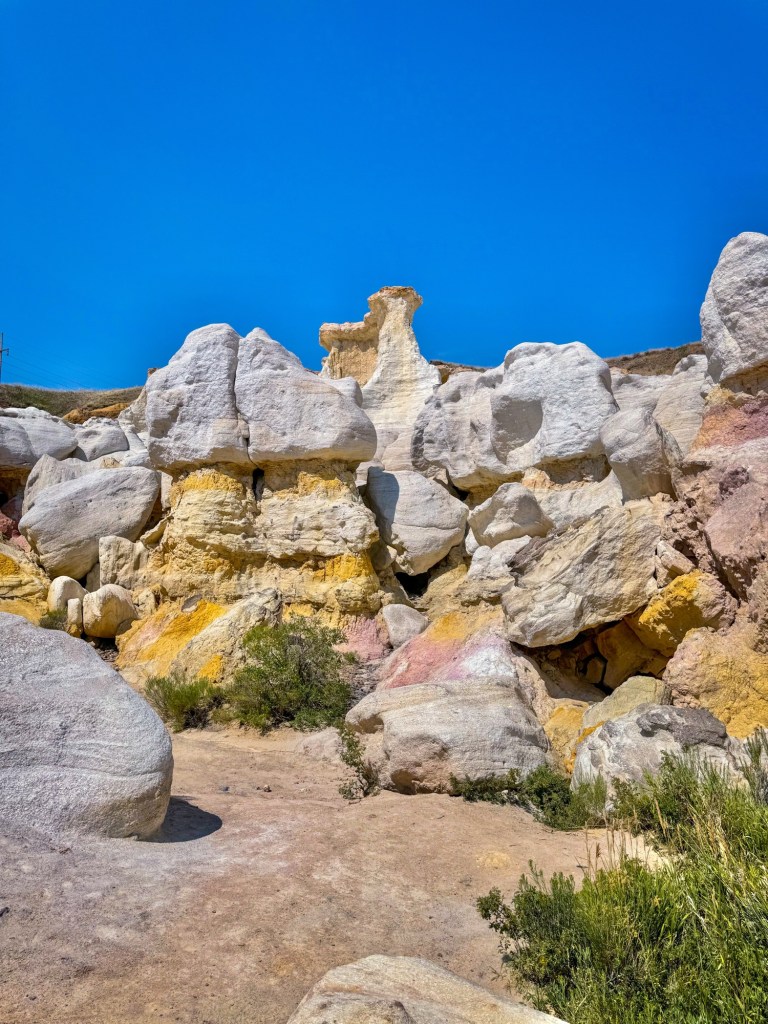
What Makes the Paint Mines Unique?
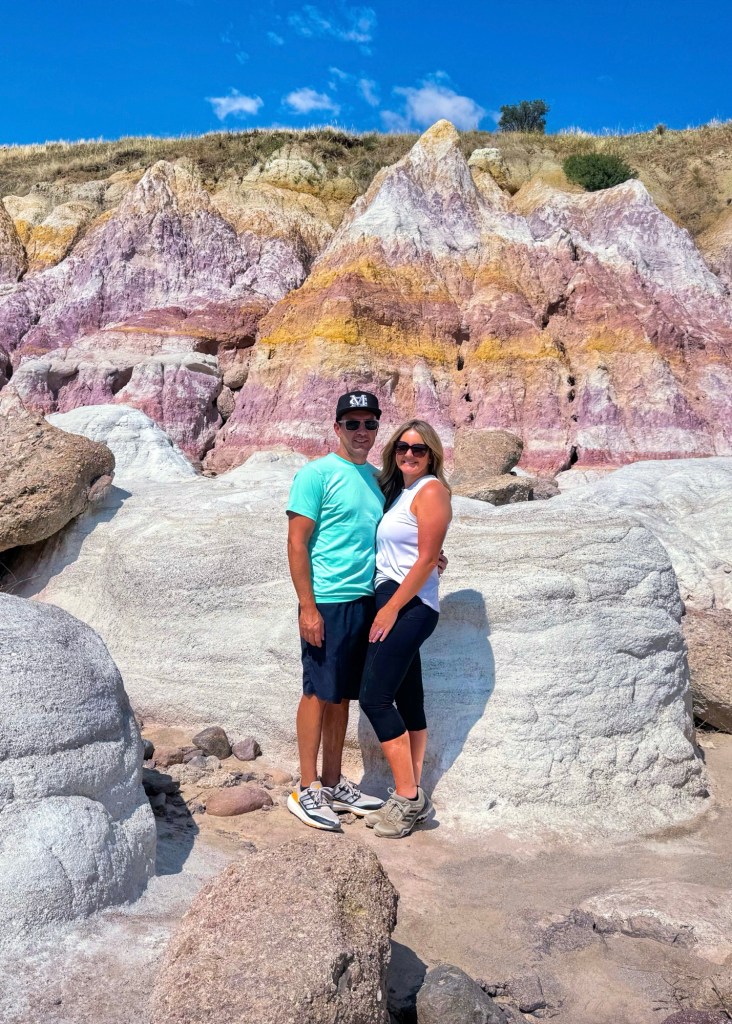
The park’s namesake formations are composed of brightly colored clays—ranging from pinks and purples to golds and whites—created by oxidized iron compounds. These clays have been sculpted into hoodoos, spires, and gullies, presenting a surreal landscape that feels otherworldly.
Rich Human History
Archaeological evidence indicates that Native American tribes utilized the area for thousands of years, extracting the colorful clays for pottery and ceremonial paints. Artifacts such as arrowheads and stone tools have been discovered, underscoring the site’s historical significance.
Ecological Diversity
Beyond its geological and historical importance, the park is home to a variety of wildlife, including coyotes, mule deer, songbirds, and falcons. The diverse habitats—prairies, wetlands, and badlands—support a rich tapestry of plant and animal life.
Tips for a Responsible and Enjoyable Visit
Stay on Designated Trails: The formations are fragile; walking off-trail can cause irreversible damage.
No Climbing: Climbing on the formations is prohibited to preserve their integrity.
Pets: Dogs and other pets are not allowed in the park.
Facilities: Restrooms are available at the main parking area, but there are no facilities along the trail.
Preparation: Wear sturdy, closed-toe shoes suitable for uneven terrain. Bring plenty of water, sunscreen, and a hat, as shade is limited.
Weather Considerations: Avoid visiting during or after heavy rains, as trails can become slippery and dangerous.
Getting There
Paint Mines Interpretive Park is located at 29950 Paint Mine Road, Calhan, CO 80808. From Colorado Springs, take Highway 24 east for approximately 31 miles to Calhan. Turn right on Yoder Street/N Calhan Highway for 0.7 miles, then left on Paint Mines Road. The main parking lot will be on your left after about 1.4 miles.
Embarking on the Paint Mines Interpretive Trail offers more than just a hike; it’s an immersive experience into the natural, historical, and cultural tapestry of Colorado’s eastern plains. Whether you’re a geology enthusiast, history buff, or simply seeking a unique outdoor adventure, the Paint Mines promise a memorable journey through time and color.
Must Have Hiking & Photography Gear
This post contains affiliate links. I may earn a small commission, at no extra charge to you, if you purchase items using any of the links provided. Thank you!
If you’re dreaming of more colorful trails, family-friendly hikes, and hidden gems across the U.S., be sure to follow along on Instagram @road.trip.queen! I’m always sharing our real-life road trip moments, travel tips, and the best scenic stops to inspire your next adventure. Whether it’s chasing waterfalls, climbing hoodoos, or wrangling snacks in the backseat with kids—there’s never a dull moment. See you on the road!
There’s something unforgettable about a road trip that winds through charming small towns, dramatic mountain passes, and ends with ocean breezes and rugged coastline views. Our recent adventure took us from the thunderous roar of Niagara Falls all the way to the peaceful shores of Bar Harbor, Maine, with scenic and soul-refreshing stops in Stowe, Vermont and Conway, New Hampshire. From waterfalls to winding mountain roads and cozy village vibes, every leg of the journey had something special to offer—and we soaked up every minute of it.
This post contains affiliate links. I may earn a small commission, at no extra charge to you, if you purchase items using any of the links provided. Thank you!
Ultimate Niagara Falls Adventure: Views, Cave of the Winds & Night Fireworks
Our summer road trip began in Niagara Falls, New York — where we stayed just steps from the falls, experienced the powerful Cave of the Winds, and ended the night with fireworks over the water. Below, I’m sharing exactly what we did and what you need to know if you’re planning your own adventure.
We stayed at the Seneca Niagara Resort and Casino, just a short walk from Niagara Falls State Park, which made exploring easy and fun. We took in stunning sights from Goat Island, where the roar of the falls and the mist in the air set the tone for the day. One of the highlights was the Cave of the Winds tour—getting up close to the falls and braving the Hurricane Deck, where we were absolutely soaked and laughing the whole time.
Located at Niagara Falls State Park, Goat Island (U.S. side)
Entrance is near the Cave of the Winds Pavilion
Adults (12+): $23
Children (6–12): $19
Ages 5 and under: Free
Park at Goat Island Parking Lot 2 (closest to Cave of the Winds)
Open daily, typically 9:00 AM – 7:30 PM in peak season (May – October)
Last ticketed entry usually 30–60 minutes before close
Best time to visit: Mornings for fewer crowds
Cave of the Winds deck area is not wheelchair or stroller accessible due to stairs and slippery surfaces
To top it all off, we capped the evening with the seasonal fireworks show at 10 PM, watching bursts of color light up the sky over the falls. It was the perfect end to an adventurous and awe-inspiring day.
Exploring Stowe: Waterfalls and Woodland Trails
Nestled in the beautiful forests of Stowe, Vermont, the hike to Bingham Falls is the perfect family-friendly adventure. This relatively short and easy trail winds through lush woods, making it accessible for kids and casual hikers alike. Along the way, the sounds of rushing water and chirping birds build the excitement as you get closer to the falls. It’s a wonderful spot to stretch your legs, breathe in the fresh mountain air, and enjoy nature together.
When we reached Bingham Falls, we were instantly captivated by the cascade tumbling over the rocks into a clear pool below. The waterfall drops about 40 feet, creating a refreshing oasis that’s popular for swimming and cliff jumping in the warmer months. My youngest son couldn’t resist the thrill — he took a brave leap from one of the cliffs into the cool water below! Whether you’re here to dip your toes or just soak in the scenery, Bingham Falls offers a memorable and joyful experience for the whole family.
Difficulty: Easy to moderate — mostly well-marked, slight elevation changes
Time: About 45 minutes to 1 hour round trip, depending on pace and stops
Trailhead Location: Off Vermont Route 108, near Smugglers’ Notch Resort parking area
Parking: Free parking available near the trailhead, but it can fill up quickly on weekends and summer holidays
Family Friendly: Yes — suitable for kids old enough to hike on uneven terrain
What to Bring: Comfortable hiking shoes, water, swimsuit or towel if you want to swim
Best Time to Visit: Late spring through early fall; avoid winter due to slippery rocks and trail conditions
Amenities: No restrooms or facilities on trail — plan accordingly
After a day of hiking and exploring, we found the perfect spot to unwind at Idletyme Brewing Company in Stowe. This cozy tavern offers a warm, rustic atmosphere with a welcoming vibe for families and travelers alike. Sitting on the outdoor patio, we enjoyed a refreshing beer flight and crispy fried pickles. The menu features hearty pub fare, including juicy burgers and flavorful wings, all made with locally sourced ingredients. Whether you’re seeking a relaxing meal after a day of adventure or a place to gather with friends, Idletyme provides a memorable dining experience in the heart of Stowe.
Mountain Magic in New Hampshire
Leaving Vermont behind, we headed toward the stunning landscapes of New Hampshire, making a memorable stop at Flume Gorge along the way. The hike through this natural granite gorge was a magical experience—walking across covered bridges, listening to rushing water, and marveling at the sheer walls towering above us. It was a perfect blend of easy adventure and breathtaking scenery that the whole family enjoyed.
Location: 852 Daniel Webster Hwy, Lincoln, NH (Franconia Notch State Park)
Open mid-May to mid-October
Trails: 9 AM–5 PM (May–Oct 13), 9 AM–4 PM (Oct 14–26); last entry at closing time
Adults (13+): $18 online / $21 at window
Children (6–12): $16 online / $19 at window
Kids under 6: Free
Reservations: Strongly recommended; required for time-slot entry and to save $3/ticket
Trail Details: 2‑mile one-way loop through gorge and rim trails.
Elevation gain ~500 ft; moderate difficulty with packed gravel, boardwalks, and many stairs
Restrooms and food/gift shop available at Gilman Visitor Center
Not wheelchair- or stroller-accessible
Wear sturdy footwear—the boardwalks and stairs can be slippery.
After our hike, we checked in to the amazing White Mountain Resort, a cozy mountain retreat that quickly became our home away from home. We savored delicious meals at the on-site restaurant, enjoying both dinner and breakfast with spectacular mountain views as our backdrop. Evenings were all about relaxation—while the boys splashed in the heated pool, we unwound in the hot tub, soaking in the peaceful atmosphere and crisp mountain air. It was the perfect balance of adventure and comfort to recharge for the next day’s explorations.
After a relaxing stay in the White Mountains, we continued our road trip eastward toward the rugged coastline of Maine. The drive from New Hampshire to Bar Harbor was beautiful in itself—winding through small towns, dense forests, and glimpses of the Atlantic as we drew closer to the coast. With a few quick stops to stretch and snack, we arrived in Bar Harbor by afternoon, ready to trade mountain views for salty sea breezes. As we crossed the bridge onto Mount Desert Island, the charm of coastal Maine greeted us immediately, and we couldn’t wait to explore everything this picturesque seaside town had to offer.
Nestled along the serene waters of Frenchman’s Bay, the Harborside Hotel, Spa & Marina served as a perfect coastal retreat for our Bar Harbor stop. With 187–193 guest rooms and suites featuring marble bathrooms, in-room coffee, and semi-private balconies overlooking the harbor, the accommodations were spacious, comfortable, and ideal for families. Located in the heart of downtown Bar Harbor, Harborside let us walk easily to local shops, restaurants, and waterfront trails—and still offered stunning views back at the hotel. It truly balanced relaxation and exploration in a way that made our Maine getaway feel special.
Cadillac Summit Road
Our first adventure in Bar Harbor was a drive to the top of Cadillac Mountain, and we couldn’t have asked for a more perfect day. The skies were crystal clear, and the views only got better with each twist and turn of the Cadillac Summit Road. As we climbed higher, sweeping vistas of Frenchman Bay, scattered islands, and the distant outline of Bar Harbor came into view. You will need the $6 timed-entry vehicle permit to drive to the summit, please see this link for booking!
At the summit, we parked and wandered the short loop trail, soaking in panoramic views in every direction. It felt like standing on top of the world. The cool breeze, endless blue sky, and jagged coastline below made it one of those moments you just want to bottle up and take home. Whether you hike or drive, the summit of Cadillac Mountain is an absolute must when visiting Acadia—and we were lucky enough to enjoy it in all its sun-drenched glory.
Cadillac Summit Road Info
Location: Mount Desert Island, Acadia National Park — 3.5 mi winding paved road to the 1,530 ft summit
Vehicle Reservation Required: $6 per vehicle, required mid-May through late October
Reservations open 90 days in advance for 30% of spots; remaining 70% release 2 days before
Best time to go: For daytime viewing: late morning to early afternoon (8 AM–11 AM avoids crowds and fog)
Sunrise is spectacular, but requires early reservation and prime timing
Road open mid-May through mid-October; closed December–mid-April
No RVs or trailers; max vehicle length 21 ft
Summit offers two paved parking areas with restrooms, gift shop, scenic overlooks
A paved 0.7 mi loop trail (about 15 min) encircles the summit — easy and accessible
Highest point on the U.S. Atlantic coast
Panoramic views of Frenchman Bay, the Atlantic, and nearby islands
Tide Pooling in Acadia National Park
Our next adventure took us to the Ship Harbor Trail in Acadia National Park, perfectly timed for low tide in the early evening. This easy, family-friendly loop winds through coastal forest before opening up to dramatic rocky shoreline—an ideal spot for tide pooling. Although we were hoping to spot starfish, the sea had other plans. Still, we had a blast discovering tiny snails, colorful anemones, and all sorts of marine life tucked between the rocks.
The kids loved climbing over the granite boulders, peering into pools, and exploring the alien-like world revealed by the retreating tide. The golden hour light made everything feel magical, and the peaceful setting gave us a perfect moment to slow down and appreciate the rugged beauty of Acadia’s coastline. Even without starfish, it was one of those simple, satisfying evenings that make road trips so memorable.
Ship Harbor Trail Information
Location: Off Maine Route 102A (Seawall Road), southwest side of Mount Desert Island, Acadia National Park
Trail Type: Easy figure‑8 loop (~1.3 mi / 2.1 km round trip) through coastal forest and rocky shoreline
Easy grade with about 60–65 ft of elevation gain; suitable for all ages
Time Needed: 30–60 minutes, plan around 45 minutes (longer if exploring tide pools)
Best Time to Visit: Target 1 hour before to 30 minutes after low tide for best tide pooling
Coastal rocks can be slippery, especially near algae
After hiking the peaceful loop at Ship Harbor Trail, we made our way to Bass Harbor Head Lighthouse—one of Acadia’s most iconic coastal sights. Perched on the edge of a rugged cliff, the lighthouse offers a dramatic view of the rocky shoreline and crashing waves below. The parking lot is small but turns over quickly, and the short walk down to the overlook rewards you with postcard-worthy views of the lighthouse framed by the Atlantic. It’s a quick stop, but one you absolutely don’t want to miss. We ended the evening with dinner at La Bella Vita at the hotel and it was delicious!
The next day, we took on the thrilling Beehive Trail—one of Acadia’s most adventurous hikes. This short but steep climb rewards hikers with stunning views, but it’s not for the faint of heart. Iron rungs, narrow ledges, and exposed cliffs make the ascent feel more like a vertical scramble than a typical trail. At the top, we were greeted with clouds and fog, but on a clear day you’ll find sweeping views of Sand Beach and the Atlantic Ocean below. It was an adrenaline-pumping hike, but absolutely worth!
Beehive Trail Information
Located in Acadia National Park on Mount Desert Island, Maine
Entrance Fee: Required for Acadia National Park – $35 weekly vehicle pass
Trailhead is across from Sand Beach Parking Lot on Park Loop Road
Distance: 1.4 miles round trip (loop option available)
Elevation Gain: 500 feet
Difficulty: Strenuous (not recommended for those with fear of heights)
Trail Type: Loop (ascend via Beehive, descend via Bowl Trail or same way)
Steep granite ascent with iron rungs, ladders, and narrow ledges
No technical climbing skills required, but agility and confidence with heights are important
Not recommended in rain or for young children
After hiking, we ended the day with shopping in Bar Harbor and dinner at Salsa Verde Grill! This restaurant features New Mexican style cuisine and it was actually really good! We needed a break from all the seafood and lobster rolls.
What I Wore on Our Niagara Falls to Maine Road Trip
Wondering what to pack for a road trip like this? I’ve linked a few of my favorite travel-friendly outfits and gear we used throughout the trip below!
From thundering waterfalls to misty mountain hikes and dramatic coastal views, this road trip from Niagara Falls to Maine gave us a little bit of everything. Whether we were climbing iron rungs in Acadia or chasing sunsets along the coast, each stop offered a chance to explore, reconnect, and make unforgettable family memories. If you’re dreaming of a scenic adventure packed with natural beauty, small-town charm, and just the right amount of thrill—this route delivers. Until the next road trip… happy trails!
Follow along for more family-friendly adventures and travel tips on Instagram @road.trip.queen!
Road trips are all about adventure, but let’s be real—long hours in the car can take a toll if you’re not prepared. That’s why I’m excited to introduce today’s guest post by Olivia Wolfe, a dedicated writer with a passion for helping travelers make their journeys smoother and more enjoyable. In this post, Olivia shares her best comfort hacks to keep you feeling refreshed, relaxed, and ready for the road ahead. Whether you’re gearing up for a cross-country trip or a weekend getaway, these tips will be game-changers for your next drive!
So, you’re pumped for a hiking road trip—hitting the trails, soaking in the views, all that good stuff. But if you’re stuck feeling uncomfortable the whole way, it’s a buzzkill.
Here’s the ultimate comfort hack to elevate your next hiking road trip, making it not only memorable but also cozy and stress-free. . Trust me, it’s a game-changer—want to know how? Let’s dive in:
1. Choose the Right Vehicle
First things first—your ride’s gotta be solid. You don’t want to be crammed in like sardines with your gear squashing you the whole way. Pick something with enough space to stretch out a bit, decent AC so you’re not sweating buckets, and maybe even comfy seats that don’t leave your back screaming.
Oh, and storage is must. You’ll thank yourself when your snacks and hiking stuff aren’t spilling all over the place.
2. Pack Smart for Comfort
Packing efficiently is essential for comfort on the road. Here’s a list of must-have items:
Layered Clothing: Weather can change rapidly while hiking. Pack layers that you can easily add or remove, including moisture-wicking shirts, insulating fleeces, and waterproof jackets.
Comfortable Footwear: Bring along your favorite hiking boots or shoes that provide support and comfort. Consider packing slip-on shoes for quick stops at rest areas.
Travel Pillows: A neck pillow or lumbar support pillow can help prevent stiffness during long stretches in the car.
Blankets: A lightweight blanket can keep you warm during chilly nights or provide extra comfort during long drives.
3. Stay Hydrated and Nourished
Keeping hydrated and well-fed is crucial for maintaining energy levels on a road trip:
Reusable Water Bottles: Invest in insulated water bottles to keep drinks cold or hot throughout the journey. Healthy Snacks: Pack a variety of snacks like nuts, granola bars, and dried fruits to keep hunger at bay without resorting to unhealthy options.
Meal Prep: If you have access to a cooler, prepare some meals in advance. Sandwiches, salads, or wraps are easy to pack and eat on the go.
4. Plan Your Stops Wisely
While it’s tempting to drive straight through to your destination, taking breaks is vital for comfort. How to do that?
Stretch Breaks: Plan to stop every couple of hours to stretch your legs and refresh your mind. Use compression socks during travel to help prevent fatigue and improve circulation.
Explore Scenic Stops: Use rest stops as opportunities to explore scenic viewpoints or local attractions along your route.
5. Create an Entertaining Atmosphere
Keeping everyone entertained during long drives can enhance the experience:
Music Playlists: Curate playlists ahead of time featuring everyone’s favorite tunes. Singing along can lift spirits!
Podcasts & Audiobooks: Download interesting podcasts or audiobooks that cater to everyone’s interests for engaging listening during the drive.
Games: Bring along travel games or apps that everyone can enjoy together, making the journey more interactive.
6. Use Technology Wisely
Leverage technology to enhance your comfort while traveling:
Navigation Apps: Use apps like Google Maps or Roadtrippers to find the best routes, avoid traffic, and discover interesting stops along the way.
Weather Apps: Stay updated on weather conditions at your destination and along your route to prepare accordingly.
Car Maintenance Apps: Keep track of your vehicle’s maintenance needs with apps that remind you of oil changes, tire rotations, and more.
7. Prioritize Restful Sleep
If your road trip involves overnight travel, ensure you get quality rest:
Sleep Masks & Earplugs: These can help block out light and noise when trying to catch some sleep in the car or at rest stops.
Comfortable Sleeping Gear: Bring along sleeping bags or blankets if you plan on camping or sleeping in your vehicle.
8. Prepare for Hiking Adventures
Once you reach your destination, being prepared for hikes will enhance your experience:
Essential Gear: Ensure you have all necessary hiking gear packed, including sturdy boots, backpacks, hydration packs, and first-aid kits.
Trail Research: Before hitting the trails, research local hikes that suit your group’s skill level and interests. Apps like AllTrails can provide valuable information on trail conditions and difficulty levels.
9. Embrace Flexibility
While planning is essential for a successful road trip, flexibility is equally important:
Go with the Flow: Be open to changing plans based on weather conditions or new discoveries along the way.
Spontaneous Stops: Allow time in your itinerary for spontaneous stops at interesting sites or local eateries that catch your eye.
Final Thoughts
By incorporating these comfort hacks into your hiking road trip planning, you’ll create an enjoyable experience that balances adventure with relaxation.
So, gear up, hit the trail, and let the good times roll! With these comfort hacks, your hiking road trip is about to be an epic blast—think stunning views, epic playlists, and epic fights over the last s’more. Adventure’s calling, and it’s time to answer with a big, goofy grin!
Olivia Wolfe
Although a nursing intern, Olivia loves to write about her first love, travel and empower individuals with knowledge and understanding to navigate the complexities of different types of traveling experiences more effectively.
If you’re craving a road trip packed with adventure, natural beauty, and a little slice of Americana, Kentucky is calling your name. This state has it all—underground kayaking, jaw-dropping hikes, epic caves, and a stop at one of baseball’s most iconic landmarks. Buckle up, because this Kentucky road trip is one for the books!
Stop #1: Kayak Underground
Kicking off the adventure in the most unique way possible—paddling through an underground cave! The Gorge Underground offers an unforgettable kayaking experience through a flooded limestone mine. Picture glowing waters, eerie rock formations, and total silence except for the dip of your paddle. Whether you’re a kayaking pro or a total newbie, this is a must-do.
Pro Tip: Book your tour in advance—they fill up fast, especially in peak seasons! Make reservations here.
Stop #2: Hike the Red River Gorge Geological Area
Once you’re back above ground, it’s time to stretch those legs with some epic hiking. Red River Gorge is packed with stunning rock formations, towering cliffs, and lush forests. Whether you want a short scenic stroll or a challenging backcountry trek, there’s a trail for you.
Must-Do Hikes:
• Natural Bridge Trail – A moderate hike leading to a massive natural rock arch.
• Auxier Ridge Loop – Jaw-dropping panoramic views of the gorge.
• Sky Bridge Trail – A short hike to another incredible rock arch.
After your hike, grab a bite at Miguel’s Pizza, a local favorite known for fueling hungry adventurers with delicious, fresh-made pizza.
Stop #3: Step Up to the Plate at the Louisville Slugger Museum
Next, it’s time for a little history and nostalgia in Louisville. Baseball fan or not, the Louisville Slugger Museum is an absolute blast. You’ll get to see how the legendary bats are made, check out memorabilia from some of baseball’s greatest players, and even hold game-used bats from legends like Babe Ruth and Derek Jeter.
Don’t forget to take a photo with the giant bat outside—it’s the world’s largest baseball bat, standing at 120 feet tall!
Stop #4: Explore Carter Caves State Park
No Kentucky road trip is complete without exploring its underground wonders, and Carter Caves State Park is the perfect place to do just that. With over 20 caves, scenic trails, and natural bridges, this park is an adventurer’s paradise.
Top Experiences:
• Natural Bridge Trail – A short but scenic hike to a unique rock bridge.
• X-Cave & Cascade Cave Tours – Walk through massive underground passageways and see stunning rock formations.
• Horn Hollow Trail – Short hike that leads to a little “wild caving!” You will need a permit, easily obtained at the visitor center!
Final Thoughts
This Kentucky road trip is the perfect mix of adventure, nature, and history. From underground kayaking and hiking through towering rock formations to swinging by one of baseball’s most famous museums, this journey has something for everyone.
Have you road-tripped through Kentucky before? What was your favorite stop? Drop a comment and let me know!
If you’re looking for a family-friendly getaway packed with adventure, stunning scenery, and a little bit of luxury, Fall Creek Falls State Park is a must-visit. We recently took a trip with the kids and stayed at theLodge at Fall Creek Falls, and let me tell you—it was an unforgettable experience!
Where We Stayed: The Lodge at Fall Creek Falls
Photo from Trip Advisor website
We booked aking suite at the lodge, and it was absolutely worth it. The spacious room, modern amenities, and beautiful views made it the perfect place to relax after a long day of exploring. The kids loved having space to spread out, and I loved the cozy yet upscale feel of the lodge.
Dining at the Lodge
We ate at the restaurant inside the lodge, and the food was great! It’s so convenient to have an on-site dining option, especially after a day of hiking and adventure. The menu had something for everyone, including kid-friendly options, and we left full and happy every time.
Hiking to the Base of Fall Creek Falls
One of the highlights of our trip was hiking down to the base of Fall Creek Falls. It’s a short but steep hike, and when we reached the bottom, the view was breathtaking.
The kids had a blast scrambling over the rocks, and we all got completely soaked from the mist! It was so worth it. If you go, be sure to bring waterproof shoes, a raincoat, and a change of clothes—you’ll thank me later.
Exploring the Other Waterfalls in the Park
While Fall Creek Falls is the star of the show, the park is home to several other waterfalls that are just as stunning and worth visiting.
• Cane Creek Falls – This waterfall is easily accessible and offers a beautiful view from an overlook. There’s also a suspension bridge nearby, which the kids loved crossing!
• Cane Creek Cascades – A short walk from the Nature Center, this cascade is a fun spot where the kids enjoyed splashing in the water. It’s a great place to take a break and let them explore.
• Piney Falls – A bit more off the beaten path, Piney Falls is another scenic waterfall with a dramatic drop. We enjoyed the peacefulness of this spot compared to the more popular areas of the park.
• Rockhouse Falls – Located near Cane Creek Falls, this one is a bit smaller but still beautiful, especially after a good rain.
If you have time, I highly recommend checking out as many waterfalls as possible—each one has its own unique beauty!
Exploring the Overlooks
Fall Creek Falls has some of the best scenic overlooks, and we made it a mission to visit them all. Each one offered a different perspective of the park’s stunning waterfalls, gorges, and forests. The kids loved peering over the railings and taking in the views, and it was a great way to see a lot without too much hiking.
A fun way to view waterfall overlooks is by accessing suspension bridges at Fall Creek Falls. Each one offers an exhilarating way to experience the park’s stunning landscapes. As you cross these swaying bridges, you’ll be treated to breathtaking views of lush forests and deep gorges, making it a perfect spot for nature lovers and adventure seekers alike. The bridges add a sense of thrill to your hike while providing a unique perspective of the cascading falls and the surrounding beauty. It’s a must-do for anyone visiting the area!
Horseback Riding Outside the Park
For a fun and unique experience, we also went horseback riding. The guided trail ride was a relaxing way to explore the area, and the kids were so excited to ride their own horses. It was a great mix of adventure and calm, and we all agreed it was one of the best parts of our trip.
Tips for Visiting Fall Creek Falls with Kids
Stay at the Lodge – The suite was perfect for families, and having a restaurant on-site made meals easy.
Bring extra clothes – If you’re hiking to the base of the falls, expect to get wet!
Plan for a mix of activities – Between hiking, scenic overlooks, waterfalls, and horseback riding, there’s something for everyone.
Check trail difficulty – Some hikes are short and easy, while others can be steep. Know what to expect before heading out with little ones.
Our trip to Fall Creek Falls was an amazing family adventure, and we can’t wait to go back! Have you visited with kids? Let me know your favorite part in the comments!
If you’re heading to Oahu and wondering how to make the most of your time, you’re in for a treat. This island is packed with jaw-dropping views, delicious food, and some of the most unforgettable adventures you’ll ever have. Whether you’re a beach bum, an adrenaline junkie, or just here for the mai tais, I’ve got you covered. Here are 10 of the best things to do in Oahu!
1. Snorkel at Shark’s Cove
Despite the name, you (probably) won’t run into any sharks here. Shark’s Cove is one of Oahu’s best snorkeling spots, filled with vibrant coral, colorful fish, and crystal-clear water. Just be prepared for rocky terrain—it’s not your typical sandy beach, but the underwater views are worth it!
2. Take in the Views at the Nu’uanu Pali Lookout
Want to feel like you’re on top of the world? The Pali Lookout offers insane panoramic views of the windward side of the island, with lush green valleys and the ocean stretching out before you. It’s also got some pretty wild history—this is the site of a legendary battle where warriors were driven off the cliffs!
3. Soak in the Beauty of the Lanai Lookout
One of Oahu’s most underrated spots, the Lanai Lookout is where you’ll find dramatic coastal cliffs and stunning ocean views. On a clear day, you can even see the neighboring islands of Molokai and Lanai. It’s the perfect place for photos, but don’t expect to swim here—the waves are intense!
4. Hike to Likeke Falls
If you love chasing waterfalls, this one’s for you. The hike to Likeke Falls is a short, muddy adventure through a lush tropical forest, leading you to a picture-perfect waterfall. It’s not as well-known as some of the other hikes on Oahu, which makes it feel like a hidden gem.
5. Climb to the Top of Diamond Head
It’s one of Oahu’s most famous hikes for a reason. The Diamond Head trail takes you up a volcanic crater with killer views of Waikiki and the Pacific Ocean. It’s not too long, but it’s steep—so be ready to sweat a little! The view at the top? Totally worth it.
6. Relax on Waikiki Beach
You can’t come to Oahu and not spend some time on Waikiki Beach. Yes, it’s touristy. Yes, it can get crowded. But it’s iconic for a reason! Grab a towel, soak up the sun, and watch surfers catch waves in the distance. Bonus points if you try a surf lesson yourself!
7. Sip a Mai Tai at Duke’s Waikiki
Speaking of Waikiki, don’t leave without stopping at Duke’s. This legendary beachfront bar and restaurant is the perfect spot for sunset drinks and live music. Order their famous mai tai and just soak in the island vibes.
8. Catch an Epic Sunset
Oahu does sunsets like nowhere else. Whether you’re watching from Waikiki Beach, Sunset Beach on the North Shore, or even from a beachside bar, you’re in for a treat. Grab a drink, kick back, and enjoy the sky turning shades of pink, orange, and purple.
9. Eat at Giovanni’s Shrimp Truck
If you’re a foodie, Giovanni’s Shrimp Truck is a must. Located on the North Shore, this spot serves up some of the best garlic shrimp you’ll ever have. It’s messy, it’s garlicky, and it’s absolutely delicious. Trust me, it’s worth the wait in line.
10. Experience a Luau at Paradise Cove
You can’t leave Hawaii without experiencing a traditional luau. Paradise Cove is one of the best, with hula performances, fire dancing, and a delicious Hawaiian feast. It’s the perfect way to end your trip with a little culture, a lot of fun, and maybe one too many mai tais.
Final Thoughts
Oahu is a dream destination packed with adventure, natural beauty, and plenty of places to just kick back and enjoy the aloha spirit. Whether you’re snorkeling, hiking, eating your weight in shrimp, or just watching the waves, this island has something for everyone. Be sure to check out my complete 8 Day Oahu Itinerary for Families!
Have you been to Oahu? What was your favorite experience? Let me know in the comments!
Nestled in the heart of Alabama, Stephens Gap Callahan Cave Preserve is a breathtaking destination for adventure seekers, photographers, and nature lovers alike. This stunning cave is known for its dramatic 143-foot pit, enchanting waterfalls, and awe-inspiring light beams that filter through the entrance, creating a surreal atmosphere. Whether you’re a seasoned caver or a casual hiker, this preserve offers a unique and unforgettable experience.
Getting There
Stephens Gap is located in Jackson County, Alabama, near the town of Woodville. To visit, you’ll need a permit, grab yours here. Because this is a protected area, visitor numbers are limited to help preserve its natural beauty.
The hike to the cave entrance is about 1.4 miles round trip and is rated as moderately difficult. While not overly strenuous, the trail can be rocky and muddy, so sturdy hiking boots are recommended.
What to Expect
Upon reaching Stephens Gap, visitors are greeted with two main entrances:
1. Walk-in Entrance: This leads to a spacious, sloping chamber where you can explore without technical caving gear. The most famous feature here is the rock pedestal, often used by photographers to capture stunning images of light beams shining through the cave’s opening.
2. Vertical Pit Entrance: This 143-foot drop is for experienced cavers with the proper gear and training in single-rope techniques. If you plan to rappel, you must bring your own equipment and know how to ascend safely.
Best Time to Visit
While the cave is open year-round, the best time to visit is early in the morning or late afternoon when the sun is at the right angle to create the famous light beams. Visiting after rainfall can also enhance the waterfalls inside the cave, adding another layer of beauty to the experience.
Safety and Conservation
Permits are required, and you must follow Leave No Trace principles.
You must wear sturdy boots and helmets are required.
No guided tours are available, so come prepared with proper hiking or caving knowledge.
Do not attempt the rappel unless properly trained—rescues are difficult and dangerous.
Be mindful of slippery rocks and fragile cave formations to help preserve the cave for future visitors.
Final Thoughts
Stephens Gap Callahan Cave Preserve is one of Alabama’s most remarkable natural wonders. Whether you’re standing on the iconic rock pedestal, marveling at the light beams, or descending into the abyss with a rope, this destination offers a true adventure. If you love exploring hidden gems, make sure to add this cave to your bucket list!
Have you visited Stephens Gap? Share your experience in the comments!
Waterfall hikes are by far my favorite. When we planned our drive to Crested Butte, I was thrilled to discover Zapata Falls! I knew right away that this was the perfect hike to cap off the year. Keep reading to discover more about this incredible winter hike to a stunning frozen waterfall!
This post contains affiliate links of products that we use and love! I may earn a small commission, at no charge to you, if you purchase any items using the links provided. Thank you!
Zapata Falls in winter is a breathtaking sight, where the cascading water freezes into intricate ice formations that glisten in the cold, mountain air. Surrounded by rugged cliffs and a serene landscape, the falls create a tranquil, almost otherworldly scene.
Getting There
Address: Zapata Falls is located off Highway 150, just a few miles from the Great Sand Dunes National Park entrance. It’s within the San Isabel National Forest.
Trailhead: The trailhead is marked, and you can drive to the Zapata Falls parking area. From there, the hike to the falls is about 1/4 mile (0.4 km) and is relatively short, but it involves some scrambling through rocky terrain and can be slippery in winter due to ice and snow.
The Hike – Distance: 0.8 miles | Time: 30 minutes | Level: Moderate
This hidden gem of a hike provides a stunning view of a 25-foot frozen waterfall nestled inside a cave. The hike to the falls is an easy, gravel trail that meanders through the trees. To reach the cave itself, you’ll need to trek on top of a chilly, frozen creek, and to see the waterfall, you will need to enter the cave.
Winter Hiking Conditions
Trail Difficulty: The short trail can be steep and potentially icy during winter, especially as you get closer to the waterfall. It’s important to wear sturdy, waterproof boots with good tread and consider investing in microspikes or crampons to improve traction on icy surfaces.
Ice and Snow: The falls themselves are often frozen in winter, creating a beautiful scene of cascading ice formations. However, the surrounding rocks, water, and trail can be slick, so proceed cautiously.
Cold Temperatures: Winter temperatures in the area can drop significantly, especially at higher elevations. Be sure to wear warm, layered clothing, and bring hats, gloves, and scarves.
Clothing and Gear
Dress in layers to regulate your body temperature and wear moisture-wicking fabrics. Be sure to pack warm gloves, hats, and a scarf or neck gaiter to protect against cold winds. Consider bringing trekking poles for added stability on slippery terrain. My heated jacket was the perfect outer layer for this hike!
If you plan to spend time near the falls, the mist and cold air can cause the surroundings to freeze, making it a beautiful, icy spectacle. Waterproof outer layers can keep you dry in these conditions.
The trail to Zapata Falls is typically accessible year-round, but in winter, there may be snow and ice, making the path slippery. Wear sturdy, waterproof boots with good traction and consider bringing traction devices like microspikes or crampons.
Safety Tips
Stay Safe Around Ice: Be cautious when walking near the frozen waterfall, as ice can be slippery. Keep a safe distance from the edge of any ice-covered areas.
Cell Service: There may be limited or no cell service in the area, so it’s a good idea to tell someone your plans and estimated return time.
First Aid Kit: Always carry a basic first aid kit, as the trail can be tricky, especially when icy.
Other Winter Activities Nearby
If you’re in the area for hiking, you might also want to explore other winter activities near Great Sand Dunes National Park, such as snowshoeing or sledding on the sand dunes, which create a surreal experience in winter.
Image credit: Great Sand Dunes National Park website
Overall, Zapata Falls in winter is a stunning and serene destination, with fewer crowds and a peaceful atmosphere. If you’re well-prepared and take necessary precautions, it can be a memorable winter hike!
My best friend and I love the hit Netflix series, Stranger Things and so do our boys! So naturally, I planned an entire summer road trip for us to see all of the filming locations around Georgia. If you’re a Stranger Things fan, keep reading to learn more about our epic Stranger Things road trip!
This post contains affiliate links. I may earn a small commission, at no extra charge to you, if you purchase items using any of the links provided. Thank you!
Just to prove how much we love this show, check out our Halloween photo! My hubby definitely won best costume ha!
On day one, we started our drive from North Texas to Rome, Georgia. It’s about an 11.5 hour drive. This was our first stop because this is where the Creel House is located and it’s the closest Stranger Things filming location to us! We stayed at the La Quinta Inn and had nice accommodations for the night.
Stop 2: Creel House
The next day we got up and began our road trip around Georgia checking out different Stranger Things filming locations! We all dressed in Stranger Things shirts and we only listened to the Stranger Things playlists on the entire drive!
Obviously we started with the Creel House, which was just about three miles from the hotel. The Creel House is located at 906 E 2nd Ave Rome, GA 30131. You are not allowed to walk up to the house, so we just admired it from the sidewalk!
Stop 3: Palace Arcade
Then we drove to Douglasville, which is about an hour and ten minutes from Rome. We had heard that the Hawkins Police Department and the Palace Arcade scenes were filmed here. We did stop by the Police Department, but it has been completely remodeled, so I wouldn’t make this stop.
We did find the The Palace Arcade. It was pretty creepy and so cool! Palace Arcade is located at 6501 Church St. Douglasville, GA 30314. It’s since been abandoned, which added to the creep factor.
Stop 4: Boys’ Houses
From Douglasville, we drove about thirty minutes to East Point to see the Wheeler House, Sinclair House, and Dusty’s House!
This was one of my favorite stops. The neighborhood is adorable, with nice homes and large trees. It really did feel like the 80s when we were driving around! You can find the the Wheeler House at 2530 Piney Wood Ln East Point, GA.
The Sinclair House is located at 2552 Piney Wood Ln, East Point, GA!
And Dusty Henderson’s House is at 2886 Piney Wood Ln East Point, GA!
Stop 5: Abandoned Mill
We then drove to the Abandoned Mill located at 2903 RN Martin St. East Point, GA and got a huge surprise when we found Billy’s Camaro parked right out front!
Stop 6: Downtown Hawkins
From East Point, we drove about an hour to Jackson, GA which was the setting of downtown Hawkins in the series. This was my favorite stop of the entire trip!
Right in the middle of downtown Jackson, we parked next to Argyle’s van and noticed the cutest little storefront with a ton of Stranger Things memorabilia called, Gold Lion Farm. We ventured inside and had the absolute BEST time of the trip!
Not only is the store totally awesome, half of it has been revamped to all things 80s and all things Strangers Things! Gosh, I felt like I was back in my childhood and never wanted to leave.
But what makes this shop so special is the people that run it! They make amazing soaps and oils, I purchased the Stranger Things Soap, and loved it. And they talked to us, they told us all about meeting the cast during filming and they took photos of us, and even emailed me later thanking us for visiting their store.
If you get the chance, you should definitely check this shop out. It was one of those places that I was happy to spend some money in, it was truly that wonderful of an experience for my crew!
Downtown Hawkins is really downtown Jackson, GA. Here you will find so much centered around the Stranger Things series. Melvad’s General Store is located right on the corner, the Library and mayor’s building is in the center of downtown. And there’s a cute little coffee shop, called Lucy Lu’s Coffee Cafe a few doors down from Gold Lion Farm that has an entire Strangers Things coffee menu! If you’re a fan of the series you will LOVE this town!
Stop 7: Hawkins High School
Our next stop had us driving about 50 minutes north, back towards Atlanta. We stopped in Stockbridge on the way to see the Hawkins High School!
You can find the High School at 109 S Lee St. in Stockbridge, GA. There was a security guard patrolling the grounds when we were there, so we couldn’t explore as much as we would’ve liked to. The Middle School is adjacent to the High School, but there are no Hawkins signs, it was just more of a vacant building.
Stop 8: Hawkins Lab
Stop eight was our final stop on our Strangers Things Road Trip! We drove about forty-five minutes to North East Atlanta to see the Hawkins Lab!
We definitely saved the creepiest place for last! You can find Hawkins Lab at 1256 Briarcliff Rd NE Atlanta, GA. It also has a security guard patrolling the grounds. We talked to him, he was a very nice guy, and he let us walk pretty close to see it in person and snap a few pictures. I wish we could’ve gotten closer, but we were lucky to even get to see it at all!
And that’s a wrap on our Stranger Things Road Trip! It took a full day, as you can see we made almost a loop and circled back to Atlanta where we stayed for two nights before heading to Jekyll Island! Check back soon to learn more about our entire Georgia Road Trip! But hands down, the Stranger Things Road Trip was the most memorable day of our entire vacation!
More Stranger Things Fun!
Check out a Stranger Things Official Store near you! We visited the one in Grapevine and had a fantastic day. There are several different photo ops and lots of merch to purchase.
Our road tripping adventures have taken us to so many fascinating and educational places across the United States. Keep reading to learn more about our favorite museums across America the whole family will love!
One of the most recent new states we visited last summer was Massachusetts! We stayed in Boston and ventured to Plymouth and Salem during our stay. This area is a history buff’s dream! We learned so much about our country’s history during the trip and seeing the places that we discuss in school was so engaging. I highly recommend a visit to this area, there is so much to experience!
The teacher in me loved this living history museum in Plymouth, MA! It was like stepping back in time and experiencing life like the Pilgrims did in the 1600s. We walked along the dirt streets in the village, explored the inside of the homes, and experienced a Wampanoag site!
The Mayflower II is a full scale reproduction of the ship that the Pilgrims sailed to America on in the 1600s. It has been added to the National Register of Historic Places and is truly an amazing site to explore!
The Freedom Trail in Boston is a unique collection of museums, churches, homes, and buildings that tell the story of the American Revolution. What I enjoyed most about this 2.5 mile trail was the option to explore it all at our own pace.
The entire family really enjoyed our time at the Boston Tea Party Museum. Not only did we learn a lot, when you’re here you are experiencing a reenactment of the time period. We were given cards with a short biography about a key person involved in the Boston Tea Party and that was the role we played during our visit. We even got to throw tea overboard! It was a really fun experience for all of us, but our boys seemed to enjoy this one the most!
My favorite part of visiting Washington DC is the amount of FREE museums that are available! We’ve visited DC four times so far and haven’t even come close to seeing all of them. Below are my favorites!
You can spend all day at the Smithsonian National Museum of Natural History and still not see everything this amazing museum has to offer! Highlights for us included the ancient Egypt exhibit, the Fossil Hall, the Hope diamond, and the Ocean Hall!
If you enjoy space and aviation, then you must check out the Smithsonian National Air and Space Museum! We enjoyed the Destination Moon Exhibition and seeing the Apollo 11 Command Module Colombia and Neil Armstrong’s Apollo spacesuit in person.
Even if you’re not a history buff, this museum has a lot to offer with over three million historical objects in collection. My personal favorite is the actual Star-Spangled Banner, the flag that inspired our national anthem!
If you’re interested in seeing the Declaration of Independence in person, this is the place to visit! Of course, this museum holds a vast amount of national records, but seeing our founding documents really was the highlight of our visit!
While this museum is somewhat of a somber one, I highly recommend a visit if you’re in DC! Be sure to get tickets to the museum, the theatre, and the Petersen House (across the street). With these three tickets, you can take a self-guided tour of the museum, it even includes a blood stained pillow from the bed Lincoln passed away in. Don’t miss the Ranger Talk in the theatre upstairs. Here you can see the special balcony seats the Lincoln’s were in at the time of his assassination and a Park Ranger will retell events leading up to that fateful night. Across the street, you can visit the Petersen House, which is where Lincoln ultimately succumbed to his injury.
Your trip to DC isn’t complete without a visit to our President’s home and workplace. Here, you will enjoy a self-guided tour of the East Wing, which includes a few public rooms, the Red Room, Blue Room, Green Room, the state dining room, and a view of the White House Rose Garden. To learn more about securing your reservation, click here.
If you find yourself in Connecticut, a great museum to visit is the Mystic Seaport Museum. Here, you will be transported back to the New England whaling trade of the 19th century as you stroll along the recreated Seaport Village and climb onto boats and ships in the Shipyard.
There are over a hundred museums in New York City, so the few we visited are just a small glimpse of what this city has to offer! I hope we have the chance to return and add more to our list soon.
A trip to New York City is just not complete without seeing Lady Liberty in person! On your visit, you can get tickets to go inside either the pedestal or the crown of the Statue of Liberty and we highly recommend this! It’s a very cool experience. While there, don’t forget to check out the museum. We enjoyed learning more about the statue’s history and seeing the original torch which is located inside.
The 911 Memorial and Museum is near the Stature of Liberty, so you can easily check out both of these museums on the same day. This is a really somber place, but a site that I feel like everyone should see at least once. The museum is very informational and very sad, but they did a wonderful job with the memorial and the artifacts. Our boys were pretty young when we visited and had a lot of questions, but I feel like it’s a big part of our history and something we should never forget.
The Empire State Building is an iconic staple of New York City. We enjoyed going up to the top viewing deck, but we loved the inside even more! I’m not even sure if this one is considered a museum, but learning about the history of the building and the construction was really neat! Plus, there’s a lot of movie history inside and several different options for photo ops!
After visiting several Smithsonian Museums over the past few years, some museums just don’t compare. But the Museum of Natural History in New York is just as amazing! I’m not sure if you can even see it all in one day, but we definitely tried! From dinosaurs to gemstones, this place has it all. Plus, it’s near Central Park, so when you finish inside, there will be more to explore outdoors!
From beaches to mountains, and a ton of history in between, Virginia is one of those states that I will never tire of visiting! And here, you will find some of my favorite museums of all time!
Being a teacher, I have a great love for history and living history museums. Colonial Williamsburg was the first one I ever visited and since then, I’ve been hooked. I was totally in my element there! The entire area is just gorgeous, and it felt like we were actually walking around in the early colonial days! You’ll see colonial homes, businesses, streets, people in time-period clothing, horse drawn carriages, and more!
How cool is it to say that you’ve walked where Pocahontas did?! This is the neatest area full of history and artifacts that go back to the early days of exploration. If you enjoy history and learning more about this time period, then I recommend checking out this historic site!
The Jamestowne Settlement is probably my favorite living history museum that we’ve visited to date. Here, you will learn about life in a Native American village, a colonial village, and on a ship. You are encouraged to talk to the re-enactors to learn more about life in this time-period as they go about their daily chores. There are even different costumes for kids to dress in. It’s a really fun, interactive museum for the whole family!
My boys loved the battlefield at the American Revolution Museum in Yorktown. If you are near Williamsburg, Virginia be sure to check out the Historic Triangle and visit Colonial Williamsburg, Jamestowne, and Yorktown. Here, you’ll learn more about the Revolutionary War!
If you’re near DC, you should consider adding a day trip to visit George Washington’s home at Mount Vernon! You are allowed to take a guided tour of the home and then explore the entire grounds on your own. The house was very impressive, but we also saw his gravesite, slave quarters, barns, and more on our visit. The most exciting part for me was inside the museum. We got to see George Washington’s actual teeth!
I love visiting our Founding Father’s homes and Thomas Jefferson’s has probably been the most fascinating. He was responsible for many of Lewis & Clark’s adventures, so there are tons of artifacts from their exploration on display in his home. Because of this, we were not allowed to take photos inside the home, but trust me, it’s amazing! We also visited the slave quarters, learned more about Sally Hemings, and were able to explore the entire property and see his gravesite. If you are near Charlottesville, Virginia be sure to check out this historical site.
Philadelphia is one of my favorite cities to visit. The history of our country and Founding Fathers has always intrigued me, so there’s no better place for history buffs than a trip to Philly, the birthplace of our nation!
Take a step back in time to the late 1700s and learn more about our independence at Independence Hall in Philadelphia. We listened to a Park Ranger tell us more about the time period and how our Founding Fathers worked together inside of the rooms here to form our government. I may have cried a few times. It smelled like the 1700s and I am still amazed I stepped foot into the very room Ben Franklin and George Washington were in!
A trip to Philadelphia is not complete without seeing the Liberty Bell. This can be a quick stop, the Liberty Bell can be seen through a glass window. Otherwise, you can wait in a line (it does move very quickly) to view the bell in person, which is what I recommend. Before you get to the bell, you have the opportunity to walk through a small museum to learn more about its history. It’s set in a beautiful location with Independence Hall in the background!
We had such a fun time at the Betsy Ross House! We got to hear from Betsy herself, and the boys even learned how to make the same stars that were on our first flag. Touring the house was fun and informational, and it was great to see so many people re-enacting history in the area!
We love learning about our Founding Fathers and its one of my goals to visit all of their homes. Ben Franklin’s home is no longer standing, but there’s a museum and courtyard where his home used to be. You can see the structure of what his home looked like, there are some artifacts left of the original structure. You can also see his printing press and post office right outside of his home!
We spent a rainy afternoon at the Franklin Institute and had a great time! There’s so much to explore and most things are hands on. The boys really enjoyed the human body and the brain exhibits!
If you plan to visit Texas, museums are an excellent attraction to add to your list of activities to beat the heat! There are several across the Dallas metroplex and throughout the entire state.
I included the Dallas World Aquarium because its location is close to the Perot Museum and it is truly an amazing place. Here, you’ll walk through a rainforest ecosystem before moving down to the aquarium. It really is a special place that we have visited time and time again.
I recently visited the George W. Bush Presidential Center in Dallas and thoroughly enjoyed my time here. My boys loved the baseball collection and I was really impressed with Bush’s paintings that are displayed throughout the museum!
Sci-Tech in Frisco is such a fun, hands-on museum, especially for younger kiddos! My kids loved the tornado simulation and the bubble tables! This is a smaller museum, but there are so many activities for kids to explore!
The Thinkery in Austin has been one of my favorite museums in Texas! There are several hands-on activities here, both inside and outdoors. This place will keep you entertained and engaged for hours!
You can’t visit San Antonio without a stop at The Alamo! Here, you can step inside this historic Spanish Mission and learn more about the Texas Revolution!
Space Center Houston is the official visitor’s center of NASA’s Johnson Space Center. This is the only place in the world where you watch astronauts train for missions, touch a real moon rock, and take a behind the scene tour of NASA!
Who knew there would be so much more to Illinois than just Chicago! While we did love exploring Chicago, we also enjoyed the history in Springfield, specifically centered around our 16th President, Abraham Lincoln!
This is my favorite Presidential Library to date! This museum, located in Springfield, seemed to be catered to kids and my boys loved it, too! There are so many neat exhibits inside that tell the story of Abe Lincoln, from when he was boy living in a log cabin, all the way to his time in the White House!
The only home that Lincoln owned can also be found in Springfield, just down the street from the Presidential Library. It was great to take a guided tour and see the home that his family lived in. Be sure to take a walk down the street as well, it has been restored to look like the time period that the Lincoln’s lived there.
My kiddos really enjoyed their time at the Adler Planetarium on our first trip to Chicago. There are many hands-on activities and even space suits and helmets to try on. It was a fun stop on our trip!
I had the chance to venture through the Art Institute of Chicago with a friend of mine. It’s truly amazing to see famous prints that I studied in school, up close and in person!
Even though I’m more of a Dr. Pepper fan, we had to check out the World of Coca-Cola on our recent trip to Atlanta. I was impressed with the amount of Coke memorabilia and it was fun trying out different flavors from around the world!
I’m including the Georgia Aquarium since it is right next to the World of Coca-Cola. It’s one of the most impressive aquariums I’ve had the chance to visit, but man was it crowded in the summer. It’s still very cool and worth a visit!
The Georgia Sea Turtle Center is located on Jekyll Island. It’s a small rehabilitation center for injured sea turtles and there’s also a museum on site. We really enjoyed learning about and watching how they help sea turtles get back to sea!
The City Museum is probably the weirdest museum I’ve visited and we loved every minute of it! There are so many places to crawl and climb your way through, in fact knee pads are highly recommended. If you’re looking for a unique adventure in St. Louis, be sure to check this place out!
The Gateway Arch National Park in St. Louis ended up being a lot more interesting than I anticipated. We enjoyed exploring outdoors around the Arch, but the museum inside is pretty cool! While there, take a tram ride up to the top!
The Titanic Museum in Branson is a really neat attraction for anyone that’s interested in the Titanic. There’s icebergs, cold temps, and over 400 artifacts, plus a replica of the grand staircase. This was a fun stop for our family
There are so many more museums across America, but these are our family favorites! It’s the perfect way to spend a day in a new place or to beat the weather if it’s too cold, hot, or rainy at your destination. Let me know what your favorite museums are that we should add to the list!
Aloha! We just returned home from our favorite family vacation on the beautiful Hawaiian island of Oahu. Keep reading for an epic 8 day itinerary for families, plus helpful tips and things to know before you go!
This post contains affiliate links. I may earn a small commission, at no extra charge to you, if you purchase items using any of the links provided. Thank you!
Day 1: Arrive in Hawaii
We took a nonstop flight on American Airlines from DFW to Honolulu. I highly recommend a direct flight, less chance of missing a connection and honestly the 7.5 hour flight wasn’t too bad. We were served lunch (a chicken curry sandwich or Asian veggie wrap option), snacks, and drinks. It went by much quicker than I thought! The whole vibe was awesome, everyone was just so happy!
Next, we checked into the hotel and grabbed lunch at Maui Brewing Company. The fish tacos and pizza hit the spot! Then we changed and headed down to Waikiki Beach. We enjoyed some beach time, but called it an early day because we were so tired after our day of travel.
Day 2: Waikiki
Not going to lie, the five hour time difference was rough getting used to. We knew it might be tough, so we didn’t make any real plans for day two. We were up pretty early and started with breakfast at the Hawaiian Aroma Café. This place was great and we ended up having breakfast here several times during our stay! I recommend the ham and egg sandwich and traditional waffles!
After breakfast we spent more time at Waikiki Beach. The water here is stunning! You can rent an umbrella and two beach chairs for $18 an hour. We pretty much just spent the day relaxing between the beach and the hotel pool.
Later in the evening, we walked around Waikiki and explored the Royal Hawaiian Center, which is basically an outdoor mall. We grabbed a quick dinner at the mall food court, which was a great option for our kids. They wanted Cane’s, Jereme and I wanted food we could only find in Hawaii. We enjoyed the burgers at Mahalo Burgers, this place was recommended to us by a local and it did not disappoint!
To end the night, we went back to the beach to watch the sunset. I am telling you, there is not a better sunset anywhere than on the beach in Hawaii!
Day 3: Snorkeling & Lanikai Beach
On day three, we had our first excursion booked with Turtles and You. We grabbed McDonald’s for breakfast and then drove to the harbor. This is a three hour boating and snorkeling with sea turtles adventure. It was a fun experience, we loved the crew on the boat and had some yummy spam musubi for lunch. We did see several sea turtles and then cruised around Diamond Head. BUT, we had much more fun snorkeling with sea turtles on our own the next day. So, I would recommend saving your money and check out our day four itinerary!
After the excursion was over, we headed to Lanikai Beach. Y’all, this beach is absolutely gorgeous and much less crowded than Waikiki! It’s about 18 miles from Waikiki, but with traffic on the island, it takes about forty minutes to get there.
We spent a few hours here relaxing, swimming, and strolling along the shore. And we happened to celebrate our 20th anniversary on this day!
Once we got back to Waikiki, we had a fantastic dinner at Duke’s. We opted to sit outside to take in the views and listen to live music. If you visit Dukes, be sure to get a Mai Tai!
Day 4: The North Shore
Day four was one of my favorite days of the entire trip! We headed to the North Shore to visit Waimea Bay, but we could never find parking! The North Shore is about 35 miles, 45 minutes from Waikiki.
So, we decided to grab lunch at Giovanni’s Shrimp Truck and regroup. The food here is to die for! The line seemed long, but moved fast and honestly, it’s so good I would wait hours for the shrimp here. We all had the shrimp scampi plate, which is their most popular dish.
From here, we went to Shark’s Cove and spent the day snorkeling and swimming in the cove. We saw so many sea turtles and schools of fish, it was awesome! It was a much more personal experience swimming on our own rather than with a big group like our excursion the previous day.
I highly recommend coming here if you have kiddos and want a safe, FREE place to snorkel and spend the day!
Day 5: Diamond Head, Likeke Falls, and Kaaawa Beach
On day five, we got in two really cool hikes and even had some time for family beach photos! Our first hike time was at noon, so we decided to sleep in late. Then, we grabbed sandwiches, fruit, and pasta from the ABC Stores in Waikiki for lunch before our day of hiking.
The first hike was Diamond Head State Monument, the iconic volcano in Oahu. You do need advanced reservations for this hike, details can be found here.
The hike to the summit of Diamond Head is about two miles out and back. It’s not too hard, but it does require some climbing up and back down stairs and walking through a tunnel. The views at the summit are gorgeous!
My favorite hike of the day was to Likeke Falls! This is a fairly easy, one mile hike through the rainforest to a magnificent waterfall.
The drive from Waikiki to the Likeke Falls trailhead is about 30 minutes.
You can park at the Koolau Golf Club for ten dollars or free along the side of the road before entering the gate to the golf course. If you park along the road, make sure that none of your vehicle is on any part of the roadway!
After hiking, we went back to the hotel and got ready for beach photos. We decided to head to Ka’a’awa Beach Park for family photos. Ka’a’awa Beach offers a stunning backdrop for photo ops. It’s about 25 miles, 42 minutes from Waikiki Beach.
For dinner, we grabbed shrimp & chicken kabobs and summer shrimp rolls with peanut sauce from different street vendors in Waikiki. It was one of my favorite meals of the entire trip!
Day 6: Paradise Cove Luau
Day six happened to be our youngest son’s birthday, so we let him decide how we were going to spend the day. We started with breakfast from McDonald’s and then went to the mall for birthday shopping. After shopping, we went to Hula Grill for lunch. I had the poke bowl and it was great! We also shared a hula pie and it was delicious!
This is a hula pie!
For dinner, we booked a luau with Paradise Cove Luau. There are different package options, you’re greeted with a Mai Tai upon arrival, and it’s set in a gorgeous location that’s great for photos!
We enjoyed the buffet food and the show! The event lasts from 5:00-8:45, the fire show is one of the last performances and was our favorite!
The drive from Waikiki to Paradise Cove is about 30 miles away and takes about 40 minutes to get there.
Day 7: Waikiki Beach, Pali Lookout, Lanai Lookout
Day seven was our most scenic day! We started with a trip to the ABC Stores to grab lunch for the beach. We grabbed hot dogs, sandwiches, and I tried the beef pot stickers and they were yummy! We also grabbed coconut and pineapple drinks from a street vendor next to the Outrigger Beachcomber Hotel and they were a big hit!
After some time on the beach, we decided to venture to the Pali Lookout. It’s about 11 miles from Waikiki and takes about 25 minutes to drive there. You do have to pay $6 for parking.
The views from the lookout are fantastic! If you’re in Oahu, you definitely need to check this place out.
From the Pali Lookout, we drove about 25 minutes to the Lanai Lookout. This place is breathtaking! We parked at the lookout and followed people down to the water. When we returned to the car, we noticed signs that said not to do this. But, there were people out there fishing and we didn’t even pay attention to the signage. So, please be cautious and better than us!
The area is absolutely gorgeous though. It was very unique and nothing like we had seen on the island so far. These are the photos I took basically breaking the rules, eek I feel awful about that part.
After sightseeing, we stopped by Maui Brewing once again for fish tacos and pizzas before calling it a night. We really enjoyed the food here, but the best part was that there was never a wait for a table!
Day 8: Waikiki Beach and Travel Day
Day eight was sadly our last day of vacation. We had a wonderful last day on the island, though. We met up with friends that live in Oahu for lunch at Lulu’s right on the beach. Then we spent some time together at Waikiki Beach before we had to return our rental and head to the airport. It was a great way to end our last day in Hawaii!
We had a 7:00 pm nonstop flight back to Texas. I thought this was a great idea, but none of us got any sleep on the flight. So, we’re still tired and trying to get used to the time change!
Overall, it was such a fantastic trip and we loved our week in Oahu! You know it’s a great vacation when your kids don’t want to leave.
Things to Know
Rent a vehicle on Turo – we booked a jeep and loved it!
Traffic is pretty crazy – plan ahead and give yourself enough time to get to your destination!
Parking is a pain – like for real, a big pain! Pack your patience and be ready to circle parking lots over and over until a spot opens up!
Reservations are needed ahead of time for most things – be sure you have a plan of activities and excursions and book these before your trip!
Time Change – for us it was a 5 hour time change and hard to get used to. It’s been harder since returning home, so be ready for that!
Give yourself some down time, especially if you’re traveling with kids!
Hawaii thrives on tourism, but be a respectful tourist and kind to the locals!
More Oahu Activities
We had a pretty packed eight day itinerary, but there are so many activities to do in Oahu! Below are some things I had on my list that we didn’t get to, partly because Jereme and I had already done some of them, and also because we just ran out of time.
We really enjoyed staying in Waikiki Beach because of the easiness of walking around to get to restaurants and shopping. When we were parked at the hotel, we never needed a car!
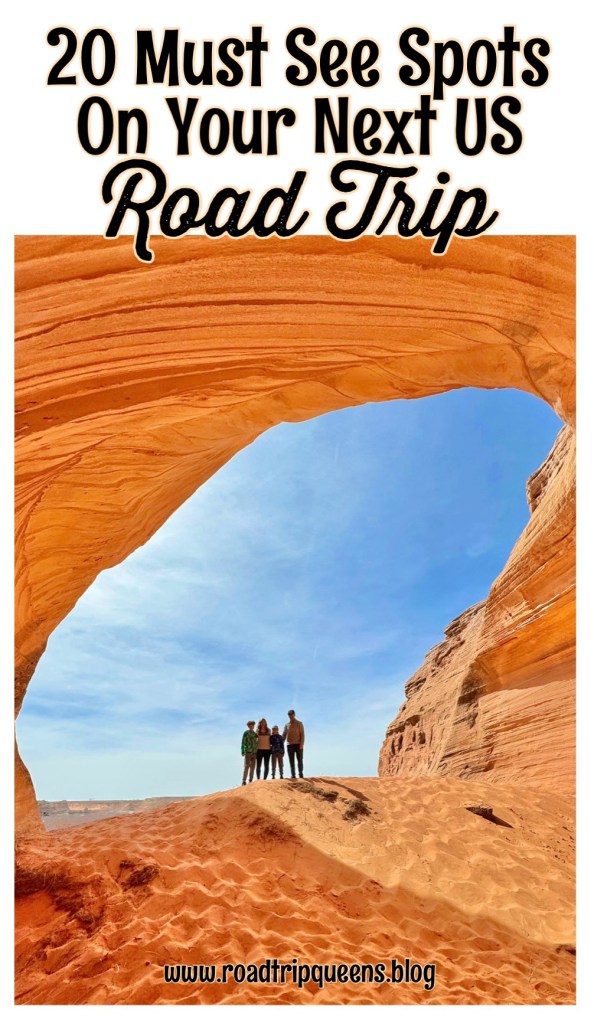
The Unites States has so many amazing destinations and a road trip is the perfect way to see them all! I’ve made a great list of 25 must see spots on your next US road trip that are quick and easy stops to help break up your drive.
Horseshoe Bend
We stopped by Horseshoe Bend in Page, Arizona on our Las Vegas to the Grand Canyon road trip! It was a little out of the way, but totally worth it. The views are incredible and you can spend ten minutes or two hours here! It was especially great for our boys because there were lots of rocks to climb on, which helped them get their wiggles out after being in the car for several hours.
Wilson Arch
If you find yourself near Moab, Utah then you must add Wilson Arch to your list! This amazing arch is not in the nearby National Parks, instead you’ll find this little gem right off of highway 191, south of Moab. This impressive arch spans 91 feet and has a height of 46 feet. It was a fantastic stop for us on our Road Trip to Yellowstone.
Dead Horse Point Overlook
Another amazing stop that doesn’t require a lot of time to explore is Dead Horse Point Overlook near Moab, Utah. This overlook is a very short walk from the parking lot and the views are to die for! I actually enjoyed these views more than those at the Grand Canyon! We visited this amazing site on our Texas to Moab road trip!
Las Vegas Sign
A trip to Las Vegas isn’t complete unless you get your photo under the infamous Welcome to Fabulous Las Vegas sign! This sign marks the start of the Las Vegas Strip and can be found in the median at 5100 Las Vegas Boulevard South. There is parking lot available here and we did have to wait in a short line to get this photo. This was another stop on our road trip adventure to the Grand Canyon!
Big Lake Sand Cave
We actually found this really cool sand cave by accident when we stopped by the Shell gas station in Page, Arizona on our road trip to Kanab, Utah! It is a very short walk from the parking lot next to the gas station to reach the sand cave. This quick stop makes for a really neat photo shoot and a great place to get out and stretch your legs!
Toadstools Hoodoos
The Toadstools are one of my favorite road trip stops to date! This is such a unique place and a short hike full of adventure. This trail is about 45 minutes from Kanab, Utah. This is one of those places that you can spend all day if you have the time! If you’re able to visit, the walk is flat, easy, and about 1.8 miles out and back. I recommend checking this out if you anywhere near Page, Arizona or in Southern Utah!
Perrine Coulee Falls
If you’re ever in Twin Falls, Idaho you must stop by Perrine Coulee Falls. This waterfall runs year round and drops an impressive 200 feet, with summer months having the strongest flow. There are places to park right off the road near the trailhead to the falls. This is the very first waterfall I walked behind and now I have a new waterfall hiking addiction! We stopped here on our road trip to Yellowstone.
Golden Gate Bridge
You can’t make the trip to San Francisco without seeing the Golden Gate Bridge! We found the perfect beach to get great photos of this iconic bridge. Head over to Baker’s Beach for a relaxing break on your road trip adventures. Walk the beach, check out the beach cave, and take in the bay! We made the stop here on our Pacific Coast Highway Road Trip!
Kanab Sand Caves
The Kanab Sand Caves are such a gorgeous stop if you’re road tripping around Southern Utah. We stumbled upon these on our drive to both Bryce Canyon and Zion National Park from Kanab, and we knew we had to stop and check it out. The views are stunning and the caves are so unique. You’ll love this intriguing stop!
Home Alone House
If Home Alone is still your favorite holiday movie, then you should put the Home Alone House on your bucket list! It was always a dream of mine to see it in person, so when I was road tripping to Chicago, I made the half hour drive to 671 Lincoln Ave in Winnetka, IL. And my childhood dream came true!
Field of Dreams Site
My boys are baseball players and love all things baseball. So, on our Midwest road trip, we made the stop at the Field of Dreams movie site! We toured the house, the cornfields, and played baseball on the actual field! This is a fantastic stop for both movie and baseball lovers!
Bear Creek Falls
If you’re in Colorado, I highly recommend driving the Million Dollar highway from Ouray to Silverton. On this drive, be sure to stop to see Bear Creek Waterfall. You can’t see it from the road without stopping at the overlook and checking it out! It is one of the most gorgeous waterfalls I’ve ever seen in person! We stopped by on our Southwest Colorado Road Trip!
Garden of the Gods Park
Another great stop in Colorado is Garden of the Gods Park in Colorado Springs. We’ve visited on more than one road trip because it’s just that great of a stop! If you enjoy nature and rock formations, this is the place for you. If you have kids, they will love this nature’s playground!
Hoover Dam
The Hoover Dam is not my favorite stop on the list, but I am glad to say that I’ve seen it in person. It is a really neat accomplishment and a cool stop. We enjoyed walking across the Hoover Dam Bridge. If you’re road tripping around Nevada, be sure to check this out! We stopped by on our Las Vegas to the Grand Canyon road trip!
Natural Bridges Overlook
One of the most beautiful overlooks I’ve seen in person is the Natural Bridges Overlook along the Samual H. Boardman Corridor in Oregon. You can simply take in the sights from the overlook, or if you’re more adventurous, you can hike out to the natural bridges. We stopped here on our Pacific Coast Highway Road Trip!
St. Joseph Lighthouses
If you’re near Lake Michigan, be sure to check out the St. Joseph lighthouses! Lighthouses always seem to make a stunning backdrop. Stroll along the beach and take in the scenery if you’re near the area. I was lucky enough to visit on a gorgeous fall day as my girlfriends and I road tripped from Chicago to Michigan!
Abe Lincoln’s Homestead
I love all things Abraham Lincoln, so when I heard that we would pass by his homestead on our road trip to Chicago, I knew we had to stop! It was a quick visit, but totally worth it. The only home that Lincoln ever owned is in Springfield, Illinois. You can see the home, take the tour, walk down his old street, or venture down the street to the Presidential Library. Who knew that Springfield was so cool?
Waco Mammoth National Monument
If you’re in Texas and you like fossils and mammoths, then you should give this place a try! We visited for less than an hour on our drive to Waco, TX. We found it very fascinating to learn that so many mammoths once roamed in Texas.
Monument Valley
We stopped by Forest Gump Point in Monument Valley for a quick photo on our Texas to Moab road trip. Monument Valley provides such a beautiful desert landscape, so just driving through is breathtaking. You can drive through, stop for a quick photo, or spend days just in this area alone!
The Hollywood Sign
It’s been years since we’ve visited Los Angeles, but if you’re in the area you have to see the iconic Hollywood Sign! You can get great views of the sign from Mulholland Highway and the Griffith Observatory!
Don’t forget to save this information for your next road trip!
I consider all of these stops quick, because you can spend less than an hour at each one. Of course, you can also spend more time at any given one of them, the choice is yours! We prefer quicker stops to get to our destination sooner, but that’s just our preference.
What amazing stops have you come across on your road trips? Leave a comment so I can add them to my list! Happy travels, my friends!
As someone that’s always looking for the next trail to hike, I cannot believe that I didn’t make the trip to Palo Duro Canyon sooner! I was absolutely blown away that this State Park exists… in Texas! Here are 3 hikes you can’t miss in Palo Duro Canyon State Park.
Photo taken from inside the Big Cave
This post contains affiliate links of products that we use and love! I may earn a small commission, at no charge to you, if you purchase any of the items using the links provided. Thank you!
Park Information
Palo Duro Canyon is located in the Texas Panhandle.
Park Address: 11450 Park Road 5, Canyon, TX 79015.
Daily Fees: $8 per adult, children under 12 are free
Hours: 7 am – 9 pm
Park Map
Things to Know
Palo Duro Canyon is known as the “Grand Canyon of Texas!”
This canyon is the 2nd largest canyon in the US!
Palo Duro Canyon spans 120 miles and is 800 feet deep.
The best time to visit is spring and fall.
Summer visits can be dangerous because of the heat and high temps.
Make sure to bring more water than you think you’ll need during your hikes!
Palo Duro Canyon is a great place for a weekend getaway!
It only takes about 45 minutes to drive the loop through the Park.
You can stay nearby in the town of Canyon, TX.
My best friend and I visited Palo Duro Canyon in mid-February. We were pleasantly surprised with the weather and really enjoyed the hikes we were able to squeeze in during our weekend visit! Keep reading to learn more about the three hikes you can’t miss in Palo Duro Canyon!
Photo taken at the beginning of the Lighthouse Trail hike
The Hikes
The Lighthouse Trail – Distance: 5.9 miles | Time: 2.5 hours | Level: Moderate
This is the Lighthouse!
Our favorite hike was the Lighthouse Trail. This 6 mile hike is fairly easy until you get closer to the “Lighthouse” rock formation. At this point the hike gains slightly in elevation and you have to make a climb to get close to the Lighthouse.
Gorgeous landscape along the Lighthouse Trail
The Lighthouse Trail took us about two and a half hours to complete. I was very impressed with how well the entire trail was marked. And, my friend and I felt very safe the entire time we were hiking!
The stunning desert landscape and dramatic colors make for an excellent hike. These unique colors of Palo Duro Canyon represent different geologic time periods spanning 240 million years!
The Big Cave – Distance: short walk from parking spot | Time: 30 min. | Level: Easy
The Big Cave
Our second hike of the day was more of a short walk. We drove under two miles from the Lighthouse Trail parking lot to reach the Big Cave. You will see a sign for The Big Cave on the side of the road past the Juniper Campground.
I have a new love of exploring caves… especially on my own without a guide or a group! This cave is BIG and was so fun to explore at our own pace. Even better, it’s only a short walk from the parking spots near the trailhead.
I had so much fun exploring this short trail and the cave. If you have children with you, this hike is a must! They’ll love the cave and all the climbing around it!
The Caves Trail – Distance: 0.9 | Time: 30 min | Level: Easy
This is another really cool hike with several caves to explore at your own pace! I wish we would’ve spent more time here, but we were pretty tired after the other two hikes of the day.
The beginning of the Caves Trail
If I had it to do all over again, or if I had my boys with me, I would like to start the day on this trail. There is a small parking lot right at the trailhead, but unlike the hike on the Lighthouse Trail, this one is not very well marked.
I recommend bringing headlamps or a flashlight to go deeper into some of the caves. It was cloudy off and on during our visit and kind of dark at times. You may not need them, but I wished that I would’ve had mine on this hike!
Palo Duro CanyonHighlights
Well marked trails
I had excellent cell service in most areas of the Park
Stunning views and colors
The Park was easy to navigate
No crowds
The trails were scenic and not too hard
Hiking Essentials
These are some of my tried and true hiking essentials that I cannot trek without! I really do consider myself a minimalist when I hike, but I do feel like you need to be prepared for anything when you’re out in the wilderness. Here are the things I never hike without.
Hiking shoes – I’ve been wearing these instead of my tall hiking boots and love the comfort of them!
Hiking backpack – This backpack is the perfect size for me. My husband carries a larger one, but this one is great for a smaller amount of stuff.
Cell phone arm band – I like the ease of this phone case. I can easily grab my phone and put it up throughout the hike as needed.
Camera stand– I love capturing family photos, but I don’t like having to ask other people to take them. This is great for all kinds of traveling, not just hiking!
Headlamps– these are the ones I own and won’t hike these trails again without!
Where to Stay
If you’re planning a trip to Palo Duro Canyon, I recommend lodging in Canyon, TX which is only about 19 miles/33 minutes from the entrance of Palo Duro Canyon State Park. We stayed at the Holiday Inn Express & Suites. The room was clean and cozy and we enjoyed the free breakfast buffet in the morning!
The Hiker’s 365 Adventure!
On a final note, my best friend and I signed up for the Hiker’s 365 Adventure Challenge! We’ve set a goal to hike 365 miles in 365 days. Whether you’re a seasoned hiker or a beginner, this challenge offers the perfect opportunity to connect with nature one mile at a time! We’d love for you to join this community of hikers, too! If you’re interested, register today using my Hiker’s 365 Adventure referral link!